As-Built Survey Process: Timeline & Site Visit Guide
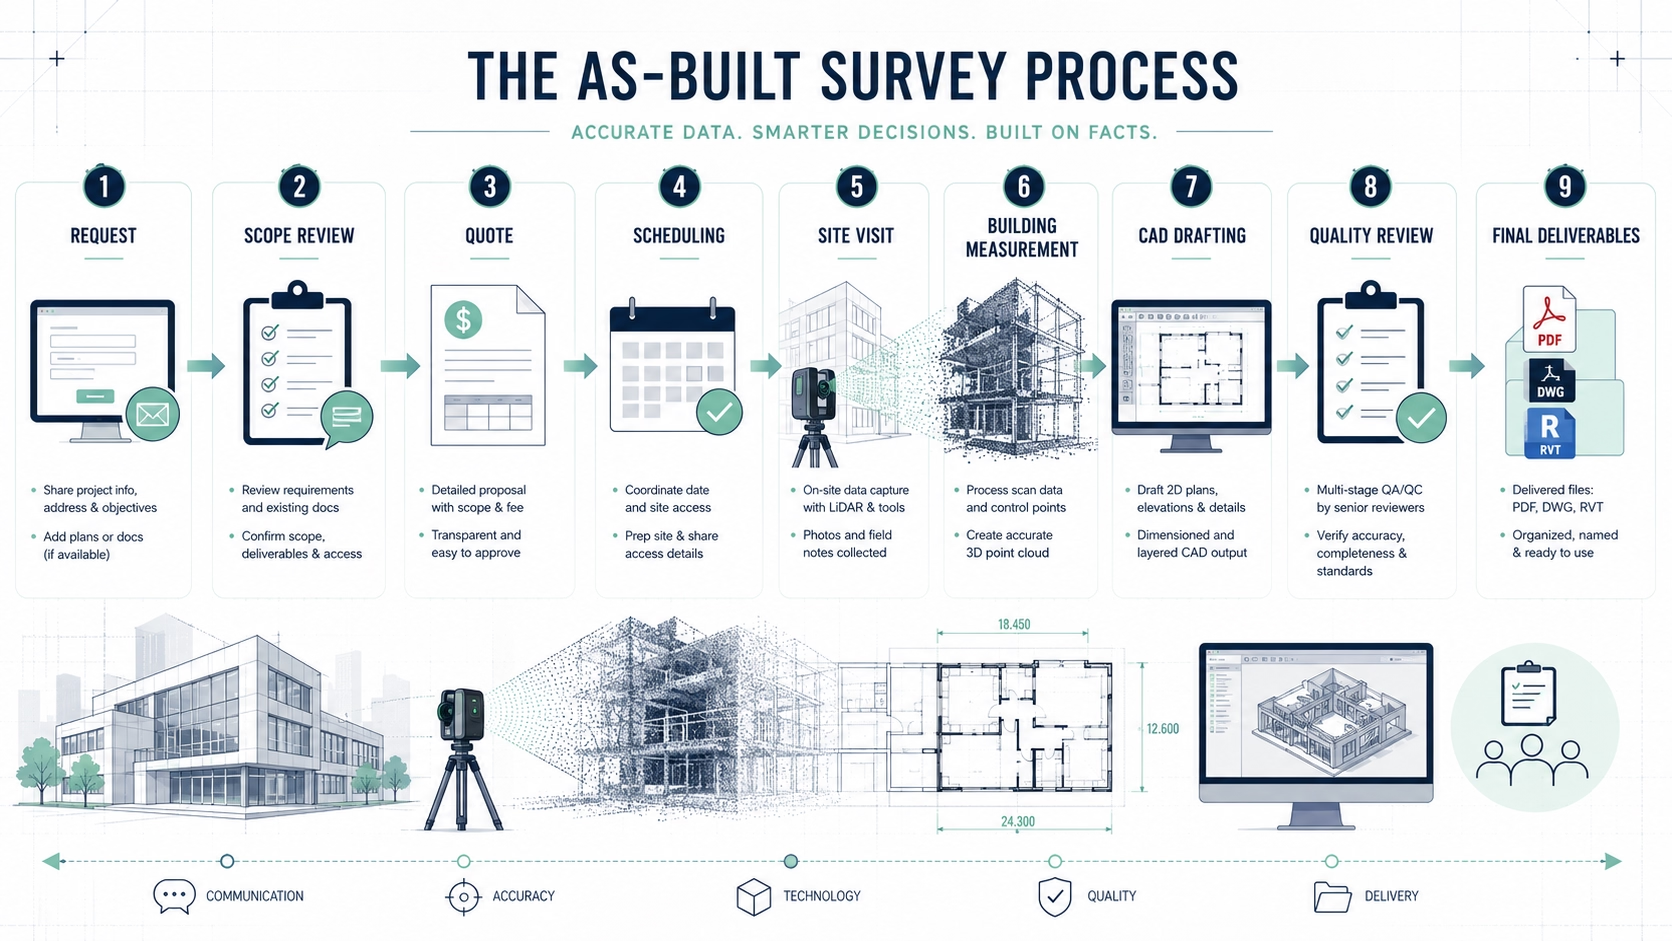
The as-built survey process usually starts with a project request, scope review, quote, site visit, building measurement, drafting or modelling, quality review, and final deliverables. For homeowners, commercial tenants, and property managers,…
Quick Answer
The as-built survey process usually starts with a project request, scope review, quote, site visit, building measurement, drafting or modelling, quality review, and final deliverables. For homeowners, commercial tenants, and property managers, the timeline depends on property size, access, complexity, required drawings, and whether the project needs simple floor plans, CAD drawings, 3D laser scanning, or BIM documentation.
Executive Summary
The as-built survey process helps document a building as it exists today before renovation, design, leasing, contractor pricing, or permit coordination begins. For property managers, commercial tenants, and homeowners in Vancouver, the process usually begins with a request for measurement, followed by scope clarification, scheduling, site access planning, a site visit, measurement or 3D laser scanning, drafting, quality control, and final delivery. A small residential or office space may require a shorter site visit and simpler floor plan turnaround, while larger commercial, industrial, multi-level, or occupied properties may need more coordination and longer drafting or modelling time. The most important timeline factors are building size, number of rooms, number of floors, site access, required deliverables, point cloud processing, CAD drafting, Revit modelling, and revision scope. The practical takeaway is simple: prepare the building, confirm deliverables early, and schedule your measurement before design or contractor pricing starts.
The As-Built Survey Process: Timeline, Site Visit, and What to Expect
What the As-Built Survey Process Means
The as-built survey process is the step-by-step workflow used to measure and document the existing condition of a building. It may include manual measurement, 3D laser scanning, field notes, photography, point cloud registration, CAD drafting, BIM modelling, and final drawing delivery depending on project scope. The goal is to create accurate floor plans, as-built drawings, CAD files, or BIM documentation that reflect the building as it stands today. The practical rule is that an as-built survey records existing conditions before new decisions are made.
An as-built survey is often used before renovation planning, tenant improvements, permit coordination, contractor estimates, interior design, space planning, or property documentation. A homeowner may need measured floor plans before speaking with a designer. A commercial tenant may need current drawings before planning improvements. A property manager may need building records for leasing or future maintenance. The same process can support different use cases depending on deliverables.
The as-built survey process is not only the site visit. The site visit captures the building, but the final value comes from turning measurements into usable documentation. That may include PDF floor plans, DWG files, elevations, sections, reflected ceiling plans, Revit models, point cloud files, or area plans. Before booking the survey, clients should confirm what final files they need.
Step 1: Request and Scope Review
The process usually starts when the client requests a quote or contacts a building measuring services provider. At this stage, the provider needs to understand the property type, project goal, approximate size, location, number of levels, required deliverables, access conditions, and timeline. This step matters because measuring a condo for renovation planning is different from scanning a commercial facility for CAD or BIM documentation. The practical takeaway is to give enough information for an accurate scope.
A good scope review asks what the drawings will be used for. If the purpose is early design, basic floor plans may be enough. If the purpose is contractor pricing, the drawings may need more dimensions and CAD files. If the purpose is permit coordination, the design team may need more structured existing-condition documentation. If the purpose is facility management, a broader digital record may be useful. The deliverable should match the decision the client needs to make.
The scope review should also identify exclusions. Hidden conditions, concealed structure, locked rooms, inaccessible ceiling spaces, and areas outside the measurement scope should be clarified before the site visit. Laser scanning and manual measuring document visible or accessible conditions; they do not automatically verify everything behind walls or ceilings. A clear scope prevents misunderstandings later.
Step 2: Quote and Scheduling
After the scope review, the provider can prepare a quote. The quote should state the included areas, deliverables, file formats, timeline, measurement method, assumptions, and exclusions. A vague quote that only says “as-built survey” or “floor plans” may not be specific enough. Clients should ask whether the package includes PDF plans, DWG files, elevations, sections, Revit models, point cloud files, or only basic drawings.
Scheduling depends on site access and urgency. A vacant residential property may be easy to schedule, while an occupied office, retail unit, warehouse, or multi-tenant building may require coordination with staff, tenants, security, building managers, or operations. If the site requires off-hours access, escorts, safety orientation, or special permissions, scheduling may take longer. The practical recommendation is to coordinate access before confirming the appointment.
Clients should schedule the as-built survey before detailed design or contractor pricing begins. If measurement happens too late, designers or contractors may already be working from assumptions. Early measurement helps reduce rework and gives the project team a clearer existing-condition base. Schedule your measurement as soon as the project scope is serious enough to require accurate drawings.
Step 3: Preparing Your Building for Measurement
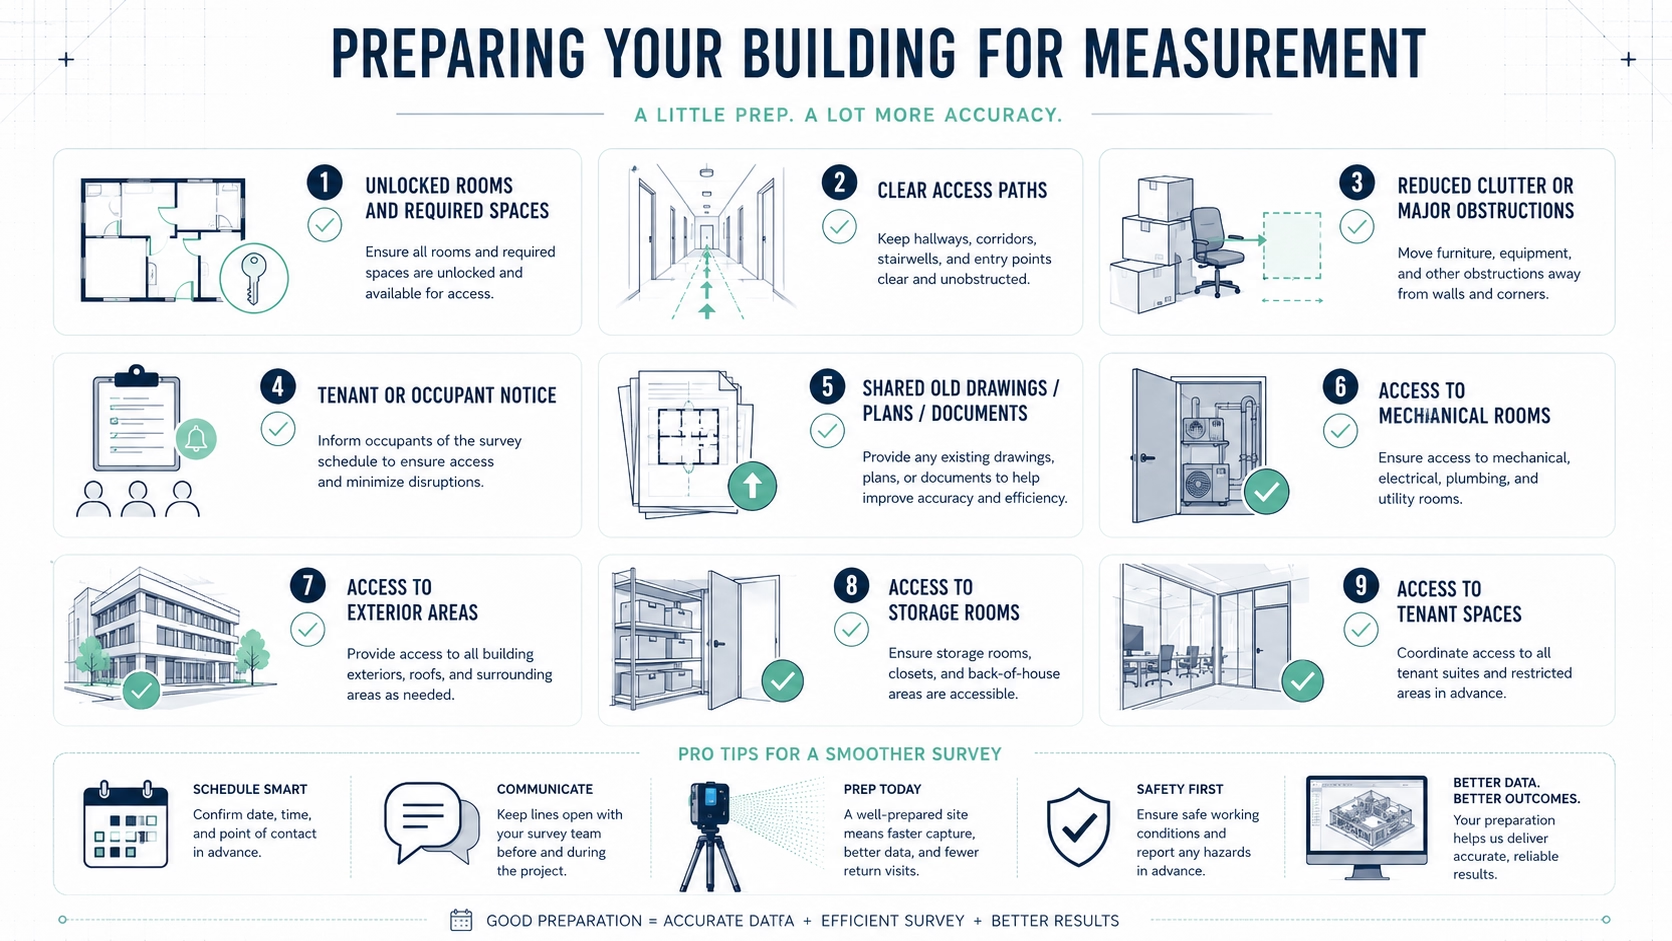
Preparing your building for measurement helps the site visit run faster and improves documentation quality. The measurement team needs access to the areas included in scope. This may include rooms, corridors, garages, basements, mechanical rooms, stairwells, balconies, exterior walls, tenant spaces, service areas, roof access, or storage areas. Locked doors and blocked areas can create missing information.
Clients should clear major obstructions where possible. The building does not need to be empty, but walls, doors, windows, stairs, fixed elements, and key measurement areas should be visible. Large furniture, stored boxes, vehicles, construction materials, or active work zones can slow the process or block important geometry. If 3D laser scanning is used, clear line of sight is especially important.
Commercial tenants and property managers should notify occupants before the appointment. Staff, tenants, security, cleaners, contractors, and building operators may need to know when the measurement team will arrive and which areas they need to access. For busy commercial spaces, low-traffic hours may be better. The practical takeaway is that good preparation reduces delays and helps avoid return visits.
Step 4: Site Visit and Measurement
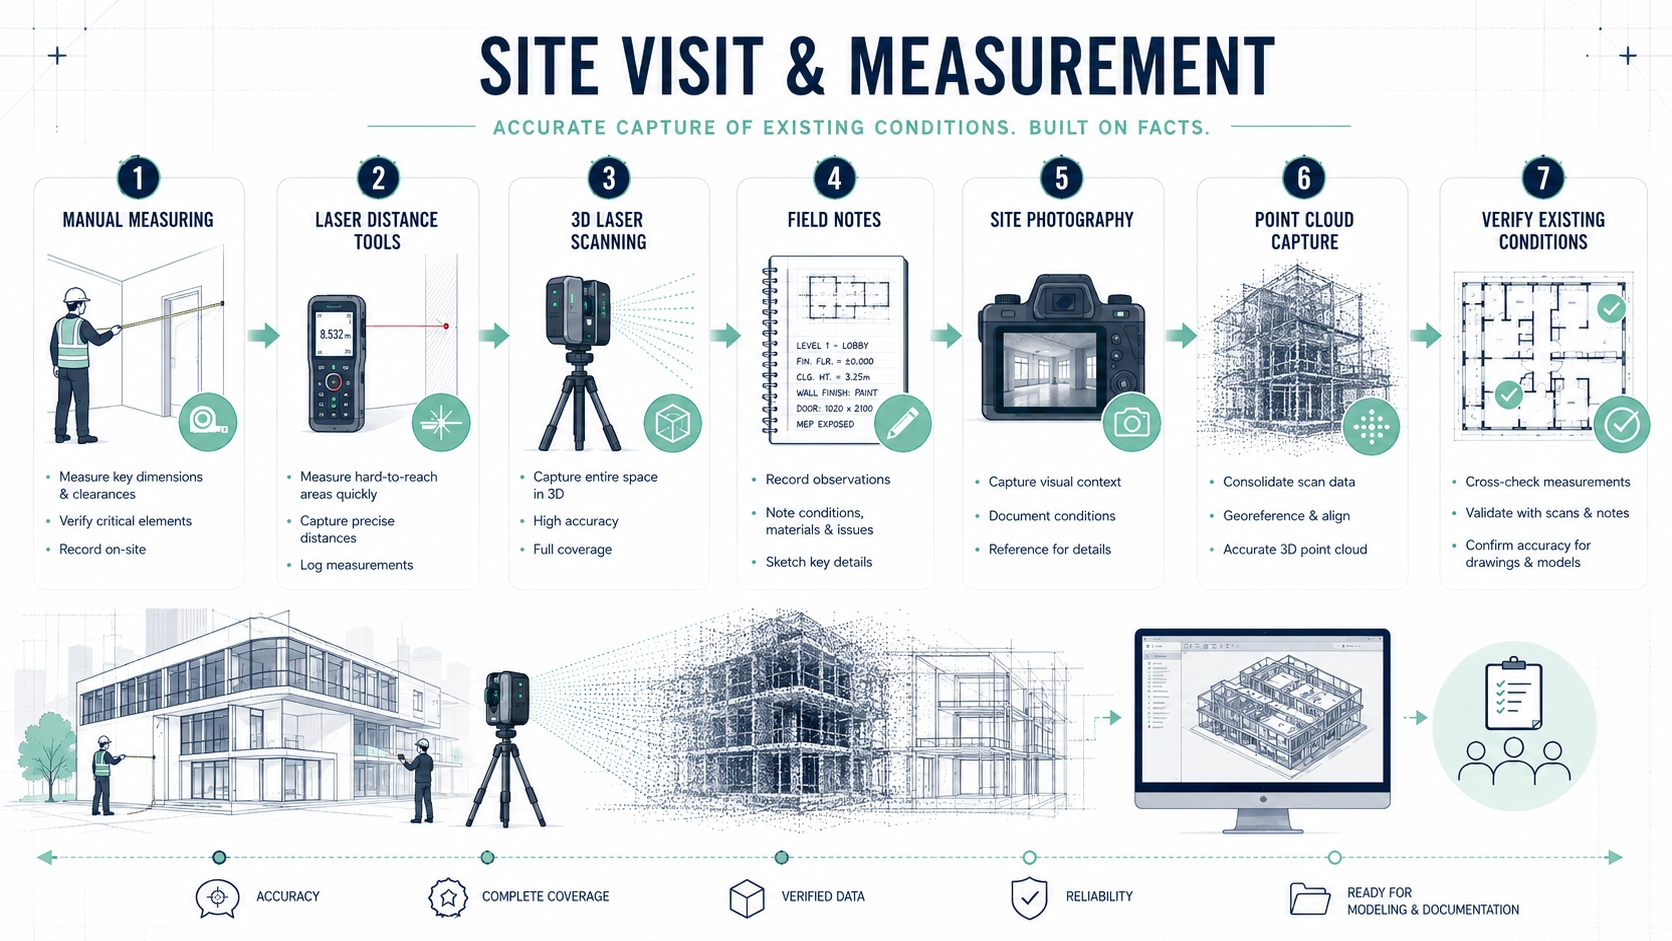
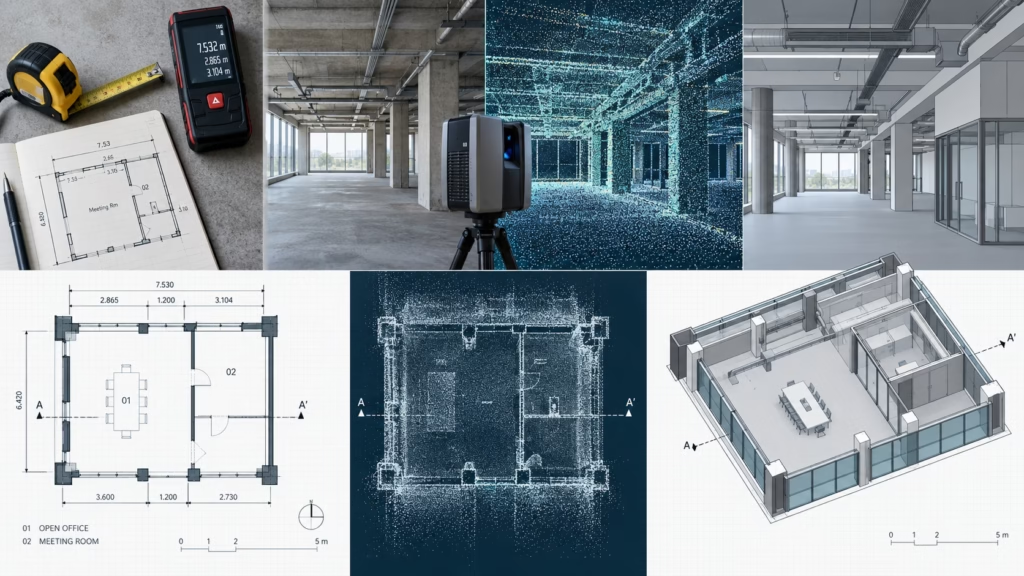
The site visit is the fieldwork phase of the as-built survey process. A technician or measurement team visits the property, measures the required areas, captures notes, photographs, scan data, or field sketches, and verifies key existing conditions. Depending on scope, the team may use manual measurement tools, laser distance meters, 3D laser scanners, or a combination of methods. The practical goal is to capture enough information to create the agreed deliverables.
A simple residential or small office site visit may be relatively short. A multi-level home, commercial tenant space, warehouse, facility, or occupied building may take longer because there are more rooms, access points, details, or safety constraints. A scan-based survey may capture a large amount of data efficiently, but it still requires enough scan positions to cover the required areas. The site visit duration depends on the building, not only the square footage.
During the site visit, the client or site contact should be available for access questions. The team may need doors opened, alarms disabled, tenant areas accessed, exterior gates unlocked, or mechanical rooms made available. If questions come up, quick decisions help avoid missing information. The practical recommendation is to have one responsible site contact available during the appointment.
Typical Site Visit Duration by Property Type
Site visit duration varies by property type, access, complexity, and deliverables. The following table is a practical planning guide, not a fixed promise. The actual appointment may be shorter or longer depending on site conditions and scope.
| Property type | Typical site visit expectation | What affects duration |
|---|---|---|
| Condo or small apartment | Often a short appointment | Unit size, furniture, access, balcony or storage areas |
| Small office or retail unit | Often short to half-day | Tenant access, rooms, ceiling conditions, service areas |
| Single-family home | Often several hours | Number of levels, basement, exterior, stairs, additions |
| Townhouse or duplex | Often several hours | Shared walls, strata access, exterior areas, multiple levels |
| Commercial tenant space | Half-day or more depending on size | Occupancy, demising walls, ceiling areas, service rooms |
| Warehouse | Can range from short to full-day | Area, racking, docks, mezzanines, equipment, height |
| Facility or industrial building | Often requires planned access windows | Safety rules, operations, mechanical rooms, equipment zones |
| Heritage or irregular building | Often longer than a standard building | Complex geometry, façade details, stairs, non-standard conditions |
| Multi-level commercial building | May require phased site visits | Floors, tenants, security, elevators, operational access |
The most common reason a site visit takes longer is not measurement itself, but access. If rooms are locked, tenants are unavailable, exterior areas are blocked, or equipment is in the way, the team may need additional time. Preparing the building is the easiest way to keep the appointment efficient.
Step 5: Processing Field Data
After the site visit, the field data must be processed. If manual measurement was used, the team organizes field notes, sketches, photos, and measurements before drafting. If 3D laser scanning was used, scan positions may need to be registered into a coordinated point cloud. This processing step is important because it turns raw capture data into a reliable drafting or modelling reference.
Point cloud processing may include registration, cleaning, alignment checks, export preparation, and review. The point cloud can then be used to create CAD drawings, Revit models, elevations, sections, or other deliverables. A point cloud alone may be useful for technical teams, but most clients need processed drawings or models. The practical takeaway is that the site visit is only one part of the timeline.
Processing time depends on data volume and deliverable complexity. A basic measured floor plan may move quickly into drafting. A large scan-to-CAD or scan-to-BIM project may require more time for registration, quality review, and modelling. Clients should ask whether turnaround time includes only fieldwork or the full delivery package.
Step 6: Drafting, CAD, or BIM Modelling
Drafting converts the measured information into usable drawings. For many projects, this means creating floor plans, dimensions, room labels, wall outlines, doors, windows, stairs, and fixed elements. For more technical projects, drafting may include elevations, sections, reflected ceiling plans, exterior drawings, area plans, or other views. The practical value is that raw measurement becomes readable documentation.
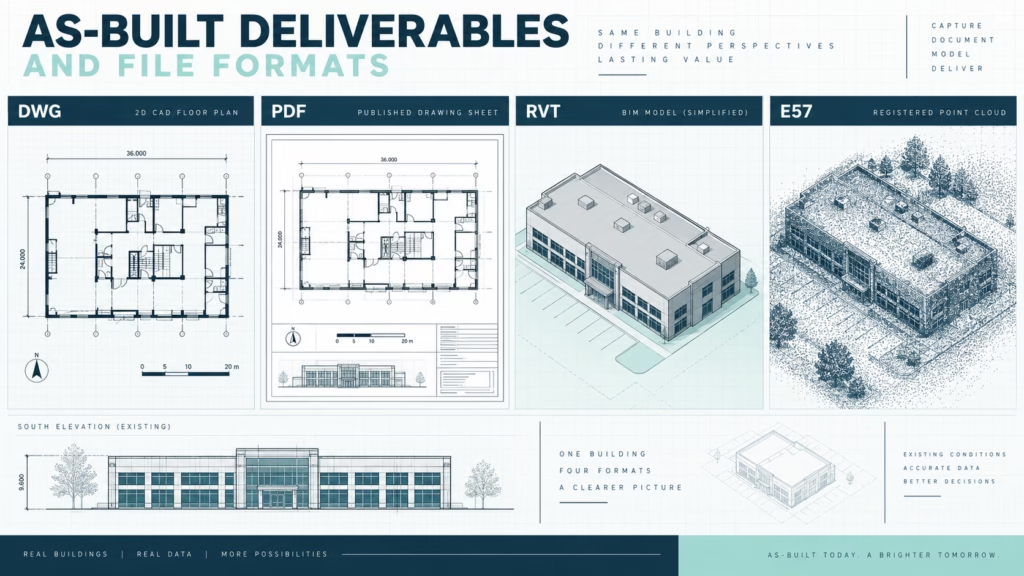
CAD deliverables may include DWG files and PDF sheets. Architects, designers, and contractors often use DWG files as a base for proposed layouts, permit drawings, or contractor pricing. If CAD files are needed, they should be included in the scope from the beginning. A PDF-only package may not be enough for a professional design workflow.
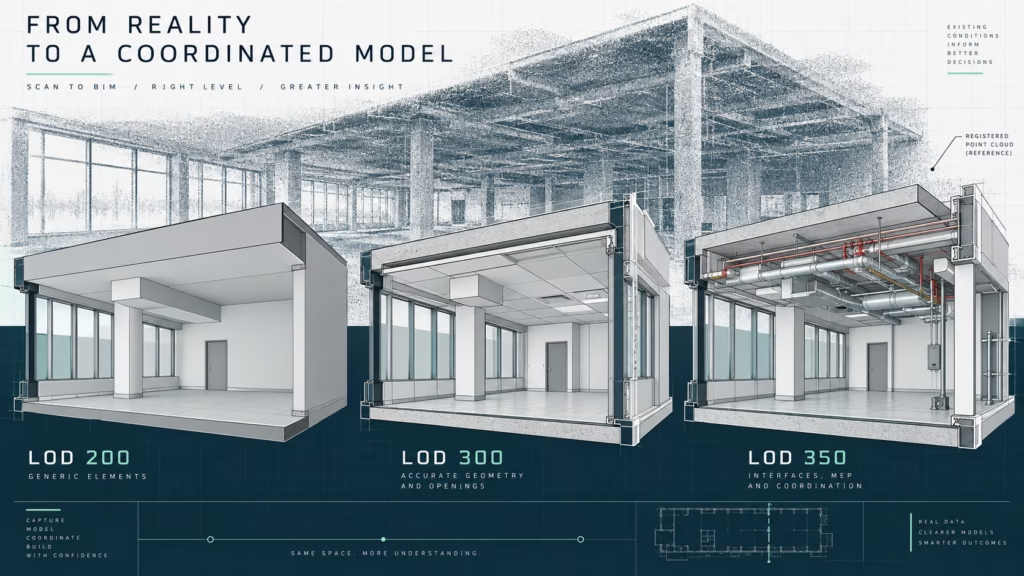
BIM modelling converts measured data or point cloud information into a model, often in Revit. This takes more time than basic floor plan drafting because elements must be modelled, organized, and reviewed. Scan-to-BIM is useful when the project requires model-based design, consultant coordination, facility records, or complex existing-condition documentation. Clients should only order BIM when the model will actually be used.
Step 7: Quality Review
Quality review is the step where the provider checks the drawings or model against the measurement data and project scope. This may include reviewing dimensions, checking scan alignment, confirming drawing completeness, checking layers or file organization, and verifying that required areas were included. Quality review is especially important when drawings support design, contractor pricing, or permit coordination.
A good quality review also identifies limitations. If some areas were inaccessible, if hidden conditions were not verified, or if certain elements were outside scope, the final package should say so. This protects the client and the project team from treating the drawings as more complete than they are. The practical rule is to deliver not only drawings, but also clarity about what the drawings represent.
Clients should ask whether the provider includes revisions or comments. Some projects may require minor adjustments after review by an architect, designer, owner, or property manager. Revision terms should be clear before work begins. A clear review process prevents delays near the end of the project.
Step 8: Final Deliverables
The final deliverables depend on the agreed scope. A simple package may include PDF floor plans. A design-ready package may include DWG files. A more detailed package may include elevations, sections, reflected ceiling plans, point clouds, or Revit models. A property manager may need area plans or building record files. The practical recommendation is to confirm deliverables before the site visit.
| Deliverable | What it provides | Who usually uses it |
|---|---|---|
| PDF floor plans | Readable plans for review and communication | Owners, tenants, contractors, managers |
| DWG CAD files | Editable drawings for design workflows | Architects, designers, contractors |
| Elevations | Vertical building or interior documentation | Architects, designers, permit teams |
| Sections | Vertical relationships, stairs, levels, ceiling heights | Architects, engineers, contractors |
| Reflected ceiling plans | Ceiling layout and visible ceiling features | Designers, contractors, consultants |
| Point cloud files | Measured scan data | BIM teams, architects, survey teams |
| Revit model | BIM representation of existing conditions | Architects, engineers, BIM teams |
| Area plans | Space and area documentation | Property managers, landlords, tenants |
Final delivery should include the correct file format. If the architect needs DWG, a PDF may not be enough. If the BIM team needs Revit or point cloud files, that should be included from the start. If the owner only needs a readable floor plan, a technical model may be unnecessary. The deliverable should match the user.
As-Built Drawing Turnaround Time
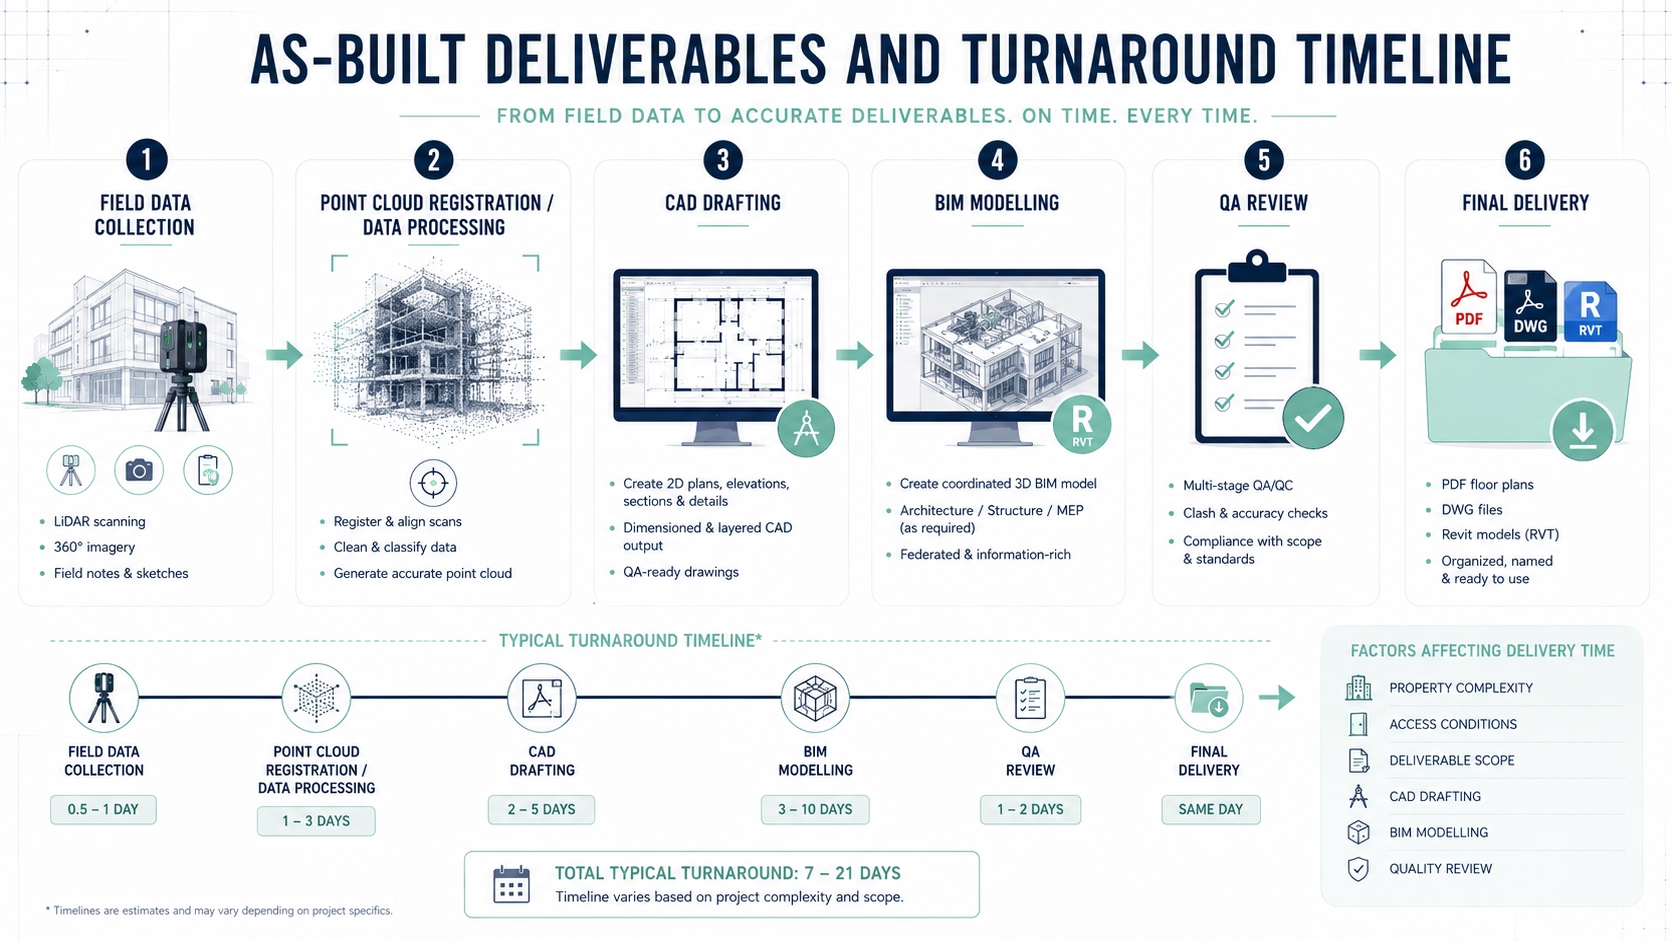
As-built drawing turnaround time depends on property size, complexity, deliverables, and review needs. A simple floor plan package may be delivered faster than a full CAD or BIM package. A complex commercial property with elevations, sections, point cloud processing, and Revit modelling will require more time. The practical rule is that turnaround time follows deliverable complexity.
A typical timeline may include one appointment window for measurement, then several business days for basic drafting, and longer for detailed CAD, scan-to-CAD, or scan-to-BIM work. However, the timeline should always be confirmed by scope. A provider should not promise the same turnaround for a small apartment and a multi-level facility. Clients should ask for a delivery date based on the actual deliverables.
Rush delivery may be possible, but it can affect cost or available review time. If the project has a design meeting, lease deadline, contractor bid date, or permit schedule, tell the measurement provider early. The practical takeaway is to schedule the survey before the documentation becomes urgent.
What Affects the As-Built Measurement Timeline?
The as-built measurement timeline is affected by both fieldwork and office production. Fieldwork depends on property size, access, occupancy, and complexity. Office production depends on drafting scope, point cloud processing, CAD standards, BIM modelling, quality review, and revisions. A project can have a short site visit but still require a longer drafting timeline if deliverables are complex.
Access has a major impact on timeline. If the team cannot enter a required room, exterior area, roof, basement, tenant space, or mechanical room, the project may need a return visit or an exclusion note. Return visits can add time and cost. Preparing access is one of the best ways to keep the timeline predictable.
Deliverable changes also affect timeline. If the original scope was floor plans only and the client later requests elevations, sections, or a Revit model, the delivery date may change. The scanning or measuring team may also need additional site information. The practical recommendation is to define deliverables before the site visit whenever possible.
How Long Does an As-Built Survey Take?
How long does an as-built survey take? The honest answer is that it depends on the property and deliverables. A small, simple property may be measured quickly, while a large or complex building may need more time on site and more time in production. Site visit time and final drawing turnaround are different parts of the same process.
For homeowners, the site visit may often be completed in a single appointment if access is prepared. For commercial tenants, timing depends on operating hours, tenant access, and ceiling or service areas. For property managers, larger buildings may require phased access or coordination across several spaces. The practical takeaway is to ask for both the site visit estimate and the delivery estimate.
A good provider should explain what can affect the timeline before the appointment. Locked rooms, unclear scope, added deliverables, clutter, safety restrictions, tenant coordination, and complex geometry can all change the schedule. Clients can help by preparing the building and confirming the final use of the drawings early.
Site Measurement Process by Client Type
Different clients experience the site measurement process differently. A homeowner may focus on access, renovation goals, and design-ready floor plans. A commercial tenant may focus on business disruption and tenant improvement planning. A property manager may focus on tenant coordination, keys, safety, and long-term records. The process should be adjusted to the client’s situation.
| Client type | What they usually need | Main preparation task |
|---|---|---|
| Homeowner | Floor plans, renovation base, possible elevations | Clear access, share renovation goals, gather old plans |
| Commercial tenant | Current space layout, CAD base, tenant improvement support | Coordinate business hours and access |
| Property manager | Building records, tenant areas, access planning | Arrange keys, tenant notice, security, escorts |
| Contractor | Existing-condition drawings for pricing | Define scope and areas affecting the estimate |
| Architect or designer | CAD/Revit base for design | Confirm file formats and level of detail |
| Developer | Due diligence, planning, building documentation | Define deliverables and timeline early |
The site measurement process works best when the client explains the project goal. A measurement team captures different information for a retail tenant improvement than for a home renovation or facility record. Clear project context helps the team capture what matters.
Preparing Your Building for Measurement
Preparing your building for measurement begins with access. Unlock doors, provide keys or entry codes, arrange parking if needed, and make sure the site contact knows which areas are included. If the project includes exterior measurement, ensure gates, yards, alleys, or loading areas are accessible. If the project includes mechanical or service spaces, arrange access in advance.
Preparing the building also means reducing obstacles. Move major clutter away from walls, clear stair paths, make windows and doors visible where possible, and avoid scheduling active construction work during measurement. The building does not need to be perfectly empty, but the measurement team needs visibility and safe movement. This is especially important for 3D laser scanning.
Preparing occupants is just as important. Notify residents, tenants, staff, cleaners, or contractors that measurement will take place. Ask them to avoid blocking rooms or moving through active scanning zones if scanning is being used. If pets are present, secure them safely. The practical takeaway is that preparation reduces friction and improves documentation quality.
What Can Delay an As-Built Survey?
An as-built survey can be delayed by incomplete access, unclear scope, active construction, occupied areas, safety restrictions, or changing deliverables. Locked rooms are one of the simplest but most common causes of missing data. If the team cannot access a required space, the drawings may be incomplete or a second visit may be needed.
Clutter and movement can also delay the process. Heavy storage can block walls and openings. Active work crews can make scanning difficult. Moving people and equipment can create extra cleanup work in point cloud data. For commercial or industrial sites, operations may need to be coordinated around the survey.
Late changes to deliverables can also delay final delivery. If the client asks for BIM modelling, sections, elevations, or additional areas after the site visit, the timeline may need to be revised. The practical recommendation is to define scope early and prepare the site before the scheduled measurement.
How to Avoid Return Visits
The best way to avoid return visits is to provide complete access during the first appointment. Check keys, codes, tenant access, exterior gates, mechanical rooms, storage rooms, basements, garages, and roof access if they are in scope. If a required area is inaccessible, tell the measurement provider before the appointment so the scope can be adjusted.
Another way to avoid return visits is to confirm deliverables before fieldwork. If elevations, sections, ceiling plans, or Revit modelling are needed, the measurement team may need to capture additional information. If they only discover this after the site visit, they may need to come back. The practical takeaway is to decide what files are needed before measurement starts.
Sharing old drawings can also help. Existing plans, strata drawings, lease plans, renovation sketches, or previous permit drawings can help the team understand the property and identify areas to verify. These documents should not replace measurement, but they can reduce ambiguity. Clients should send them before the site visit if available.
Practical Timeline Matrix
A practical timeline matrix helps clients understand what to expect. The following ranges are planning categories, not guaranteed delivery promises. Exact timing should always be confirmed after scope review.
| Project type | Site visit expectation | Drawing/model turnaround expectation |
|---|---|---|
| Basic residential floor plan | Short to several hours | Often several business days |
| Condo or apartment renovation base | Short to several hours | Often several business days |
| Single-family home as-built package | Several hours or more | Usually longer if elevations or sections are included |
| Commercial tenant improvement base | Half-day or more depending on size/access | Depends on CAD scope and review needs |
| Warehouse or facility survey | May require planned access window | Depends on size, point cloud processing, and deliverables |
| Scan-to-CAD package | Site scan plus processing | Longer than basic floor plans |
| Scan-to-BIM / Revit model | Site scan plus modelling scope | Longer than CAD because modelling and QA are required |
| Multi-tenant or occupied property | May require phased visits | Depends on tenant access and areas captured |
The timeline matrix is best used for planning conversations. If the project has a permit deadline, lease deadline, contractor bid date, or design meeting, the provider should know before scheduling. Timeline planning is part of the survey process, not an afterthought.
Common Mistakes Before an As-Built Survey
A common mistake is booking measurement before deciding what deliverables are needed. If the project later needs elevations, sections, CAD files, or BIM, the original site capture may not be enough. This can lead to extra work or another site visit. Clients should ask the designer, architect, contractor, or property manager what files are needed before the survey.
Another mistake is failing to coordinate access. A site contact may assume all rooms are open, but tenants, locks, alarms, storage, or security rules can prevent access. This creates gaps in the drawings. Property managers should prepare keys, notices, escorts, and permissions before the measurement day.
A third mistake is using real estate floor plans as if they are as-built drawings. Real estate plans may help with layout understanding, but they are usually not detailed enough for renovation, permit coordination, or contractor pricing. If the project depends on accurate existing conditions, a proper as-built survey is safer.
A fourth mistake is waiting until the project is urgent. Measurement and drafting take time. If the survey is ordered right before a design deadline or contractor bid date, the project may be pressured. The practical recommendation is to schedule your measurement early.
Questions to Ask Before Booking
Before booking, ask what the as-built survey includes. Confirm whether the package includes site measurement, 3D laser scanning, point cloud processing, floor plans, DWG files, elevations, sections, Revit models, PDF drawings, or area plans. A clear deliverable list helps prevent surprises.
Ask how long the site visit is expected to take and how long final delivery will take. These are separate timeline questions. A site visit may be short, but drafting or modelling can still take time. Ask whether turnaround depends on the number of drawings, file formats, or review rounds.
Ask how to prepare the building. The provider should explain access, keys, clutter, tenant notice, safety, exterior areas, and occupant movement. Preparation instructions should be practical and specific. If the provider does not discuss access, missing information may become a problem later.
Ask what happens if an area is inaccessible. Will it be excluded? Will a return visit be required? Will the drawings include a limitation note? Knowing this before the appointment helps the client manage expectations.
How the As-Built Survey Leads to Building Measuring Services Deliverables
The as-built survey process naturally leads into building measuring services deliverables. The site visit captures existing conditions, and the office phase converts them into drawings, files, or models. These deliverables can then support renovation planning, design work, contractor pricing, lease planning, permit coordination, or facility records. The practical sequence is request, measure, draft, review, deliver.
Building measuring services should be scoped around the client’s next decision. A homeowner may need renovation-ready floor plans. A commercial tenant may need a tenant improvement CAD base. A property manager may need an area plan or updated building record. An architect may need DWG or Revit files. The deliverables should match the user.
The CTA should come naturally at this stage. If the client understands the process and is ready to proceed, the next step is to book a site visit or schedule your measurement. A prepared client will get a smoother appointment, better documentation, and a more predictable turnaround.
Key Takeaways
The as-built survey process includes scope review, quote, scheduling, site preparation, measurement or scanning, data processing, drafting or modelling, quality review, and final deliverables. The site visit is only one part of the process; office production and QA are also part of the timeline.
How long an as-built survey takes depends on property type, size, access, number of floors, complexity, deliverables, and whether the project requires CAD or BIM. A simple floor plan package is faster than a detailed scan-to-CAD or scan-to-BIM package. Clients should ask for both site visit duration and final turnaround time.
Preparing your building for measurement can reduce delays. Clear access, unlock rooms, notify occupants, reduce clutter, share old drawings, and confirm deliverables before the appointment. The best next step is to book a site visit or schedule your measurement before design, contractor pricing, or permit coordination begins.
FAQ
What is the as-built survey process?
The as-built survey process is the workflow used to measure and document a building as it exists today. It usually includes scope review, quote, scheduling, site visit, measurement or 3D scanning, drafting or modelling, quality review, and final delivery. The final files may include floor plans, CAD drawings, elevations, sections, point clouds, or Revit models depending on scope.
How long does an as-built survey take?
How long an as-built survey takes depends on property size, complexity, access, and deliverables. A small property may require a shorter site visit and simpler drafting, while a large commercial, industrial, or multi-level building may require more time. Ask separately about site visit duration and as-built drawing turnaround time because fieldwork and final delivery are different stages.
What affects the as-built measurement timeline?
The as-built measurement timeline is affected by building size, number of levels, site access, occupancy, clutter, complexity, measurement method, required deliverables, CAD drafting, point cloud processing, BIM modelling, and quality review. Late deliverable changes or inaccessible rooms can also extend the timeline. Clear scope and prepared access help keep the schedule predictable.
What happens during the site measurement process?
During the site measurement process, the technician visits the property, accesses the required areas, measures or scans existing conditions, takes notes, and captures the information needed for the agreed deliverables. Depending on scope, this may include manual measurement, 3D laser scanning, photographs, field sketches, or point cloud capture. The data is then processed into drawings or models.
How should I prepare my building for measurement?
Prepare your building for measurement by unlocking all required spaces, clearing major obstructions, notifying residents or tenants, providing keys or access codes, securing pets, and sharing old drawings if available. If exterior areas, mechanical rooms, roofs, basements, garages, or tenant spaces are included, make sure they are accessible during the appointment.
Do occupants need to leave during an as-built survey?
Occupants do not always need to leave during an as-built survey, but access and movement should be coordinated. For manual measurement, the team may work around occupants if rooms are accessible. For 3D laser scanning, it is better to reduce movement through active scan areas because moving people or objects can affect scan quality. The provider can advise based on scope.
What is as-built drawing turnaround time?
As-built drawing turnaround time is the time between the site visit and final delivery of drawings or models. It depends on deliverables, building complexity, file formats, and quality review. Basic floor plans may be faster than detailed CAD packages, elevations, sections, point clouds, or Revit models. Ask for a project-specific delivery estimate when booking.
Can I use old floor plans instead of an as-built survey?
Old floor plans can be useful references, but they should not automatically replace an as-built survey. Buildings may have changed through renovations, tenant improvements, additions, or field modifications. If accurate existing conditions matter for design, contractor pricing, permit coordination, or leasing, a current as-built survey is safer.
What deliverables do I receive after an as-built survey?
Deliverables may include PDF floor plans, DWG CAD files, elevations, sections, reflected ceiling plans, point cloud files, Revit models, area plans, or other documentation depending on the scope. Before booking, confirm which file formats are included and who will use them. The deliverables should match the project’s next step.
How do I book an as-built site visit?
To book an as-built site visit, provide the property type, location, approximate size, number of floors, project goal, required deliverables, access conditions, and timeline. Share old drawings if available and explain whether the survey is for renovation, tenant improvements, permit coordination, contractor pricing, or property records. Book a site visit or schedule your measurement once the scope is clear.
Conclusion
The as-built survey process is designed to turn existing building conditions into usable documentation for renovation, design, leasing, contractor pricing, permit coordination, and property records. For homeowners, commercial tenants, and property managers, the process is straightforward when the scope is clear: request a quote, confirm deliverables, prepare access, complete the site visit, allow time for drafting or modelling, review the final package, and use the drawings for the next project step. The timeline depends on size, complexity, access, number of floors, file formats, and whether the project needs CAD or BIM. To keep the process smooth, prepare the building before the appointment and confirm what files your team needs. Book a site visit or schedule your measurement when you are ready to move from planning to accurate existing-condition documentation.

Analyse this page with AI
Want a summary, fact-check, or an RFP template built around these measurement standards? Send this page directly to your favourite AI model.
Content and prompt will be copied to clipboard for some models.