Revit LOD for as-built models usually starts at LOD 300 for most renovation and existing-conditions workflows because major model elements are represented with sufficiently defined geometry for design and coordination. LOD 200 works when approximate geometry is enough, while LOD 350 becomes useful where interfaces, connections and coordination between systems must be modelled. The correct scope can also mix LOD levels instead of applying one level to the entire building.
Choosing Revit LOD for as-built models is not simply a question of requesting more detail. LOD 200, LOD 300 and LOD 350 represent different levels of model development, and each supports different project decisions. The right choice depends on how architects, engineers, contractors or owners intend to use the scan-based model after the existing conditions survey.
How Revit LOD for as-built models applies to Scan-to-BIM
Level of Development describes how reliably a model element has been developed for a defined use. In practical Scan-to-BIM work, the LOD requirement tells the modeller how far building elements must be developed beyond basic point-cloud tracing. LOD 200 is schematic or approximate, LOD 300 represents more precisely defined elements, and LOD 350 adds interfaces and connections needed for deeper construction coordination.
This distinction matters because an as-built Revit model can serve very different purposes. One project may need a lightweight architectural reference for preliminary design, while another may require coordinated mechanical, electrical and plumbing geometry around congested ceiling spaces. Both projects start from existing conditions, but they should not automatically receive the same modelling scope.
The key LOD decision
Choose the lowest LOD that reliably supports the decisions your team must make. LOD 200 is suitable for approximate spatial understanding, LOD 300 supports detailed design and coordination, and LOD 350 is justified when interfaces between elements affect constructability.
Requesting higher LOD everywhere can increase modelling effort without improving the parts of the project that actually matter. Revit LOD for as-built models should therefore follow the intended use of the model rather than maximum detail.
LOD is not the same as simply adding more geometry
LOD progression should reflect the intended reliability and use of modelled elements, not a visual preference for a more complicated model. A model can contain many visible objects and still be poorly scoped for coordination. Conversely, a carefully defined LOD 300 model can be more useful than a heavily modelled file if the latter includes information that the design team does not need.
Revit LOD for as-built models: LOD 200 vs LOD 300 vs LOD 350
The practical difference between LOD 200, 300 and 350 is the degree to which model geometry can support downstream decisions. LOD 200 communicates approximate building elements. LOD 300 develops elements with more defined geometry. LOD 350 goes further by representing how elements interface with other systems or components.
LOD
Typical model character
Best suited to
Key limitation
LOD 200
Approximate or generic geometry representing major elements
Early planning, broad spatial studies, preliminary existing-condition reference
Not intended for detailed interface or construction coordination
LOD 300
More precisely defined element geometry suitable for measured documentation
Renovation design, architectural coordination, documentation and many Scan-to-BIM workflows
Connections and interfaces between systems may remain outside the scope
LOD 350
LOD 300 geometry plus relevant interfaces, connections and coordination conditions
MEP coordination, congested technical areas and construction-focused coordination
Additional modelling effort may provide little value outside coordination-critical zones
In short: Revit LOD for as-built models is often best balanced at LOD 300 for an existing-condition Revit model. Move to LOD 350 when the project depends on understanding how systems connect, intersect or interface with surrounding construction.
When LOD 200 is the right choice
LOD 200 works when the project needs an organized BIM representation of existing conditions without detailed development of every component. Elements can be represented schematically or with generic geometry, making this level appropriate where spatial relationships matter more than construction-level interfaces.
Typical LOD 200 use cases
Early renovation feasibility studies where teams need overall rooms, walls, floors and major building volumes.
Concept design workflows where existing-condition geometry provides context but detailed coordination has not started.
Large facilities where only selected architectural or technical zones require deeper modelling.
Projects using the Revit model mainly as a visual and spatial reference rather than a construction coordination model.
LOD 200 can also be useful as one layer within a mixed-scope model. For example, architecture that is not being modified may remain at LOD 200 while mechanical rooms or renovation zones are developed further. This approach keeps modelling effort aligned with project risk rather than treating every object equally.
LOD 200 becomes less suitable when designers need dependable element geometry for detailed renovation decisions or when contractors must coordinate interfaces between trades. In those cases, the model usually needs to progress to LOD 300 or selectively to LOD 350.
Why LOD 300 is often the practical default for Revit LOD for as-built models
LOD 300 is commonly suited to renovation and existing-condition documentation because model elements are developed beyond schematic representation into more clearly defined geometry. For architects and designers, this creates a stronger base for producing plans, elevations, sections and coordinated design views without automatically modelling every connection.
A Scan-to-BIM LOD 300 model can support teams that need usable Revit geometry derived from measured building conditions. Architectural elements such as walls, floors, openings, ceilings and other scoped components can be developed as defined model objects rather than approximate masses or generic placeholders. This is why Revit LOD for as-built models frequently centres on LOD 300 for architectural renovation workflows.
Where LOD 300 provides the most value
Architectural renovation and retrofit design based on existing conditions.
Interior design workflows that need coordinated floor plans, elevations, sections or reflected ceiling information.
Existing-building BIM documentation where editable Revit geometry is more useful than a point cloud alone.
Projects where architectural coordination is important but detailed system connections are not yet required.
Intended use: Confirm that the model will support design, documentation or coordination rather than fabrication-level decisions.
Elements included: Define which architectural, structural and MEP elements must be modelled instead of assuming the same treatment for every object.
Deliverables: Specify whether the project requires RVT, DWG, PDF, point cloud data or a combination.
Views required: Identify whether floor plans, elevations, sections or reflected ceiling plans must be generated from the model.
Critical areas: Flag technical rooms, ceiling spaces and renovation zones that may need development beyond LOD 300.
When LOD 350 requirements become necessary
LOD 350 becomes relevant when coordination depends on interfaces between building elements. The step from LOD 300 to LOD 350 is not simply a visual upgrade. The model begins to represent relationships such as connections, supports or other interface conditions that affect how adjacent systems can be coordinated.
MEP coordination and congested technical spaces
Mechanical, electrical and plumbing coordination is one of the clearest reasons to specify LOD 350. In dense plant rooms, service corridors, raised-floor zones or ceiling spaces, the project team may need more than the centreline or approximate envelope of a service. Supports, penetrations, connections and interfaces can determine whether proposed work can physically coexist with existing systems.
Construction-focused coordination
LOD 350 is also useful when contractors and consultants must understand how modelled elements relate at construction interfaces. The additional development can make coordination more actionable because conflicts are evaluated against the components and relationships that matter to installation, not only against simplified geometry.
Complex MEP retrofit zones where existing services constrain new routing.
Industrial renovations with dense technical systems and limited available space.
Areas where supports, penetrations or system connections influence constructability.
Project zones requiring detailed multidisciplinary coordination before construction documentation is finalized.
In short: LOD 350 should be tied to coordination risk. If interfaces between elements do not affect a project decision, modelling those interfaces everywhere may add effort without improving the deliverable. Revit LOD for as-built models can therefore use LOD 350 selectively rather than across the entire building.
Why a mixed LOD strategy can be more efficient
A single LOD does not have to apply uniformly to an entire existing building. A mixed LOD strategy can assign different development requirements to architecture, structure, MEP systems and individual zones according to their project importance. This is especially useful for renovations where only a portion of the building is being altered.
For example, an architectural shell may be adequate at LOD 300 while a congested mechanical room is developed to LOD 350. Secondary spaces outside the renovation area may require only LOD 200. The result is a model specification based on intended use instead of a blanket requirement for maximum development.
Project area
Possible LOD approach
Reason
Unmodified background areas
LOD 200
Provides spatial context without unnecessary modelling depth
Primary architectural renovation zone
LOD 300
Supports defined geometry for design and documentation
Congested MEP or technical room
LOD 350
Adds interfaces and connections needed for coordination
Selected critical interfaces
LOD 350
Focuses modelling effort where constructability depends on element relationships
This approach also helps prevent a common scope problem: using the phrase “LOD 350 model” without defining which disciplines, elements or areas actually require LOD 350. A clearer scope identifies the relevant model elements and ties their development level to a specific design, documentation or coordination purpose.
How point clouds and deliverables affect Revit LOD for as-built models
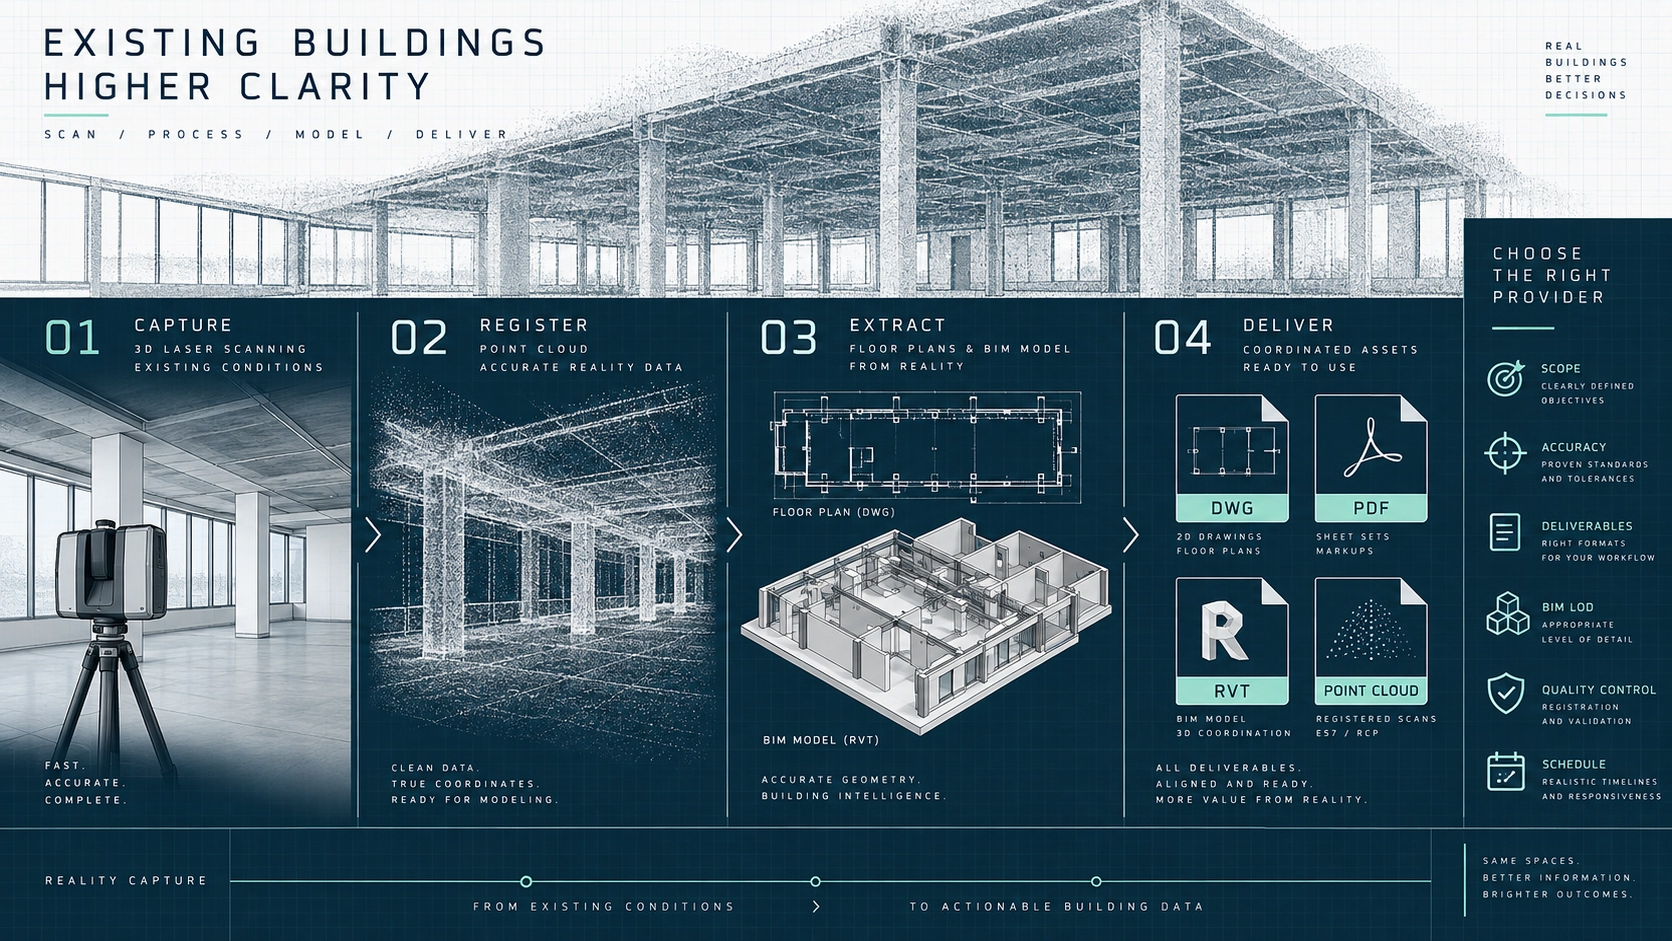
The requested LOD should be coordinated with the underlying reality-capture workflow and the final deliverables. In Scan-to-BIM projects, 3D laser scanning creates point cloud data representing existing building conditions. The point cloud then acts as the measured reference from which selected building elements are developed in Revit.
Define what must become a Revit element
Not every visible condition in a point cloud needs to become a separate BIM object. The project scope should state which walls, floors, ceilings, structural elements, openings, equipment or MEP components must be represented. This prevents modelling effort from being spent on objects that will never influence the design or construction workflow.
Define the deliverables separately from LOD
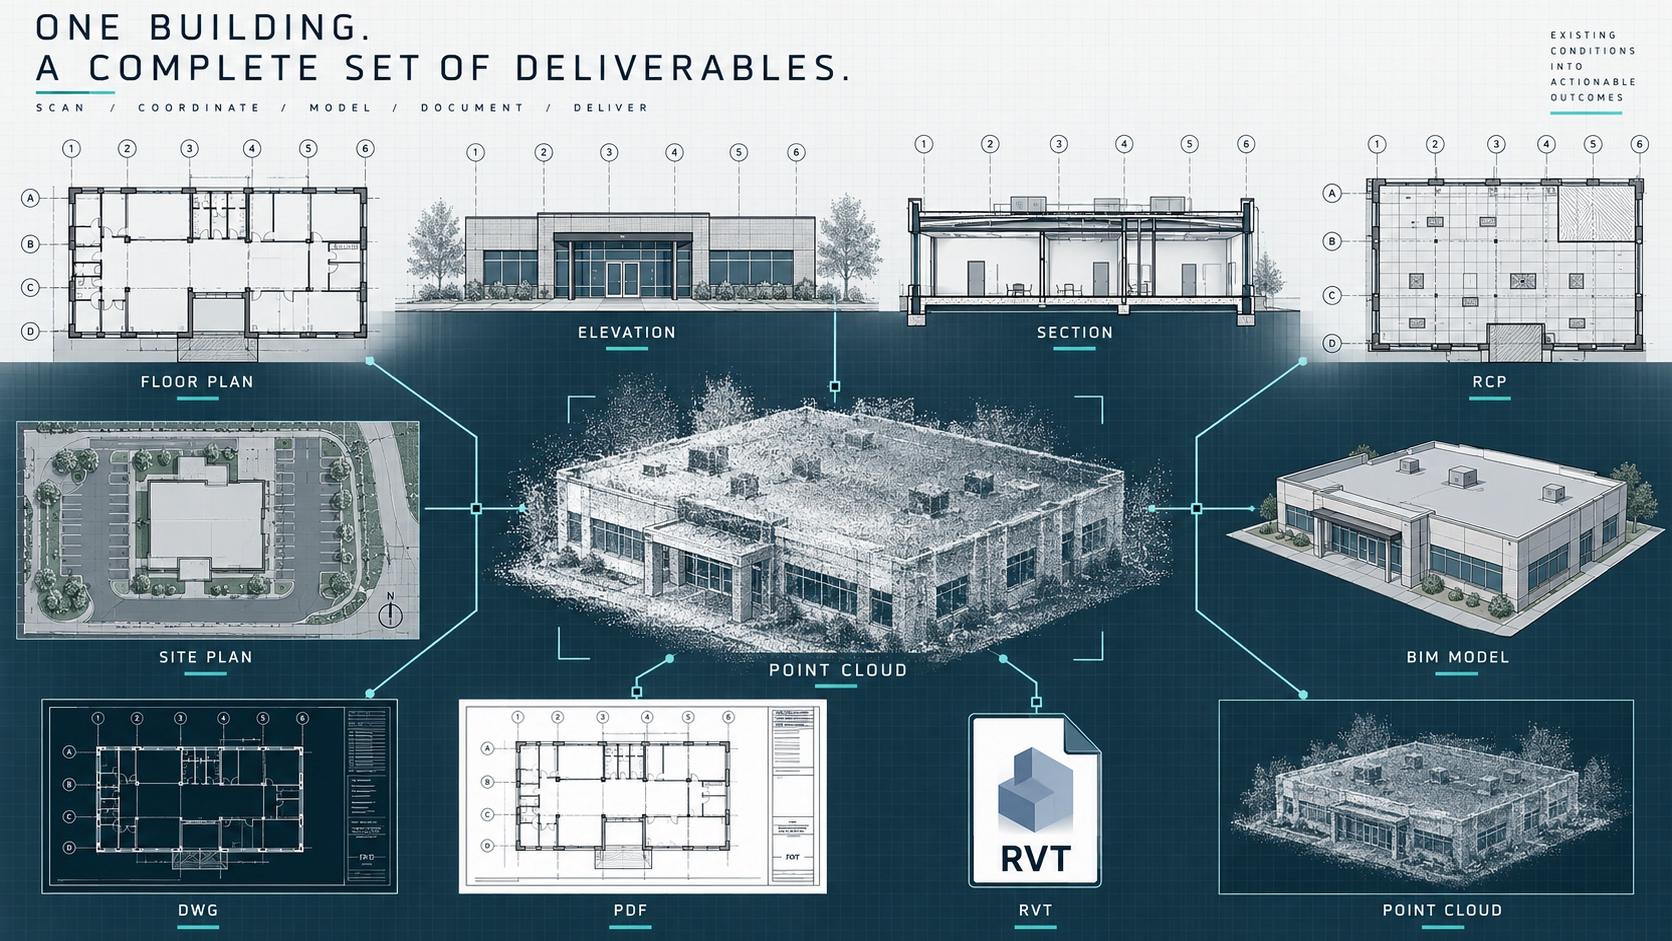
LOD and file format solve different problems. A client may need an RVT model for design, DWG drawings for CAD workflows, PDF drawings for accessible review and a registered point cloud as the underlying measured reference. The required package can also include floor plans, elevations, sections, reflected ceiling plans or other defined existing-condition views.
RVT for editable Revit/BIM workflows.
DWG for CAD-based design and coordination.
PDF for review, field reference and distribution.
Point cloud data for direct access to captured existing-condition geometry.
Floor plans, elevations, sections and reflected ceiling plans when those views are part of the project scope.
Revit LOD for as-built models and the final file package should therefore be specified separately so that model development and deliverable format each match the downstream workflow.
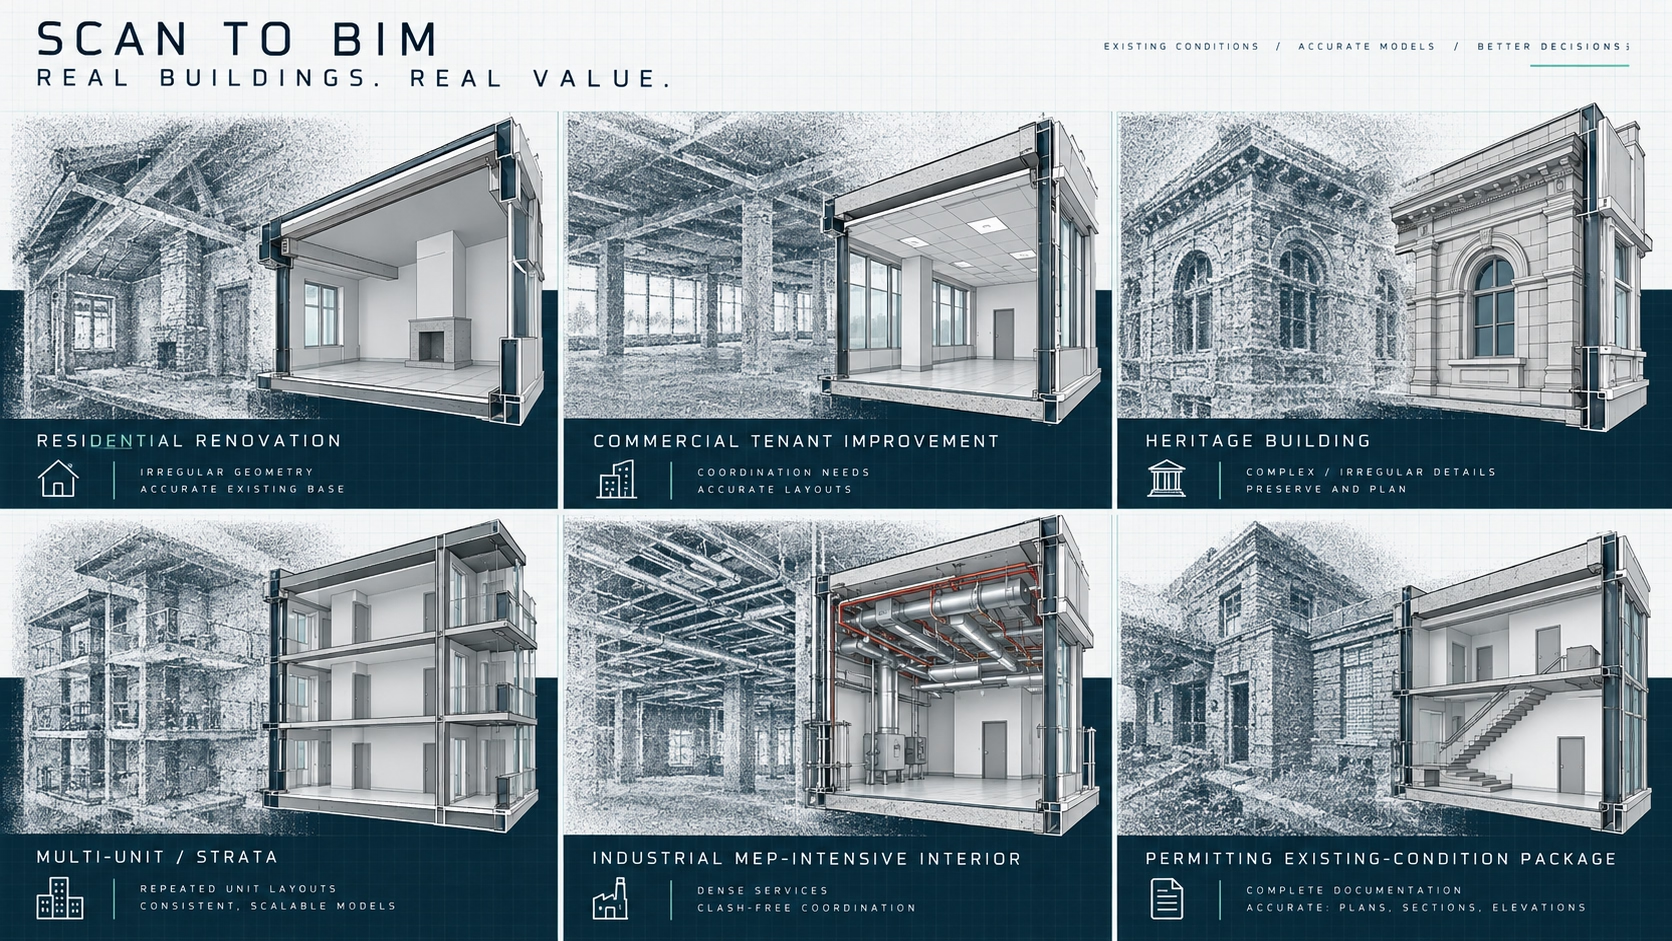
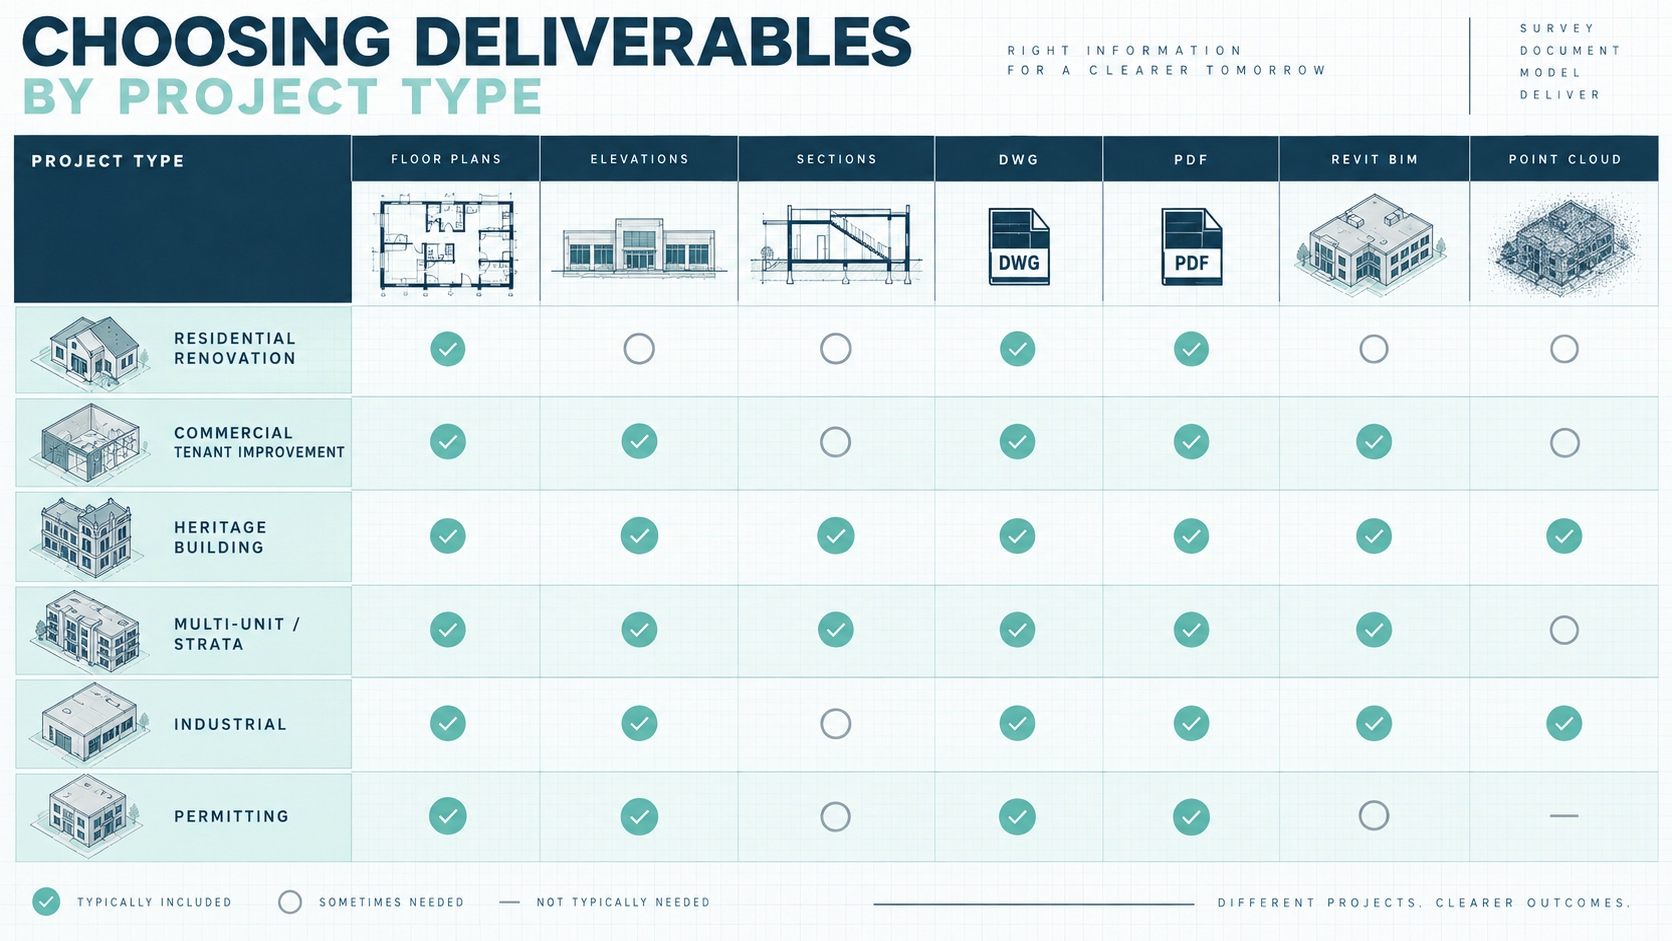
Choosing Revit LOD for as-built models by project type
Residential renovations
Residential renovations often benefit from LOD 300 when architects or interior designers need reliable existing-condition geometry for layout changes, additions or detailed design. LOD 200 may be sufficient for preliminary planning, while LOD 350 is more appropriate only where complex building-service or construction interfaces must be coordinated.
Commercial tenant improvements
Commercial tenant improvements frequently need LOD 300 architecture because walls, openings, ceilings and existing spatial conditions form the base for design. Where new HVAC, electrical, plumbing or ceiling systems must fit around existing services, selected areas can be raised to LOD 350.
Heritage buildings
Heritage documentation should be scoped according to the elements that matter to renovation or conservation decisions. A project may require defined LOD 300 architectural geometry for the overall building while selected complex interfaces receive additional development. LOD should not be used as a substitute for explicitly listing the elements that need to be documented.
Multi-unit and strata properties
Multi-unit properties can use different LOD requirements across suites, common areas and service zones. Repetitive spaces may not require the same modelling depth as plant rooms, risers or renovation areas. A zone-based scope helps keep the BIM deliverable aligned with the actual project.
Industrial facilities
Industrial renovation and retrofit projects are stronger candidates for LOD 300 to LOD 350 because equipment, building services and interfaces can dominate coordination. LOD 350 is particularly relevant in areas where existing systems, supports or connections influence the placement of proposed work.
Permitting workflows
Existing-condition BIM can support the design information used to prepare permit documentation, but the required LOD depends on the design team’s needs rather than the word “permit” alone. LOD 300 may provide a suitable base for many renovation workflows, while more detailed coordination can be limited to project-critical zones.
Across these project types, Revit LOD for as-built models should be matched to the areas and disciplines that actually influence design or construction decisions.
What to specify for Revit LOD for as-built models
A useful Scan-to-BIM brief should define the intended use before specifying a LOD number. The modeller needs to understand which project decisions the Revit model must support, which disciplines are included and what outputs the downstream team expects to receive.
Project purpose: State whether the model supports feasibility, design, renovation, coordination, construction planning or long-term documentation.
LOD by discipline: Define whether architecture, structure and MEP require the same or different development levels.
LOD by zone: Identify renovation areas, plant rooms, ceiling spaces and other locations requiring additional coordination detail.
Model elements: List the building components that must be represented in Revit.
Interfaces: State whether supports, penetrations, connections or adjacent-system relationships are required.
Deliverables: Confirm RVT, DWG, PDF, point cloud and required drawing views.
Existing data: Provide available drawings or BIM files and identify whether they are reference information or expected to be verified against site conditions.
Downstream users: Confirm whether architects, engineers, contractors, owners or facility teams will use the final files.
The MeasureBuilt approach
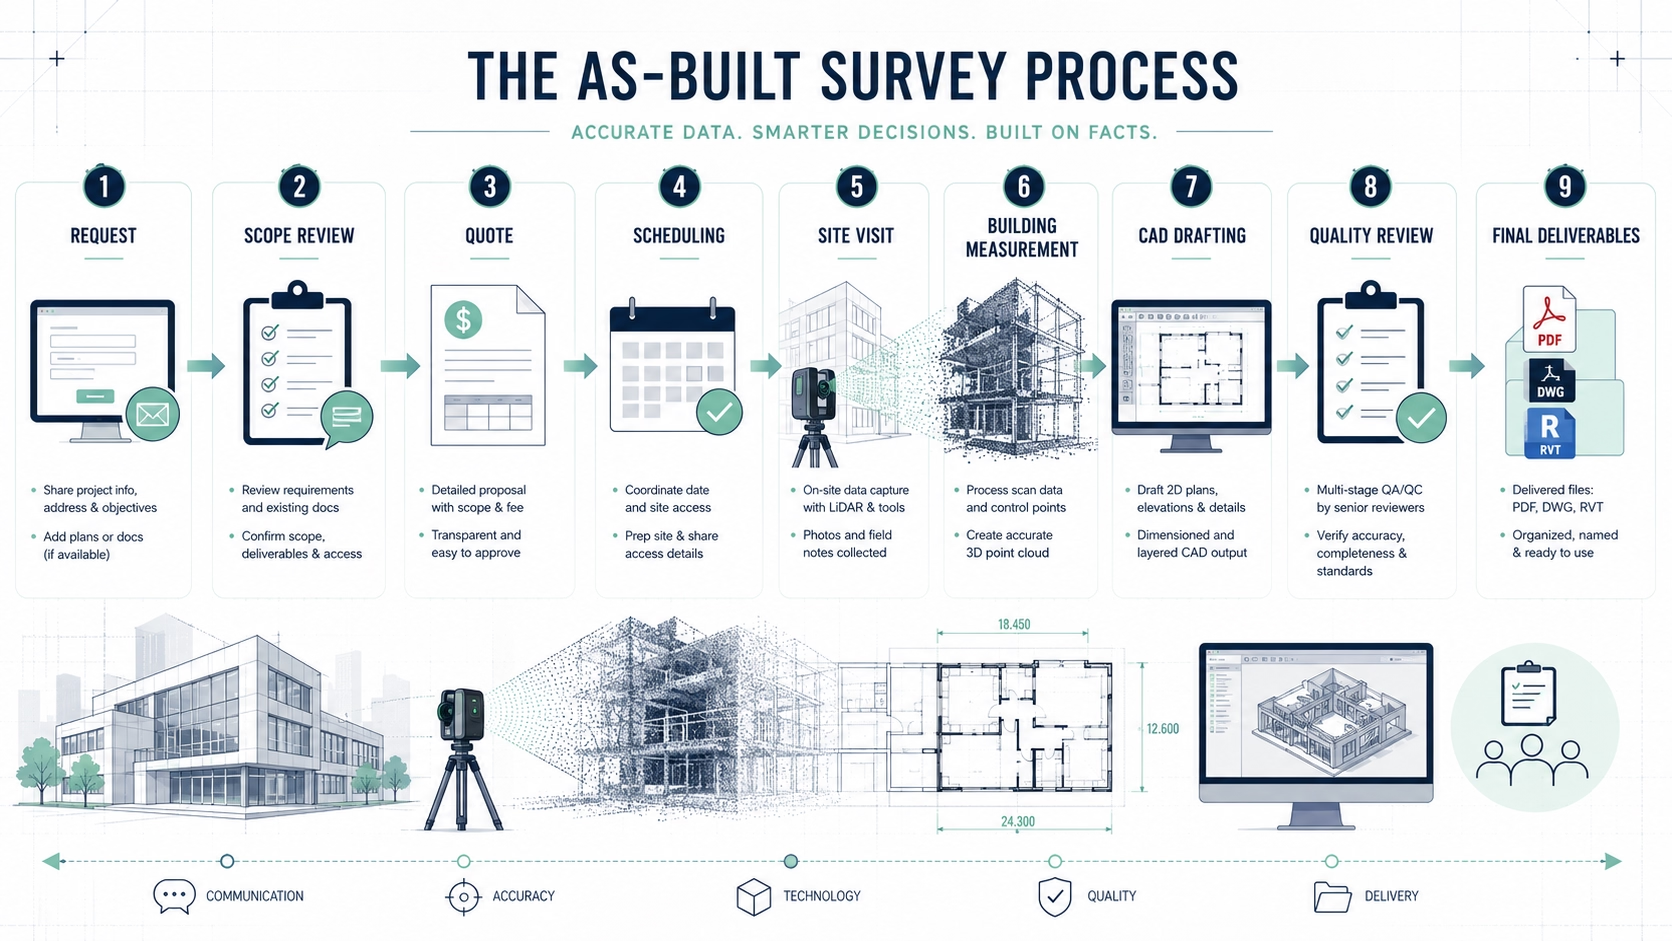
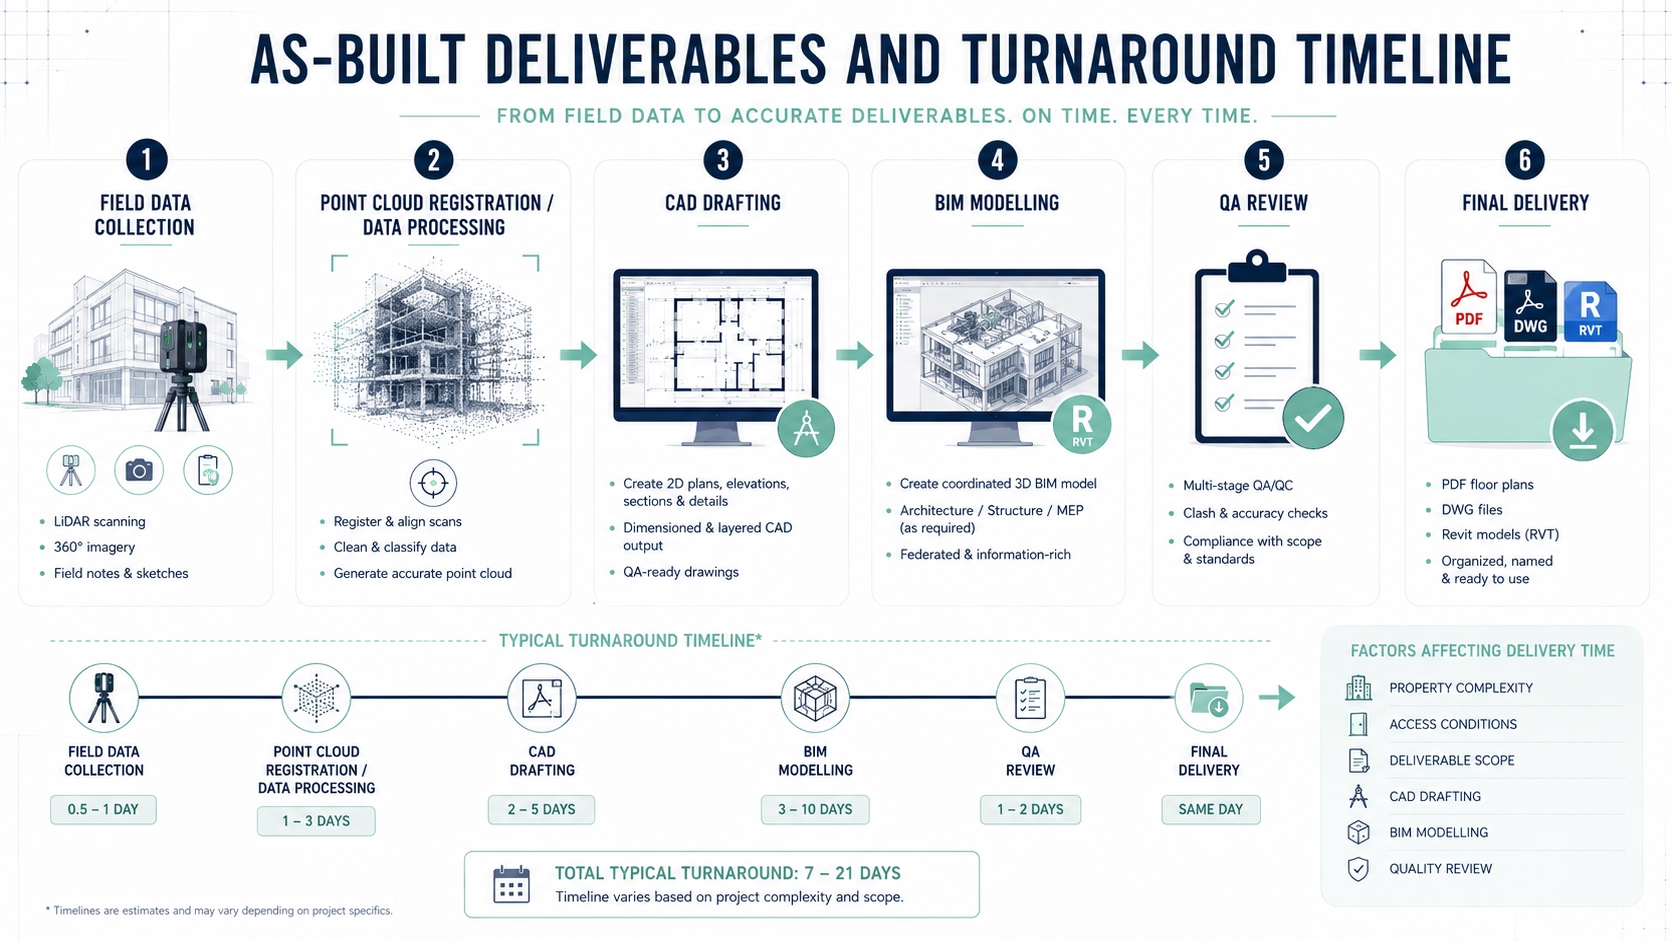
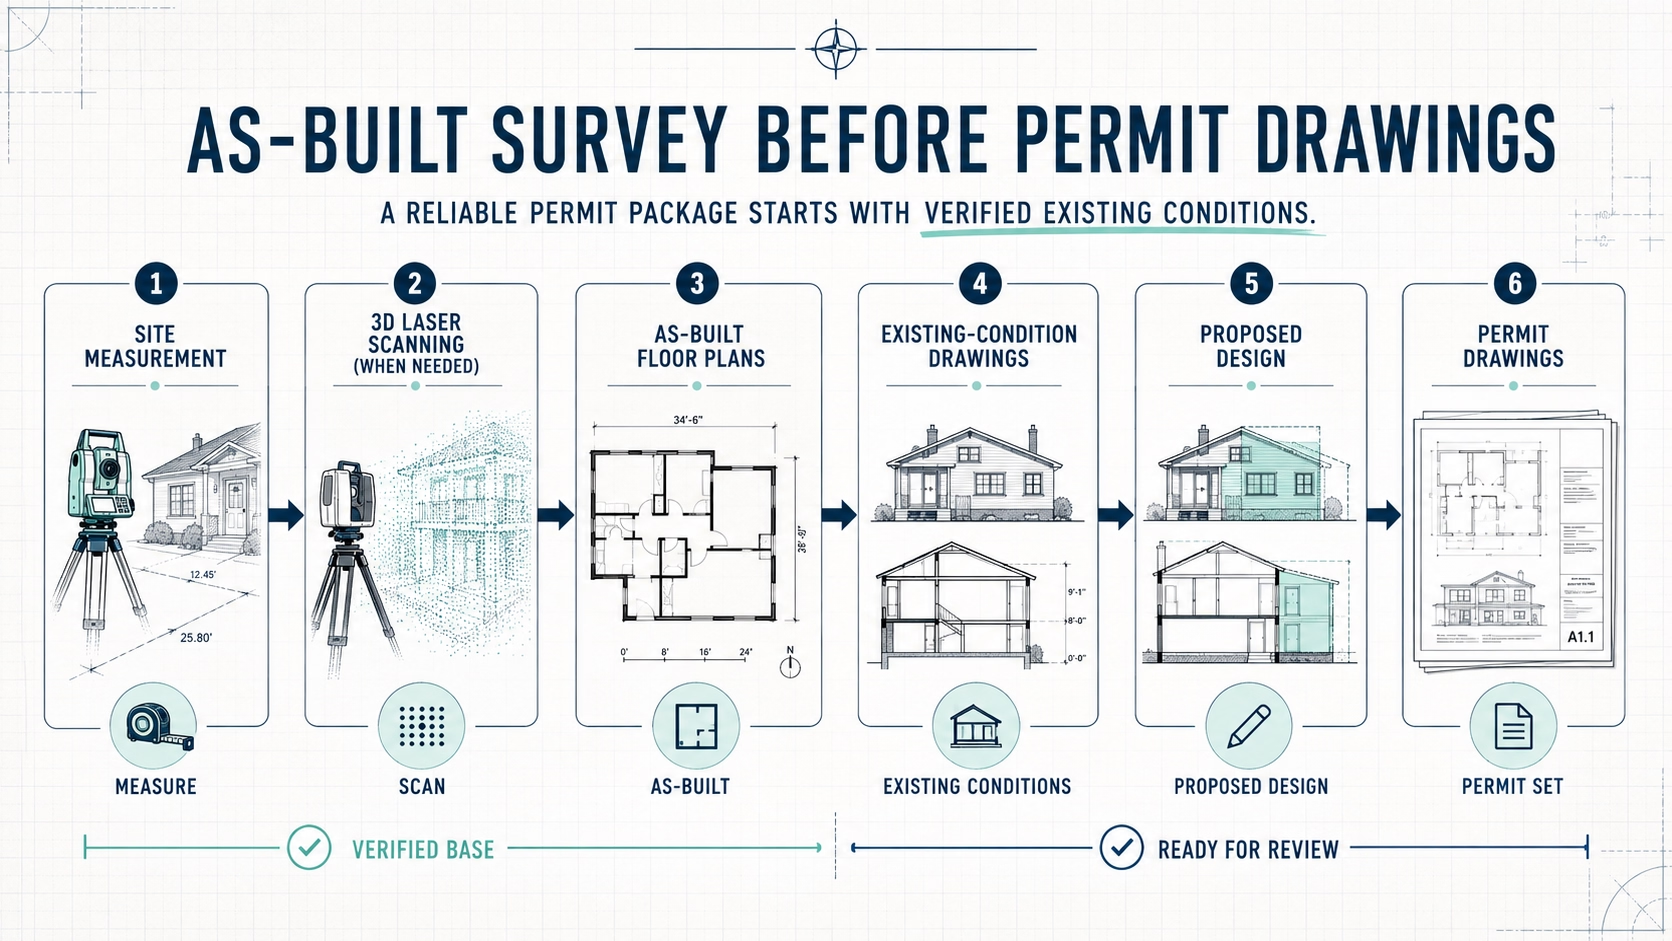
MeasureBuilt structures existing-condition documentation as a practical workflow: site measurement and 3D laser scanning, point cloud processing, conversion into the required drawings or Revit model, quality review and delivery in agreed formats such as DWG, PDF and RVT.
For projects across Greater Vancouver and the Lower Mainland, the modelling scope can be matched to the intended use instead of automatically applying the highest development level to every element.
Why an as-built model does not automatically need LOD 500
The term “as-built” and the LOD designation should not be treated as interchangeable. LOD references commonly describe LOD 500 as a field-verified as-built or facility-management state, but many Scan-to-BIM projects are commissioned to create an existing-condition design base rather than a fully developed LOD 500 asset model.
An architect preparing a renovation may need LOD 300 architecture and selected LOD 350 coordination areas even though the model is based on measured existing conditions. Requiring LOD 500 across the entire building would define a different and broader modelling objective.
In short: Describe what the model must contain and what decisions it must support. The phrase “as-built Revit model” alone is not a complete LOD specification.
The best Revit LOD for as-built models is the level that supports the next project decision without adding unnecessary modelling scope. LOD 200 works for approximate context, LOD 300 is a strong fit for many renovation and design workflows, and LOD 350 is most valuable where connections, interfaces and multidisciplinary coordination affect constructability. For complex buildings, a mixed LOD strategy can be more useful than assigning one development level everywhere. Request a quote at measurebuilt.com/request-a-quote to get a fixed price and timeline for your as-built survey.
FAQ
What LOD is usually best for an as-built Revit model?
LOD 300 is often the practical starting point for an as-built Revit model used for renovation, design and existing-condition documentation. It provides more defined geometry than LOD 200 without automatically requiring the interface and connection modelling associated with LOD 350. The final choice should still be based on the elements, disciplines and project zones that the design or construction team actually needs.
What is the main difference between LOD 300 and LOD 350?
LOD 350 adds coordination-relevant interfaces and connections to the more defined element geometry associated with LOD 300. This makes LOD 350 useful when adjacent systems, supports, penetrations or connections affect constructability. If the team only needs reliable architectural geometry for design and documentation, LOD 300 may be sufficient.
Is LOD 350 required for every Scan-to-BIM project?
No. LOD 350 is most useful when construction coordination depends on detailed relationships between elements. Many renovation projects can use LOD 300 for most architectural geometry and reserve LOD 350 for mechanical rooms, congested ceiling zones or other coordination-critical areas. A mixed LOD specification can therefore be more efficient than modelling the entire property to LOD 350.
Can one Revit model contain different LOD levels?
Yes. Different disciplines, elements or building zones can be assigned different development requirements when the project scope supports that approach. Architecture may be developed to LOD 300, selected MEP areas to LOD 350 and background areas to LOD 200. The important step is documenting those requirements clearly before modelling begins.
Does a higher LOD mean the survey itself is more accurate?
Not necessarily. LOD defines how model elements are developed and what information or interfaces they represent. The survey workflow and captured site data are separate parts of the project scope. A highly developed model should still be based on appropriate existing-condition information, and additional modelling cannot replace missing site data.
Does an as-built Revit model have to be LOD 500?
No. LOD 500 is commonly associated with a field-verified as-built or facility-management state, but many existing-condition Scan-to-BIM projects are created as design and coordination bases. Those projects may use LOD 300, LOD 350 or a mixed LOD specification depending on how the model will be used.
What should be included in a Revit LOD scope?
The scope for Revit LOD for as-built models should define project purpose, disciplines, modelled elements, development level by zone where necessary, required interfaces and final deliverables. It should also identify whether the client needs RVT, DWG, PDF, point cloud data, floor plans, elevations, sections or reflected ceiling plans. A clear element-by-element scope is more useful than requesting a LOD number alone.
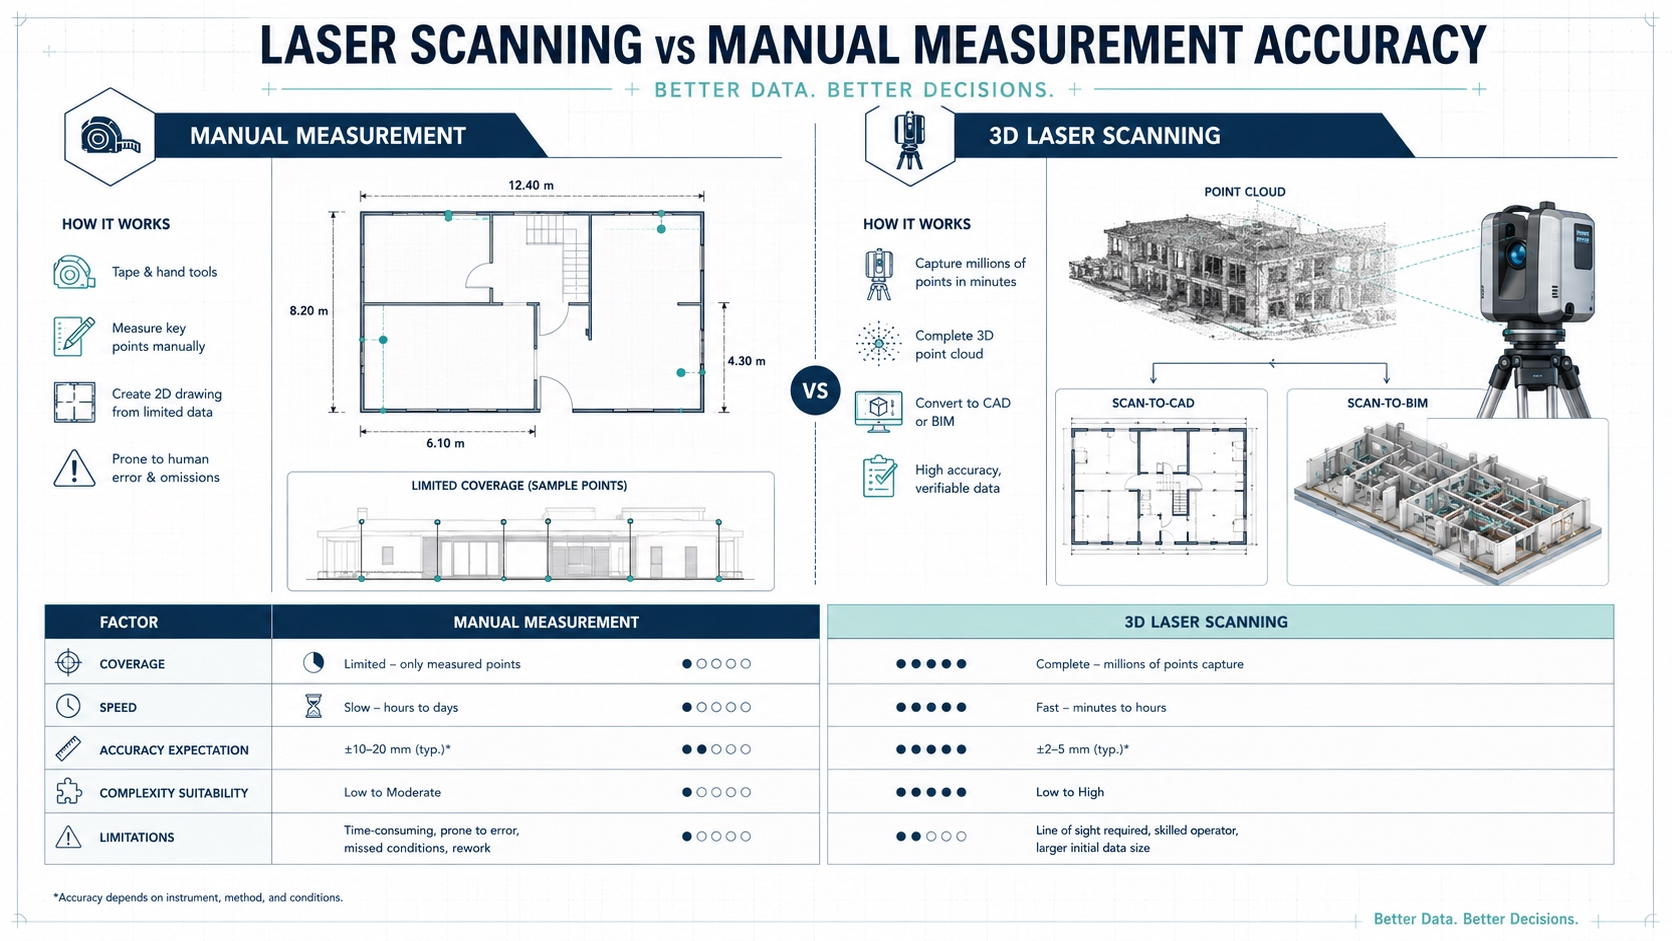
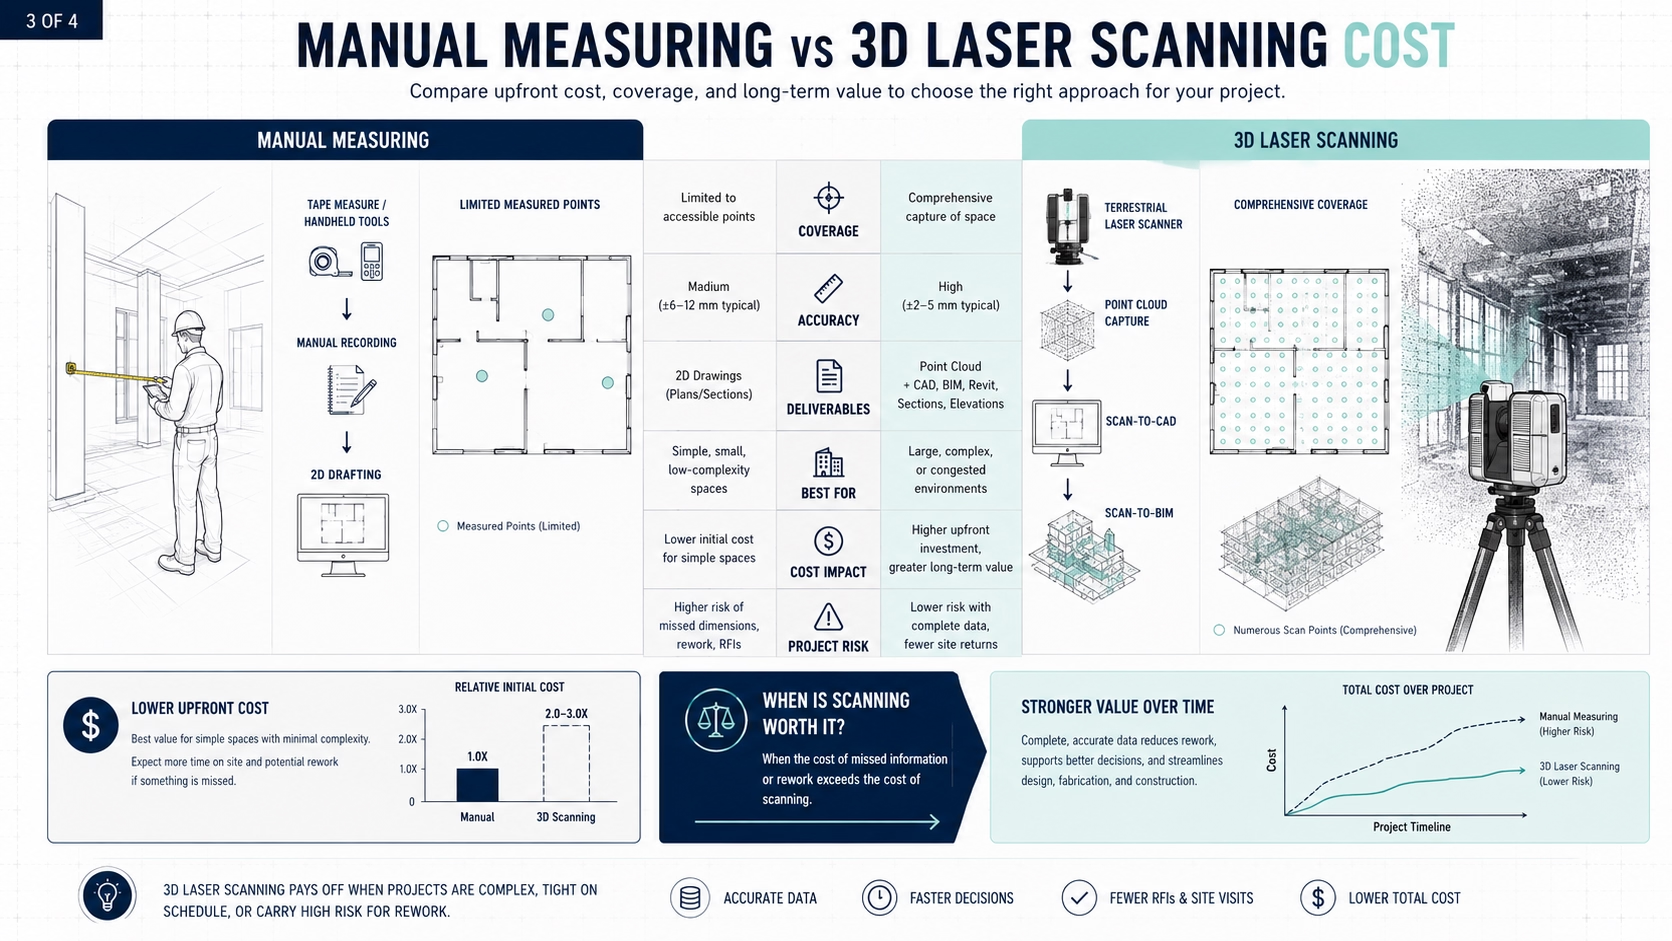
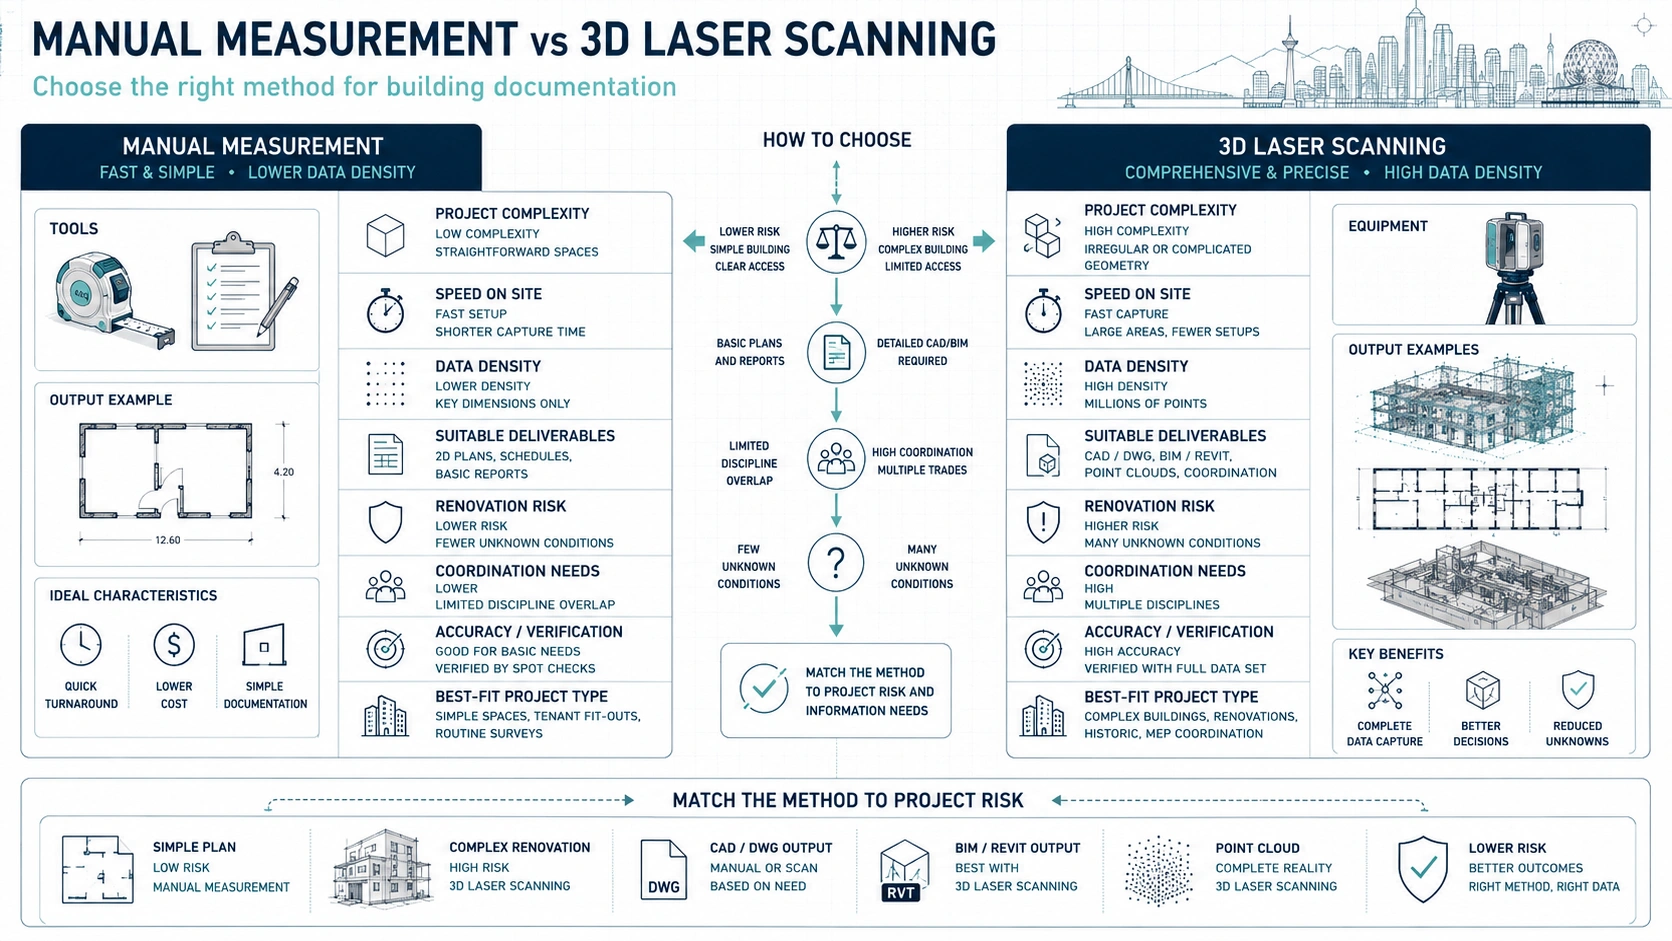
The right choice in scan to BIM vs manual measurement depends on project scale, geometry, required deliverables, tolerance, site access, and the cost of missing information. Manual measurement is efficient for small, selective scopes with simple geometry. Scan-to-BIM is usually better suited to complex or larger existing buildings where teams need dense existing-conditions data, point clouds, coordinated drawings, or a Revit/BIM model.
Choosing a building measurement method is not a technology contest. The scan to BIM vs manual measurement decision should be based on what the project actually requires. Architects, contractors, developers, property managers, and permitting teams need the method that captures enough reliable information for the next design or construction decision without creating unnecessary fieldwork or processing. The comparison starts with one question: what must the final as-built deliverable allow the project team to do?
How manual measurement and Scan-to-BIM capture existing conditions
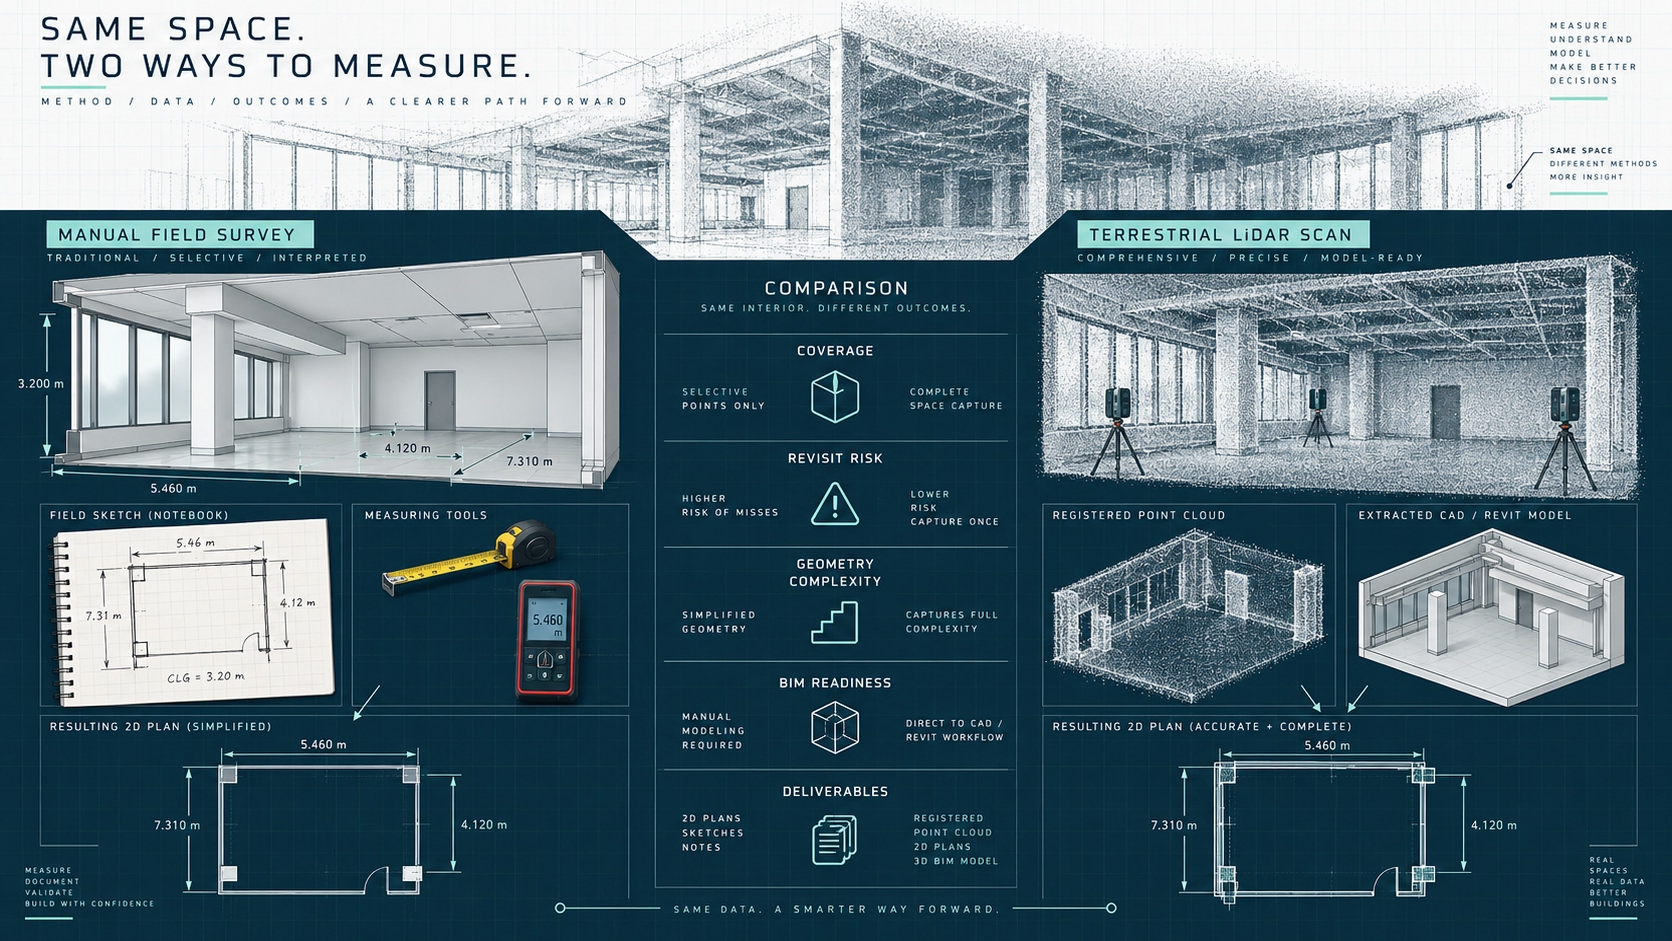
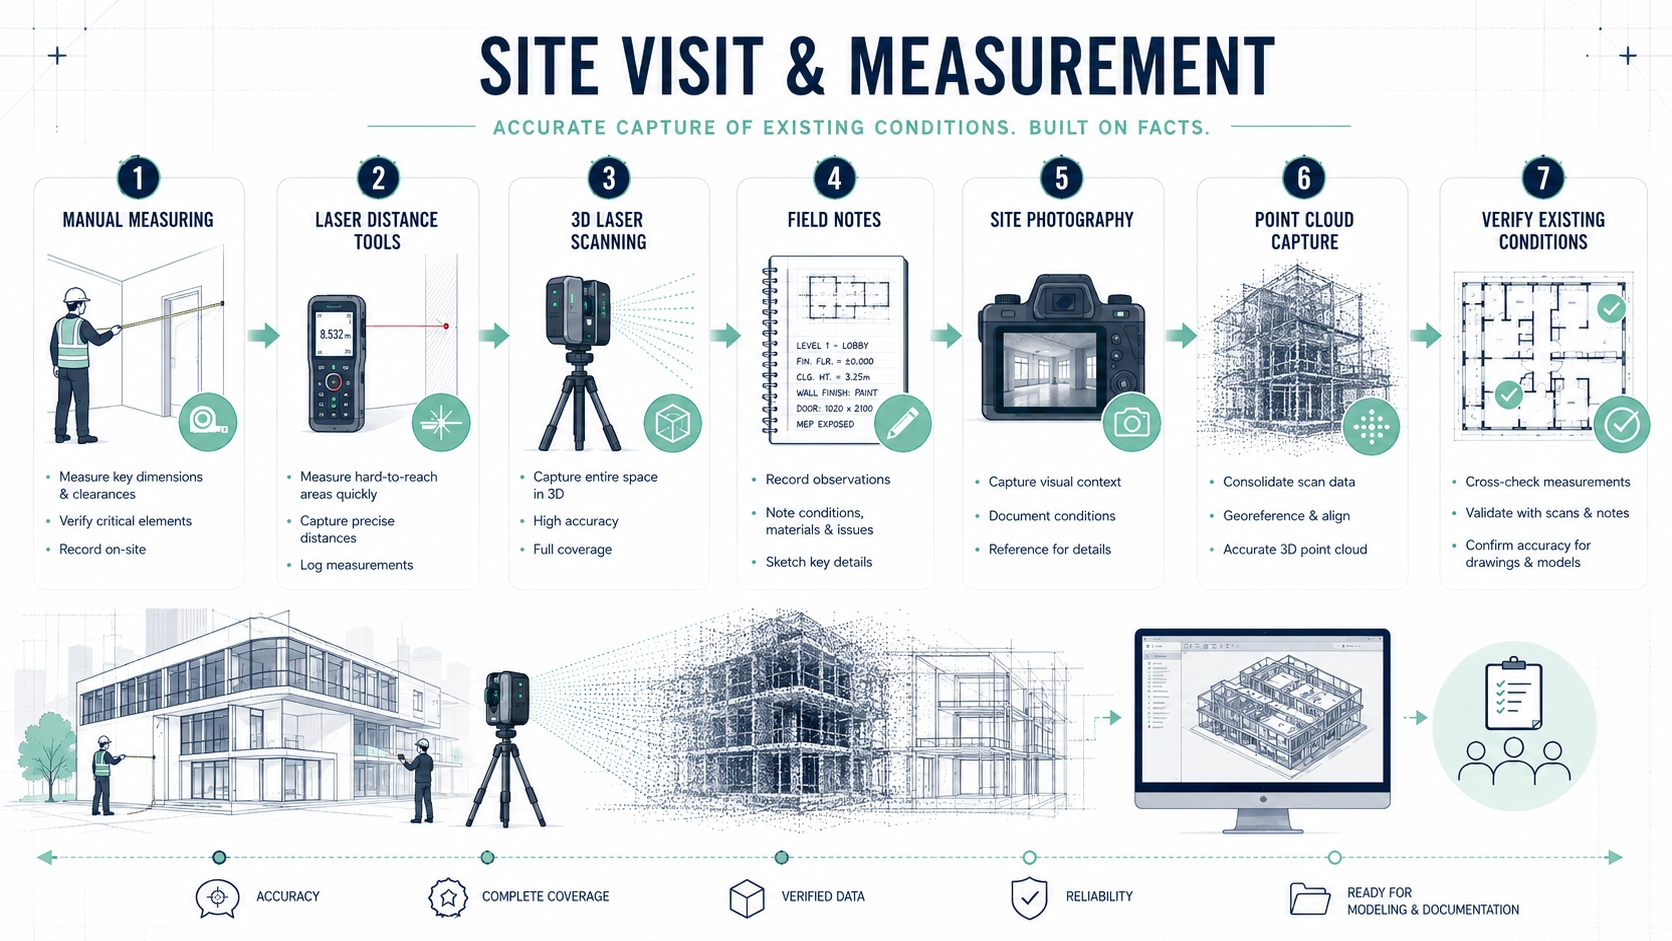
Manual measurement records dimensions and observations one by one. A technician may use a tape measure, laser distance meter, sketches, photographs, and field notes to document wall lengths, openings, ceiling heights, and required features. The method can be efficient when the scope is narrow because the field team captures only what the drawings require.
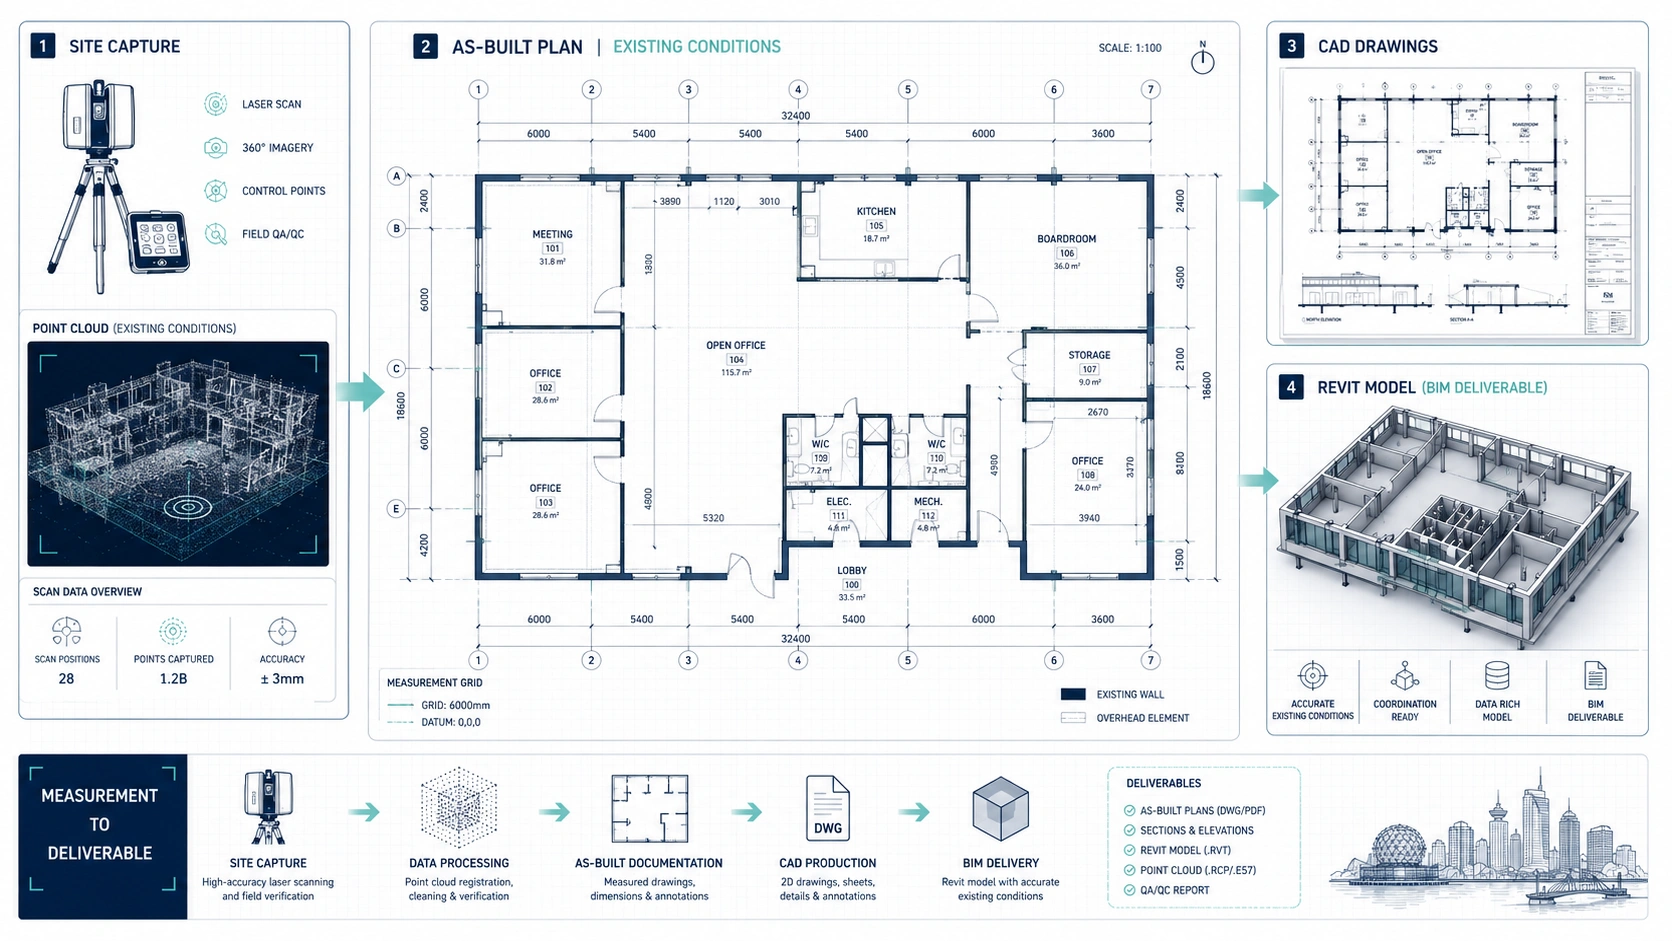
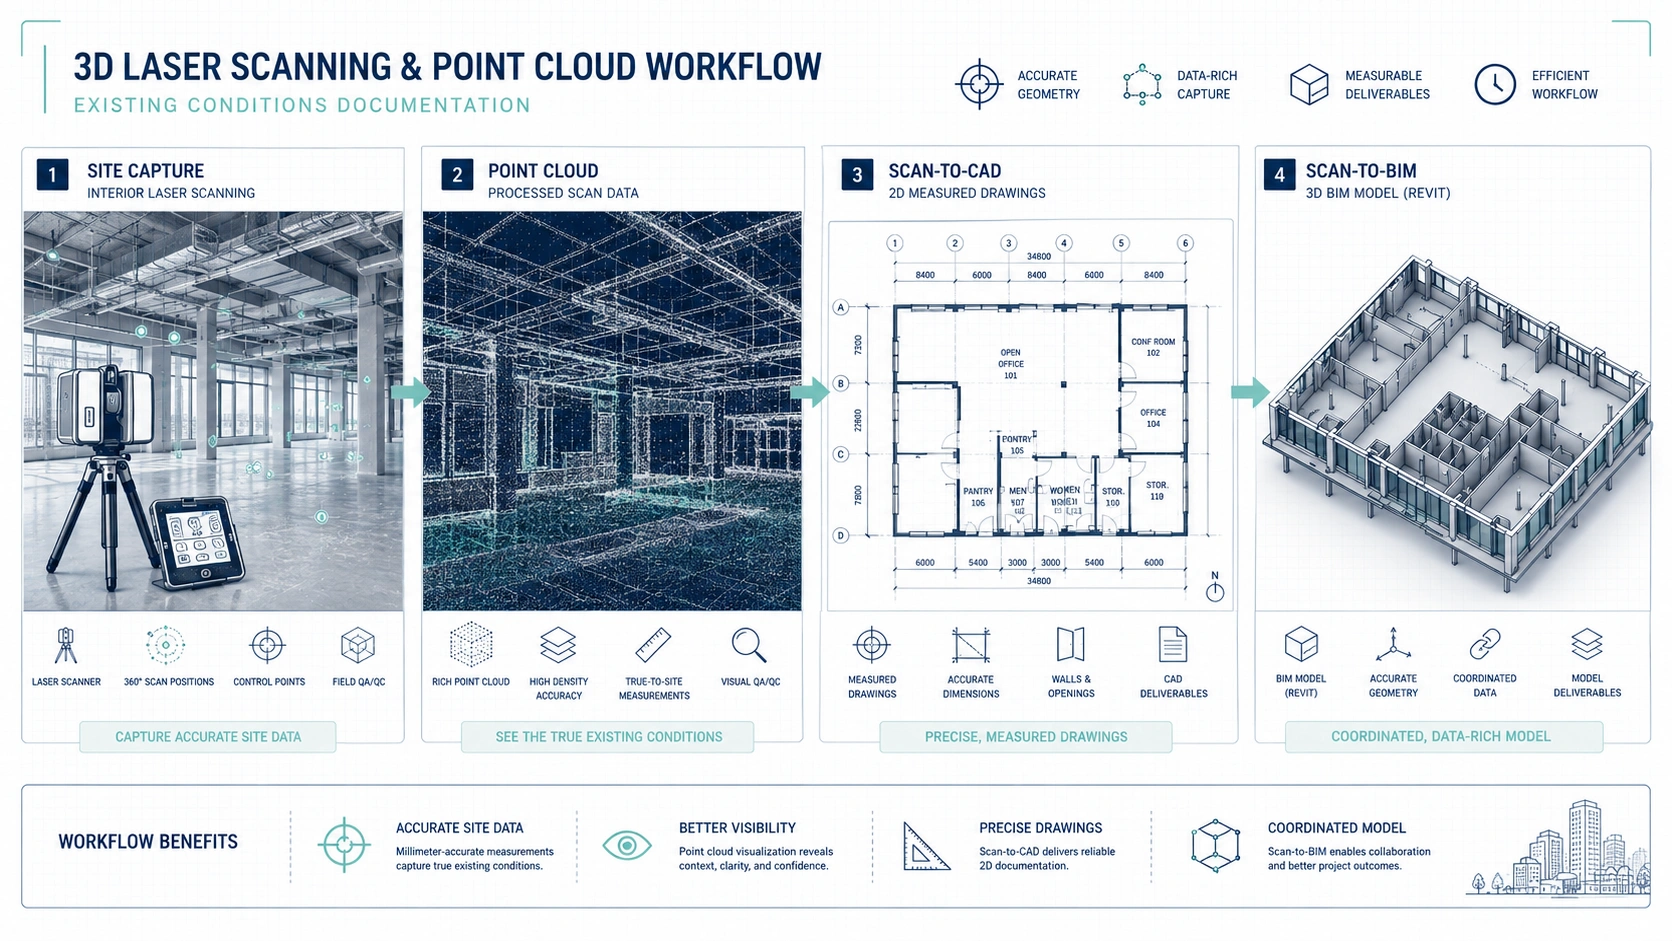
3D laser scanning uses LiDAR-based reality capture to record dense spatial data from visible building surfaces. Multiple scan positions are registered into a coordinated point cloud, which becomes a measurable digital record of the existing conditions. That point cloud can then support as-built drawings, CAD drafting, sections, elevations, reflected ceiling plans, and Scan-to-BIM modeling.
The operational difference is data density. Manual workflows depend on choosing the correct measurements while on site, while scanning captures a much broader spatial record that can be interrogated later. This matters when design questions change after the survey, when irregular geometry must be reconstructed, or when several disciplines need information from the same existing-condition dataset. This difference in data density is central to the scan to BIM vs manual measurement comparison.
Decision summary
Choose manual measurement when the building area is limited, geometry is straightforward, and the required output depends on a defined set of dimensions. Choose Scan-to-BIM when missing one condition could trigger a revisit, when geometry is complex, or when the project needs coordinated 2D and 3D deliverables from one capture. In scan to BIM vs manual measurement, the appropriate choice follows project scope rather than technology preference.
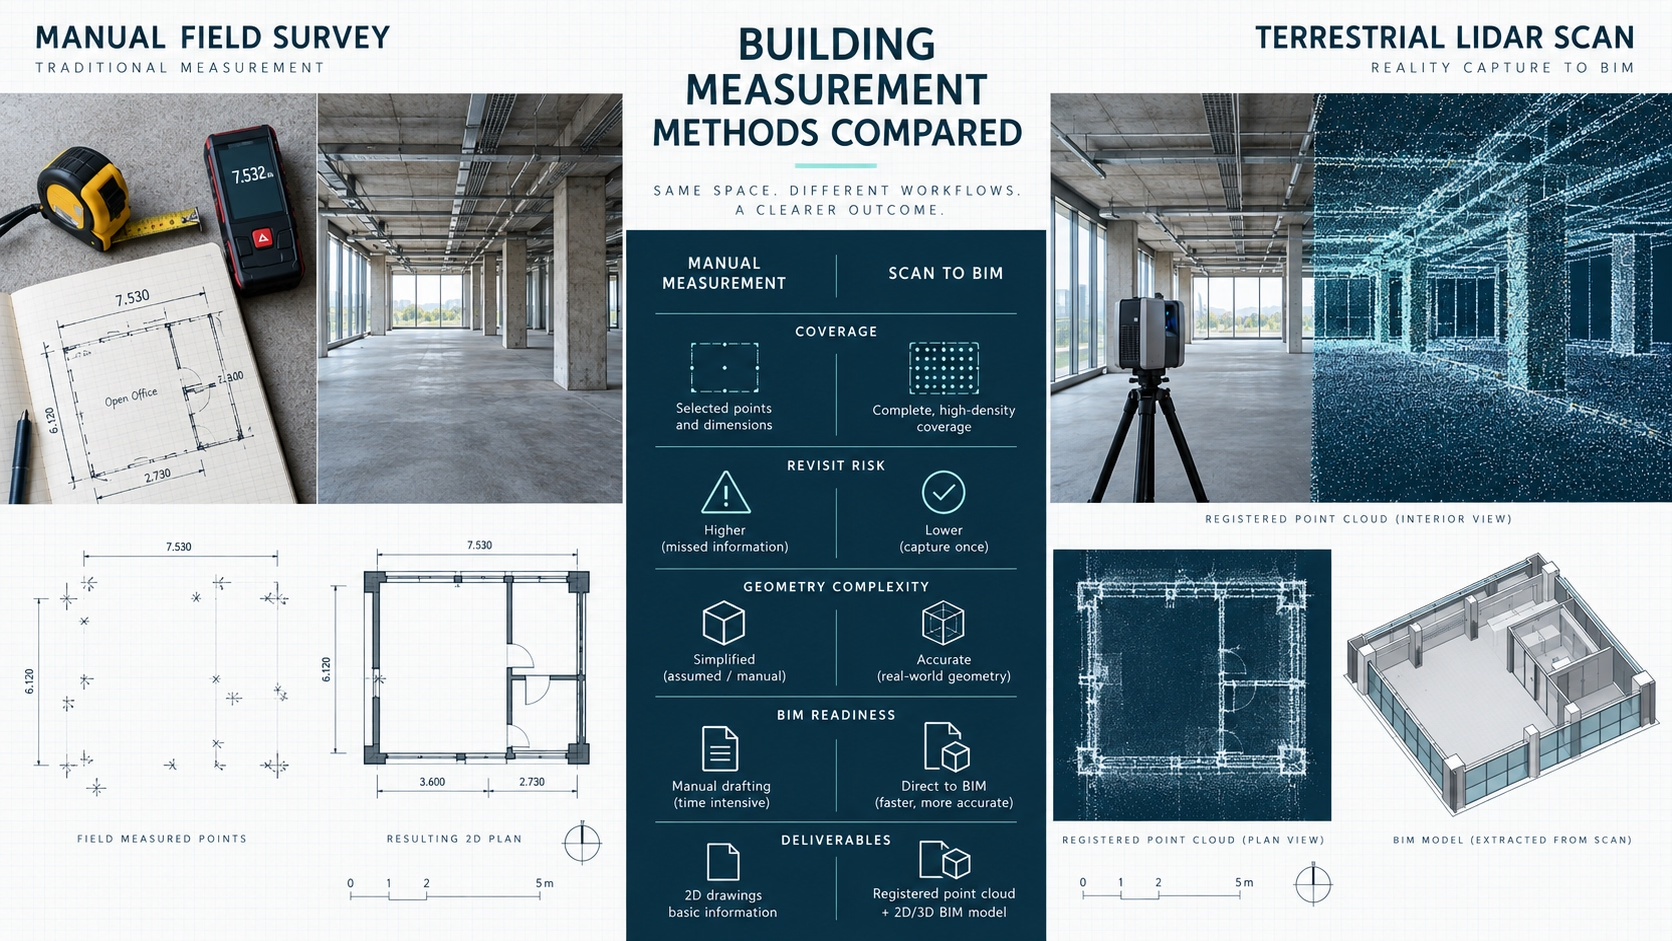
Scan to BIM vs manual measurement: building measurement methods compared
Compare the complete workflow from field capture to the drawings or model used by the project team. A fast field method can still be inefficient if it creates drafting gaps, while a data-rich method may be excessive when the project only needs a few verified dimensions. A broader comparison of 3D laser scanning and traditional surveying also shows why coverage, accuracy, field time, cost, and project type should be considered together.
Decision factor
Manual measurement
Scan-to-BIM / 3D laser scanning
Field capture
Selected dimensions, sketches, photos, and notes
Dense point-cloud capture from multiple scan positions
Geometry
Best suited to simple or clearly defined geometry
Strong fit for irregular, layered, curved, or congested geometry
Coverage
Limited to measurements intentionally recorded on site
Broad visible-surface coverage that can be measured after field capture
Human-error exposure
Higher dependence on field notation, transcription, and measurement selection
Automated spatial capture reduces manual transcription but still requires sound scan planning and registration
Revisit risk
Higher if a required dimension was not captured
Lower when the required condition is visible in the registered point cloud
Point cloud, floor plans, elevations, sections, RCPs, DWG/PDF, and Revit/BIM models
BIM integration
Requires manual reconstruction from notes and dimensions
Point cloud provides a direct geometric reference for Revit/BIM modeling
Best project fit
Small or selective scopes
Complex, larger, coordination-heavy, or model-driven scopes
In short: Laser scanning vs tape measuring is primarily a question of coverage and downstream use. Manual measurement captures the dimensions you anticipated; scanning preserves a broader spatial record for later drafting, coordination, and modeling.
How scope, accuracy, and cost should drive scan to BIM vs manual measurement
Define project scope before selecting the capture method. A survey for one retail unit has different requirements from a multi-level renovation or MEP coordination project. Identify which spaces, systems, surfaces, and disciplines must be represented and which deliverables will be issued.
Accuracy should be specified as a project requirement
Accuracy is not created by naming a device. Scanner quality, scan position, line of sight, surface characteristics, registration, field procedure, and modeling decisions all affect the result. These variables are also discussed in guidance on measured building survey accuracy using laser scanning. MeasureBuilt may use a typical ±5 mm figure where appropriate, but the required tolerance should be confirmed for the specific project and deliverable.
Cost should be evaluated across the full workflow
The cost difference between scanning and manual survey has no universal ratio. Manual measurement can have the lower entry cost for a small, simple space. Scanning can create better value on larger or complex scopes when it reduces field labour, supports multiple deliverables, or helps avoid return visits.
Compare field time, site access, drafting or modeling effort, remobilization risk, deliverable count, and the consequences of missing dimensions. In an occupied commercial property, reducing repeated access may matter more than minimizing the initial survey fee. Published comparisons of Scan-to-BIM and traditional surveying similarly evaluate cost, speed, accuracy, and deliverable requirements together.
In short: Compare total project effort, not equipment cost. The lowest-cost capture method is the one that supplies enough verified information for the required deliverables without creating avoidable rework or site revisits.
When manual measurement is the right method
Manual measurement remains a practical choice when the scope is limited and the required geometry is easy to verify directly. Traditional survey vs 3D scanning should not be framed as obsolete versus modern; point-based measurement is still efficient when comprehensive spatial capture would add processing without adding useful project information. For scan to BIM vs manual measurement, small and selective scopes often remain strong candidates for manual capture.
Small interiors: a compact suite, room, or isolated renovation area with straightforward walls and openings.
Selective verification: a contractor or designer needs several dimensions rather than a full existing-conditions package.
Simple 2D deliverables: the required output is a basic floor plan or limited drawing set without a coordinated BIM model.
Accessible geometry: relevant surfaces and endpoints can be reached and measured safely without extensive obstruction.
Low change risk: the survey scope is stable, so the team is unlikely to request many additional dimensions after the site visit.
Manual measurement becomes less attractive when the field technician must make many judgment calls about what to record. Every omitted height, offset, wall thickness, beam position, ceiling condition, or opening can become a drafting question later. If a return visit would delay design or require difficult site access, broader reality capture can be the safer workflow.
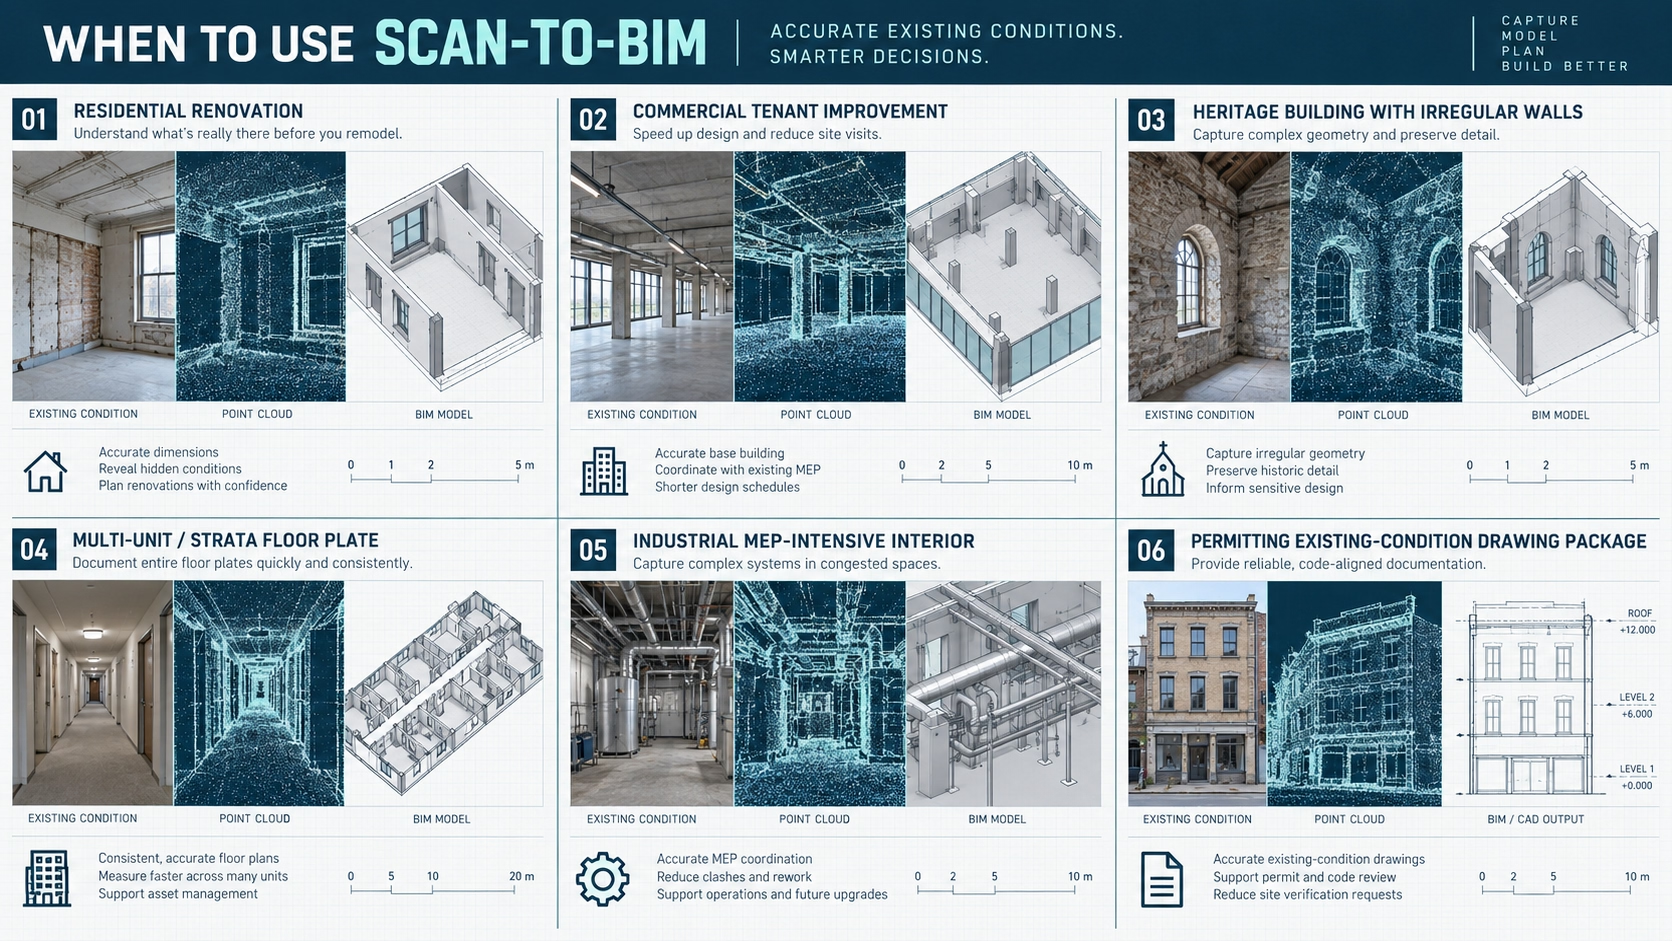
When to use Scan-to-BIM for existing buildings
Scan-to-BIM is most useful when the project needs a reusable geometric record rather than a short list of dimensions. The point cloud gives architects and BIM teams a dense reference for existing conditions, spatial relationships, coordinated drawings, and Revit modeling. In the scan to BIM vs manual measurement decision, this broader reusable dataset is one of the strongest reasons to choose scanning.
Residential renovations
Scanning suits larger renovations where several rooms, levels, stairs, roof conditions, or non-orthogonal walls must coordinate. Manual measurement can still suit a small alteration, but whole-house redesigns benefit when designers can return to the point cloud for additional dimensions.
Commercial tenant improvements
Commercial tenant improvements often require floor plans, RCPs, ceiling heights, columns, storefront conditions, and service spaces. A point cloud can support that design work when legacy drawings are incomplete. BOMA should be limited to commercial area calculations, leasing, and square-footage verification, not treated as a general scanning standard.
Heritage and irregular buildings
Heritage buildings are strong scanning candidates because walls, openings, floors, façades, and structural features may not be square, level, or repetitive. Dense capture records irregular geometry more effectively than a small set of assumed straight-line dimensions.
Multi-unit and strata properties
Multi-unit and strata projects require consistency across suites, common areas, corridors, stairs, and service spaces. Scan-based capture can provide one geometric reference for a coordinated package and reduce variation in what different field crews record.
Industrial and MEP-intensive spaces
Industrial interiors and MEP-intensive spaces contain pipes, ducts, equipment, structure, and overhead services that are difficult to describe with isolated dimensions. 3D laser scanning is useful when teams need visible spatial relationships, clearances, and routing context.
Permitting and existing-condition drawing packages
Permitting teams need clear existing-condition drawings rather than a point cloud by itself. Scanning can support floor plans, elevations, sections, and site information where geometry is complex or record drawings are incomplete. The final package should match the submission requirements.
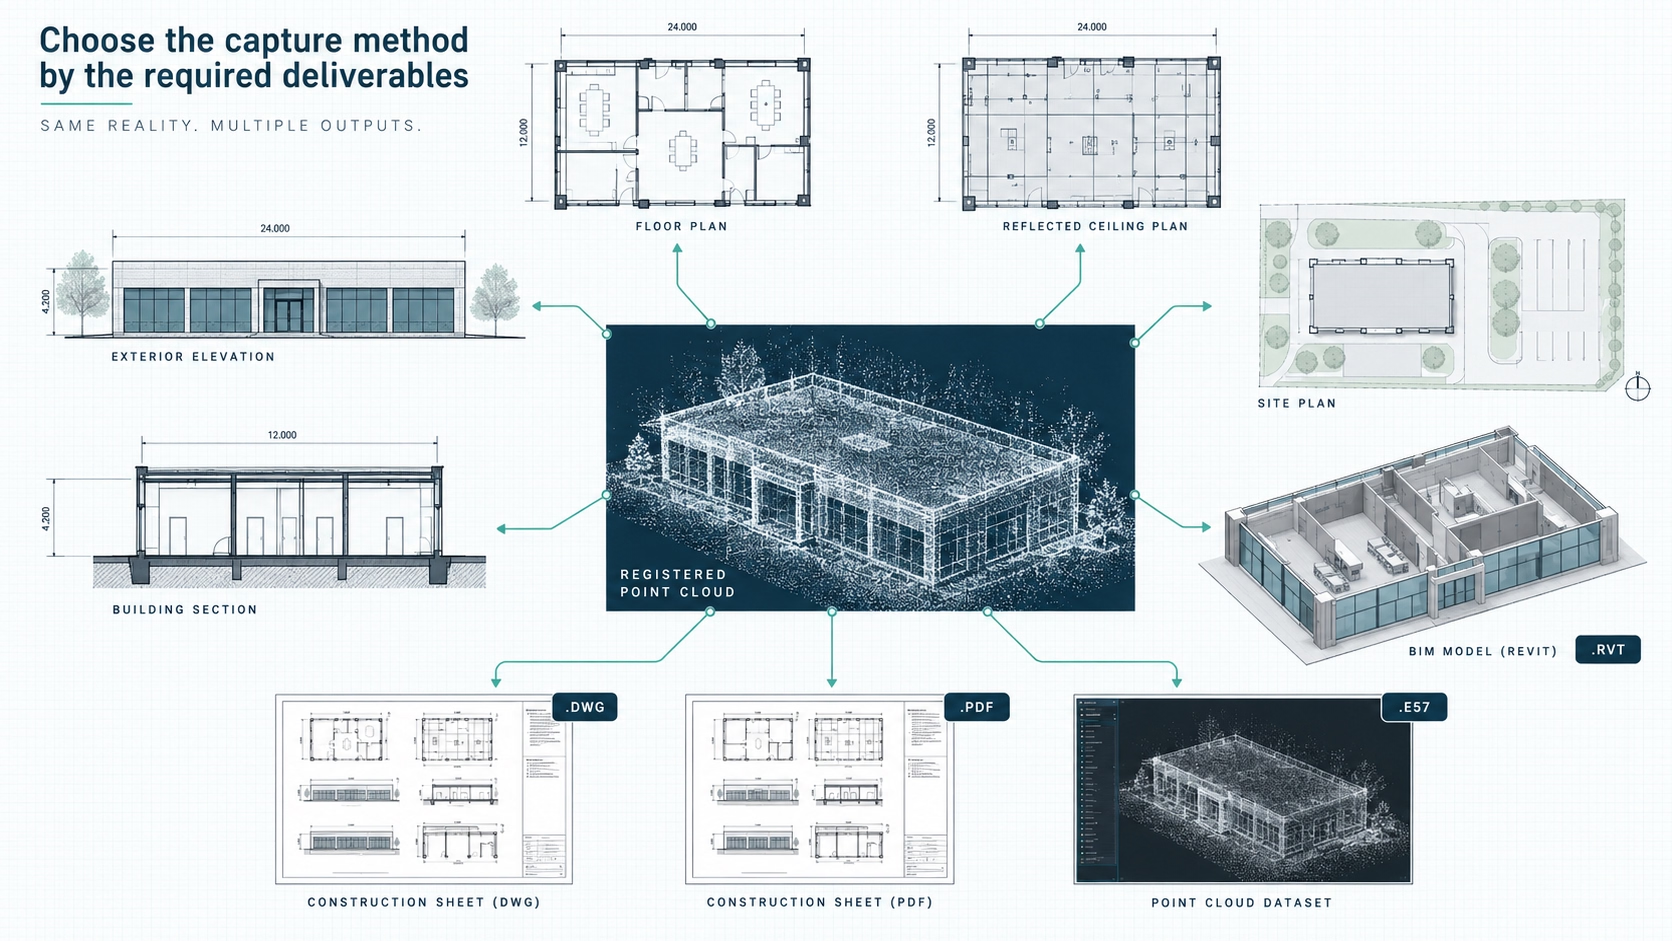
Choose the capture method by the required deliverables
Deliverables should be defined before field capture because they determine what must be visible, measured, modeled, and checked. A request for floor plans alone is not equivalent to a request for a coordinated Revit model, even when both begin with the same building. Deliverables are therefore an important part of the scan to BIM vs manual measurement choice.
Scanning can improve coverage in coordination-heavy interiors
Site plans
Building position and visible site features within the defined scope
Method depends on required extent, control, and site conditions
Revit/BIM model
Consistent 3D geometry and an agreed modeling scope
Point cloud is a strong reference for LOD 100–300 existing-condition modeling
DWG / PDF
Drafted and checked 2D documentation
Either method can support output; complexity determines the efficient capture route
RVT
Structured model geometry and agreed Revit deliverable requirements
Scan-to-BIM is normally the more direct workflow
Point cloud
Registered scan data
Requires 3D scanning or another compatible reality-capture workflow
A point cloud and a BIM model are not interchangeable deliverables. The point cloud is measured spatial data; the Revit/BIM model is an interpreted, structured representation created from that data. Modeling therefore requires decisions about object scope, LOD, simplification, exclusions, and how irregular existing conditions will be represented.
Accuracy, registration, and scope requirements to define before the survey
Reliable as-built documentation starts with a written scope, not a scanner specification. State what is captured, what is excluded, which deliverables are required, what tolerance is relevant, and how the data will be used. This prevents a technically successful survey from producing the wrong information for design.
Define the survey extent: identify floors, suites, façades, roofs, service spaces, exterior areas, and inaccessible zones.
Define the deliverables: specify floor plans, elevations, sections, RCPs, site plans, point cloud, DWG, PDF, RVT, or a Revit/BIM model.
Define model scope: state which architectural, structural, or visible MEP elements must be represented and the intended LOD where BIM is required.
Define accuracy expectations: match tolerance to the project decision rather than assuming every element needs the same precision.
Define coordinate requirements: confirm whether local coordinates are sufficient or whether the dataset must tie into project control.
Define acceptance criteria: confirm file versions, naming, completeness, and what the client will review before final delivery.
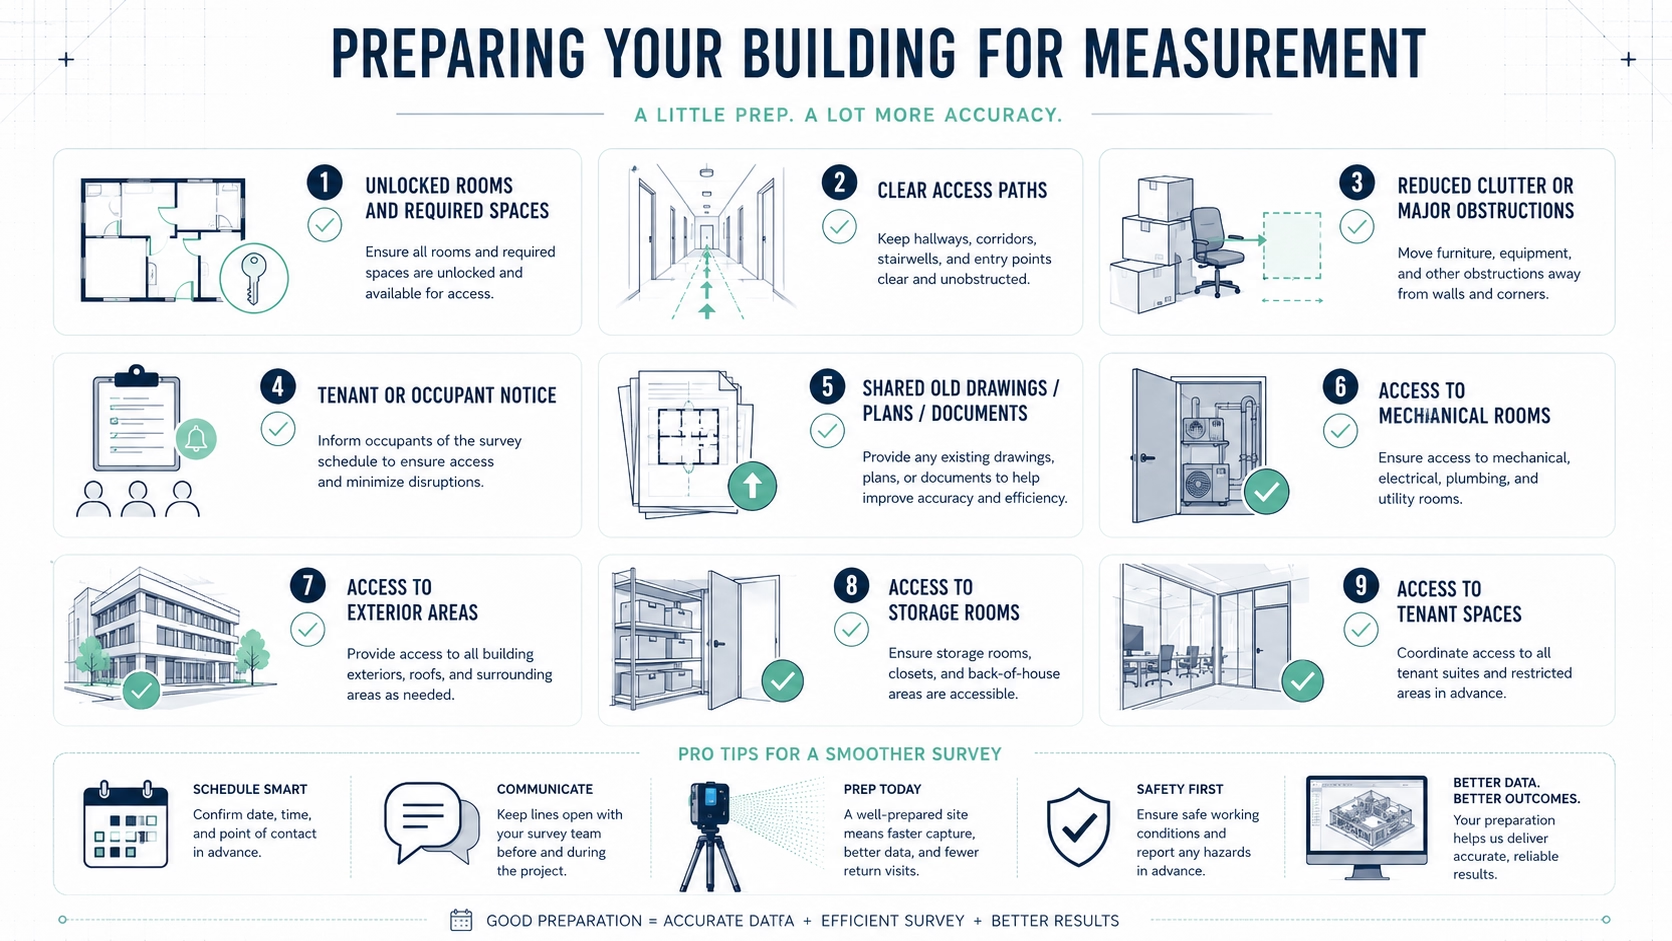
Laser scanners record surfaces visible from their scan positions. Furniture, equipment, finishes, or inaccessible areas can create occlusions. Registration combines multiple scan positions into one coordinated dataset, so good scan planning is essential for reducing blind spots and producing a coherent point cloud.
In short: A dense point cloud is useful only when capture extent, registration, tolerance, and deliverables match the project brief. Scope quality is part of measurement quality.
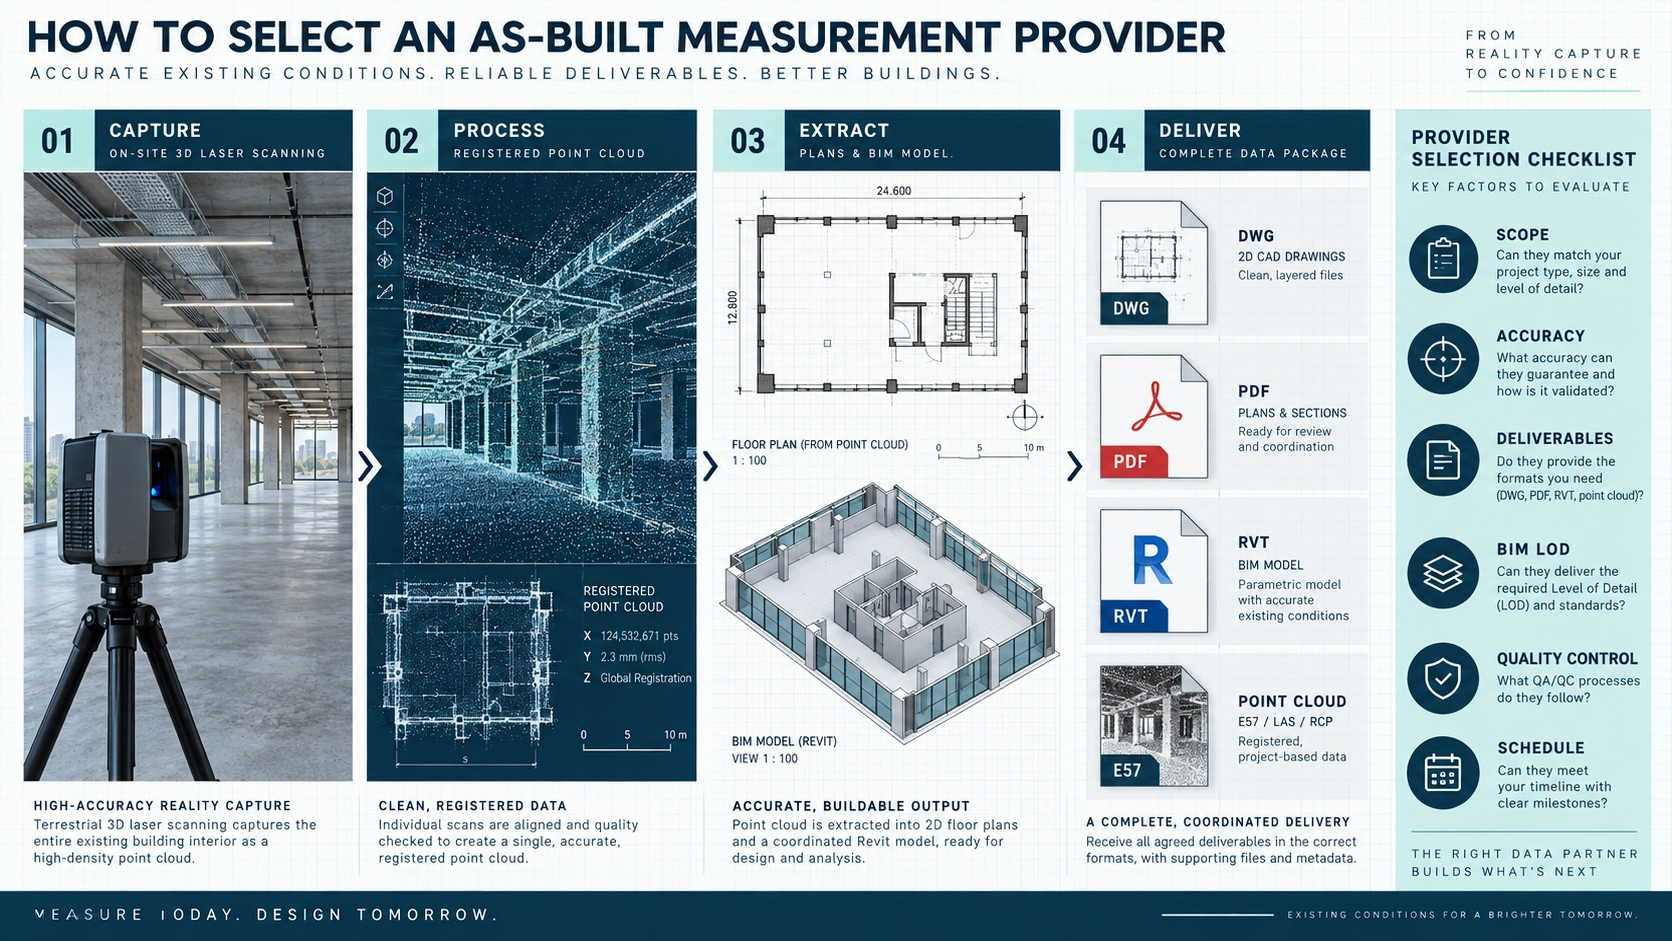
How to select an as-built measurement provider
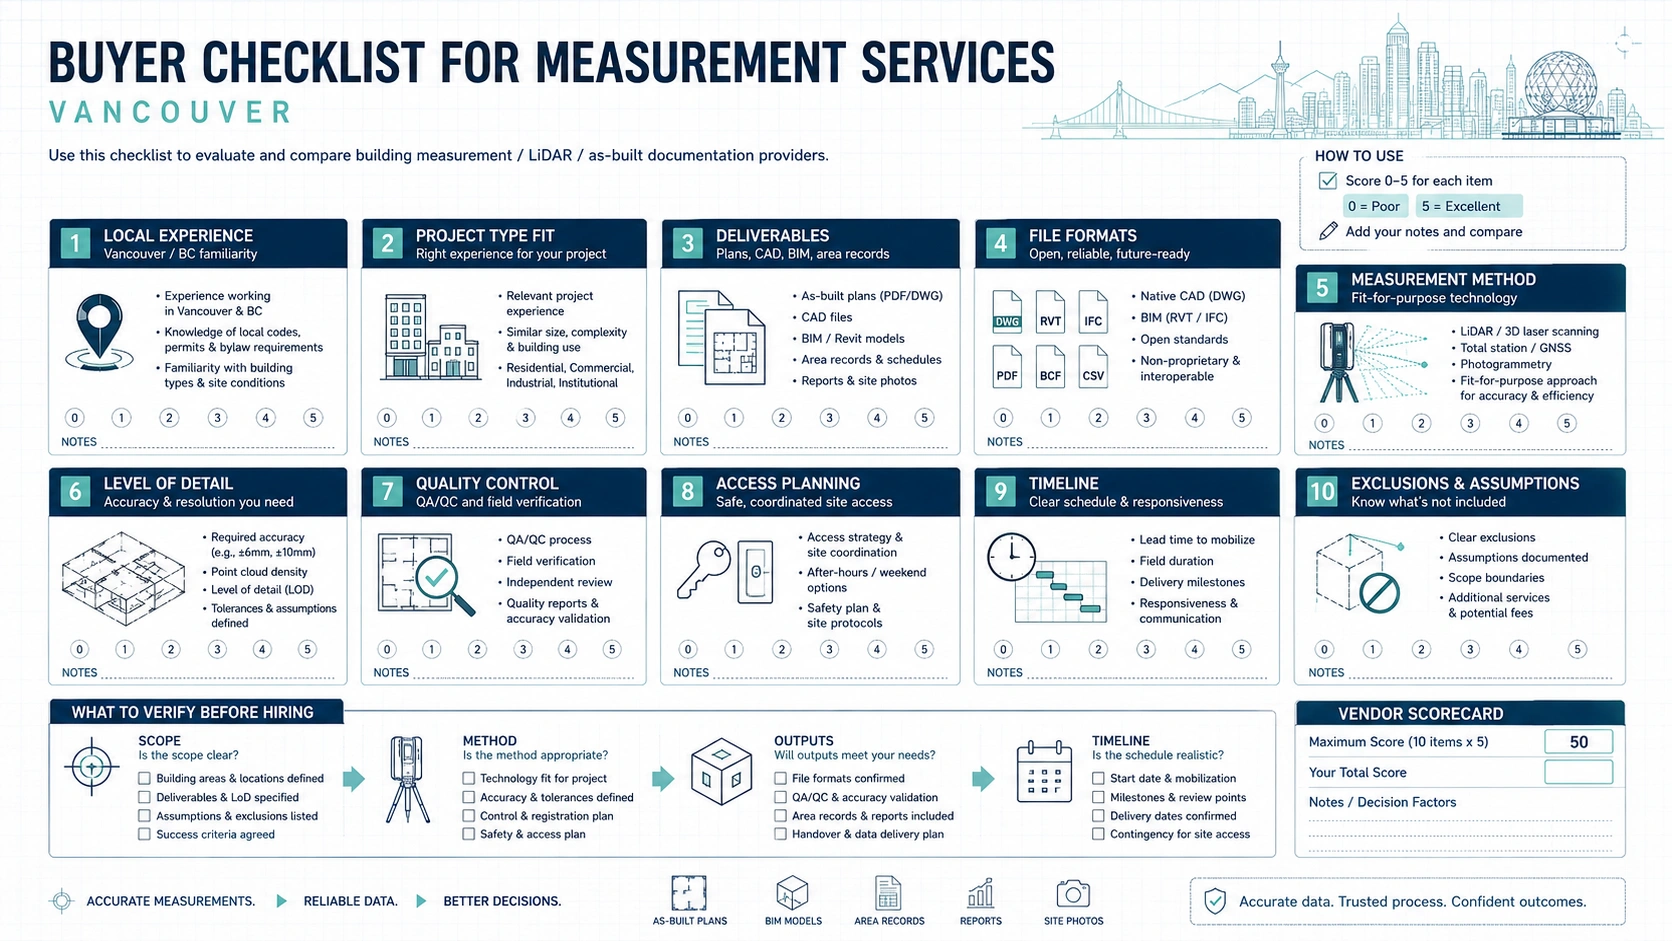
Provider selection should cover the complete field-to-deliverable workflow. A company may capture good scan data yet still create coordination problems if model scope, drawing content, or quality checks are unclear. Ask how captured geometry becomes the exact files your team will use and how the provider decides between scan to BIM vs manual measurement for different project conditions.
Technology: Confirm the provider can use manual measurement, 3D laser scanning, or a hybrid workflow based on the project rather than forcing one method.
Survey scope: Confirm the provider identifies capture boundaries, inaccessible areas, exterior requirements, and discipline-specific needs before mobilization.
Accuracy: Ask how field procedure, registration, and deliverable checks are matched to the required project tolerance.
Deliverables: Specify floor plans, elevations, sections, RCPs, site plans, DWG, PDF, RVT, point cloud, and Revit/BIM requirements explicitly.
BIM scope: If a model is required, define LOD 100–300 expectations, included elements, exclusions, and Revit version before work starts.
Quality control: Ask how dimensions, geometry, registration, and drawing/model consistency are reviewed before issue.
Schedule: Confirm field access, processing sequence, review milestones, and final delivery timing rather than assuming one standard turnaround.
Future use: Decide whether the point cloud or model will support only the current renovation or should remain useful for later design and facility decisions.
The MeasureBuilt approach
For Greater Vancouver and the Lower Mainland, MeasureBuilt can structure the workflow as scan → registered point cloud → as-built drawings or Revit/BIM model → DWG, PDF, RVT, and agreed data delivery. Capture and deliverables should match the building, required tolerance, and project decisions.
The scan to BIM vs manual measurement choice should come from the project scope, not from technology preference. Manual measurement is efficient for small, well-defined spaces and selective dimensions. 3D laser scanning is stronger when the project needs broad coverage, complex geometry, reusable point-cloud data, multiple drawing types, or a coordinated Revit/BIM model. Define deliverables, tolerance, site constraints, and revisit risk first. Request a quote at measurebuilt.com/request-a-quote to get a fixed price and timeline for your as-built survey.
FAQ
Is Scan-to-BIM always more accurate than manual measurement?
Not necessarily. Accuracy depends on the full survey workflow, not only the capture technology. Manual measurements can work well for specific dimensions, while laser scanning provides dense coverage for complex geometry. Scanner setup, line of sight, registration, site conditions, and modeling decisions affect the final result, so define the required project tolerance first.
When should I use Scan-to-BIM instead of manual measurement?
Use Scan-to-BIM when the building is large, complex, difficult to revisit, or expected to produce several coordinated deliverables. It is especially useful for point clouds, elevations, sections, RCPs, and Revit/BIM models. Manual measurement is usually more efficient when the scope is small, stable, accessible, and limited to selected dimensions or simple 2D drawings.
What is the main difference between laser scanning vs tape measuring?
The main difference is coverage. Tape measures and laser distance meters capture selected dimensions chosen by the technician. 3D laser scanning captures dense spatial information from visible surfaces and combines it into a registered point cloud. That broader dataset can be measured later and used for CAD drawings, sections, elevations, and BIM modeling.
Is 3D laser scanning cheaper than a manual survey?
Not always. Manual measurement can cost less for a small, simple scope because capture and processing are limited. Scanning may offer better value on larger or more complex buildings because one coordinated dataset can support several deliverables and reduce remobilization risk. Compare total workflow cost, not the survey fee alone.
Do I need a point cloud if I only need floor plans?
Not necessarily. A simple floor plan for a small, regular space can often be produced efficiently from manual measurements. A point cloud becomes more useful when the layout is large or irregular, when additional drawings may be requested later, or when the design team wants a reusable existing-conditions record.
Can Scan-to-BIM produce Revit, DWG, and PDF deliverables?
Yes, when those outputs are included in scope. A registered point cloud can support Revit/BIM geometry and coordinated 2D documentation such as floor plans, elevations, sections, and RCPs. Define required file formats, Revit version, LOD 100–300 expectations, included elements, and drawing content before field capture and modeling.
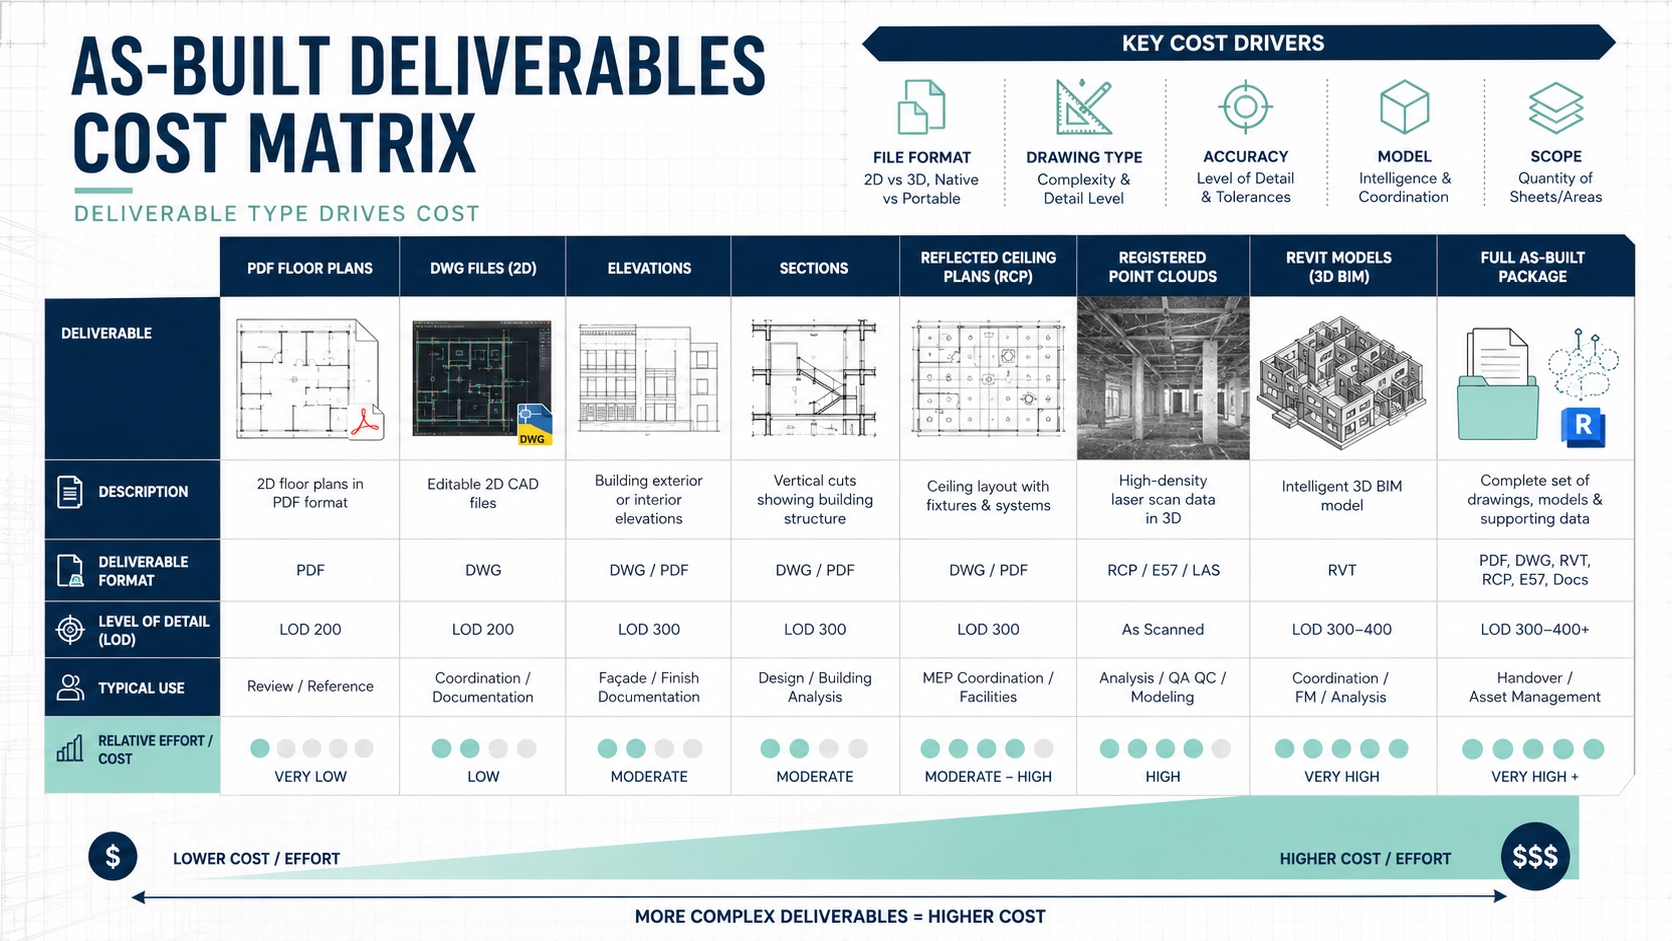
As-Built Deliverables Explained: CAD, PDF, Revit, and Point Cloud File Formats
Quick answer
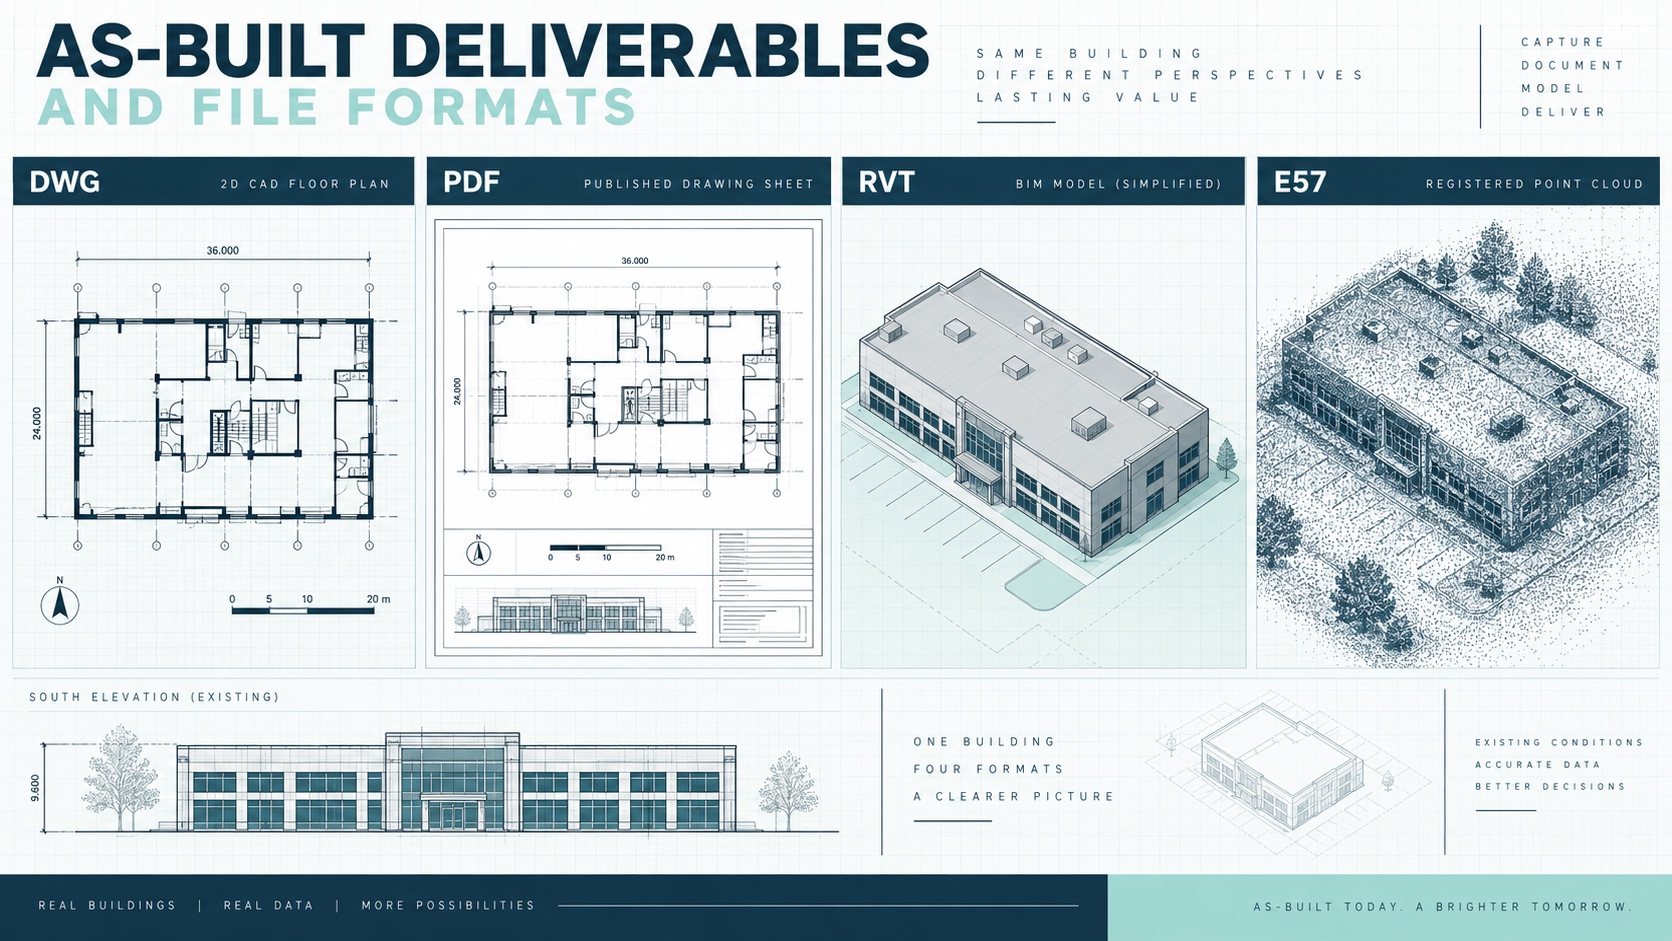
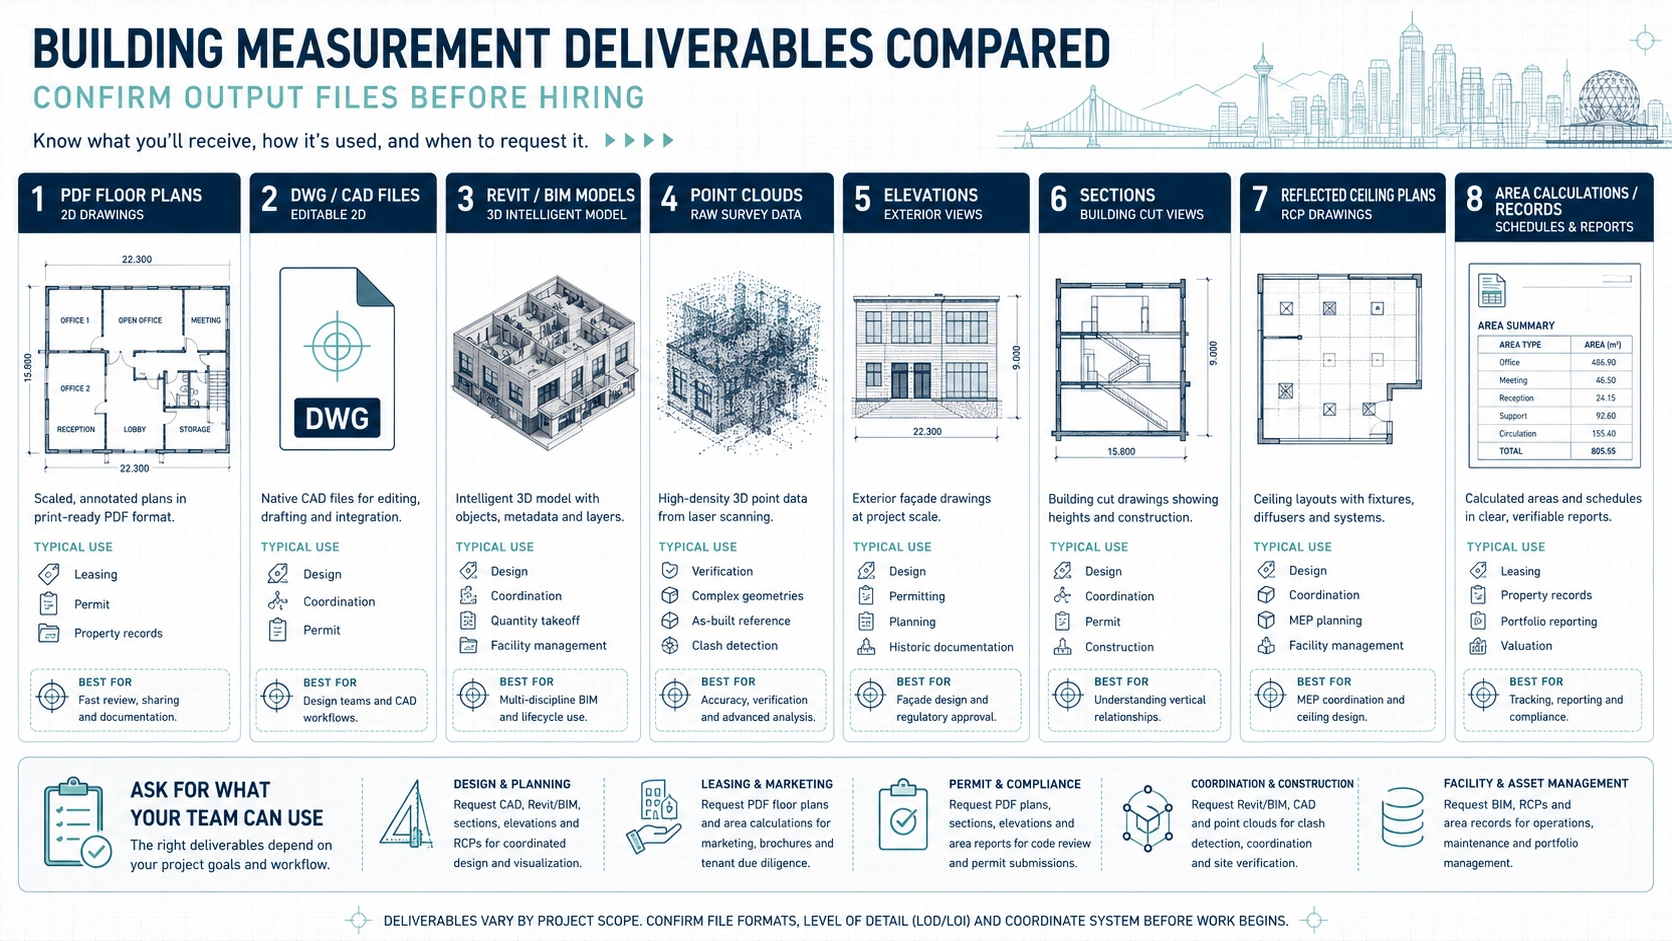
As-built deliverables can range from simple PDF floor plans to editable DWG drawings, native Revit models and registered point clouds. The right package depends on what happens after the survey. Architects often need DWG or RVT files for design, contractors may need drawings plus scan data for coordination, and owners may prefer PDFs for accessible existing conditions records. A useful scope defines both the file format and the information contained in it.
Choosing a file extension is only part of specifying an as-built survey. The same building capture can support 2D drawings, a Scan-to-BIM model, registered LiDAR data or several coordinated outputs. For architects, designers, contractors, developers and property teams, the practical question is which deliverables will remain usable throughout design, permitting, construction and facility documentation.
Quick answer: which as-built deliverables should you request?
Request deliverables based on the next software workflow, not simply on the most familiar file type. DWG is appropriate when the design team needs editable 2D geometry. PDF is appropriate for review, printing and distribution. RVT is appropriate when existing conditions must become part of a Revit-based BIM workflow. A registered point cloud is appropriate when the team needs direct access to captured 3D survey data for verification, modeling or later reference.
File-format decision summary
DWG: choose it when architects, engineers or contractors need editable floor plans, elevations, sections or other 2D CAD geometry.
PDF: choose it when the primary need is review, markup, printing, permitting support or an accessible record that does not require CAD software.
RVT: choose it when existing conditions must be integrated into a Revit design or coordination workflow.
Point cloud: choose E57, RCP/RCS or another agreed format when scan data must remain available as the measured 3D reference behind drawings or BIM.
Combined package: request multiple formats when different disciplines will use the survey data in different ways.
A complete package can include a registered point cloud, a native Revit model, exported 2D drawings and open exchange files such as IFC. Professional Scan-to-BIM workflows commonly separate the measured source data from the interpreted model because the point cloud and the BIM model serve different purposes: one preserves captured geometry, while the other organizes selected building elements into usable model objects.
What is included in as-built drawings and digital survey packages?
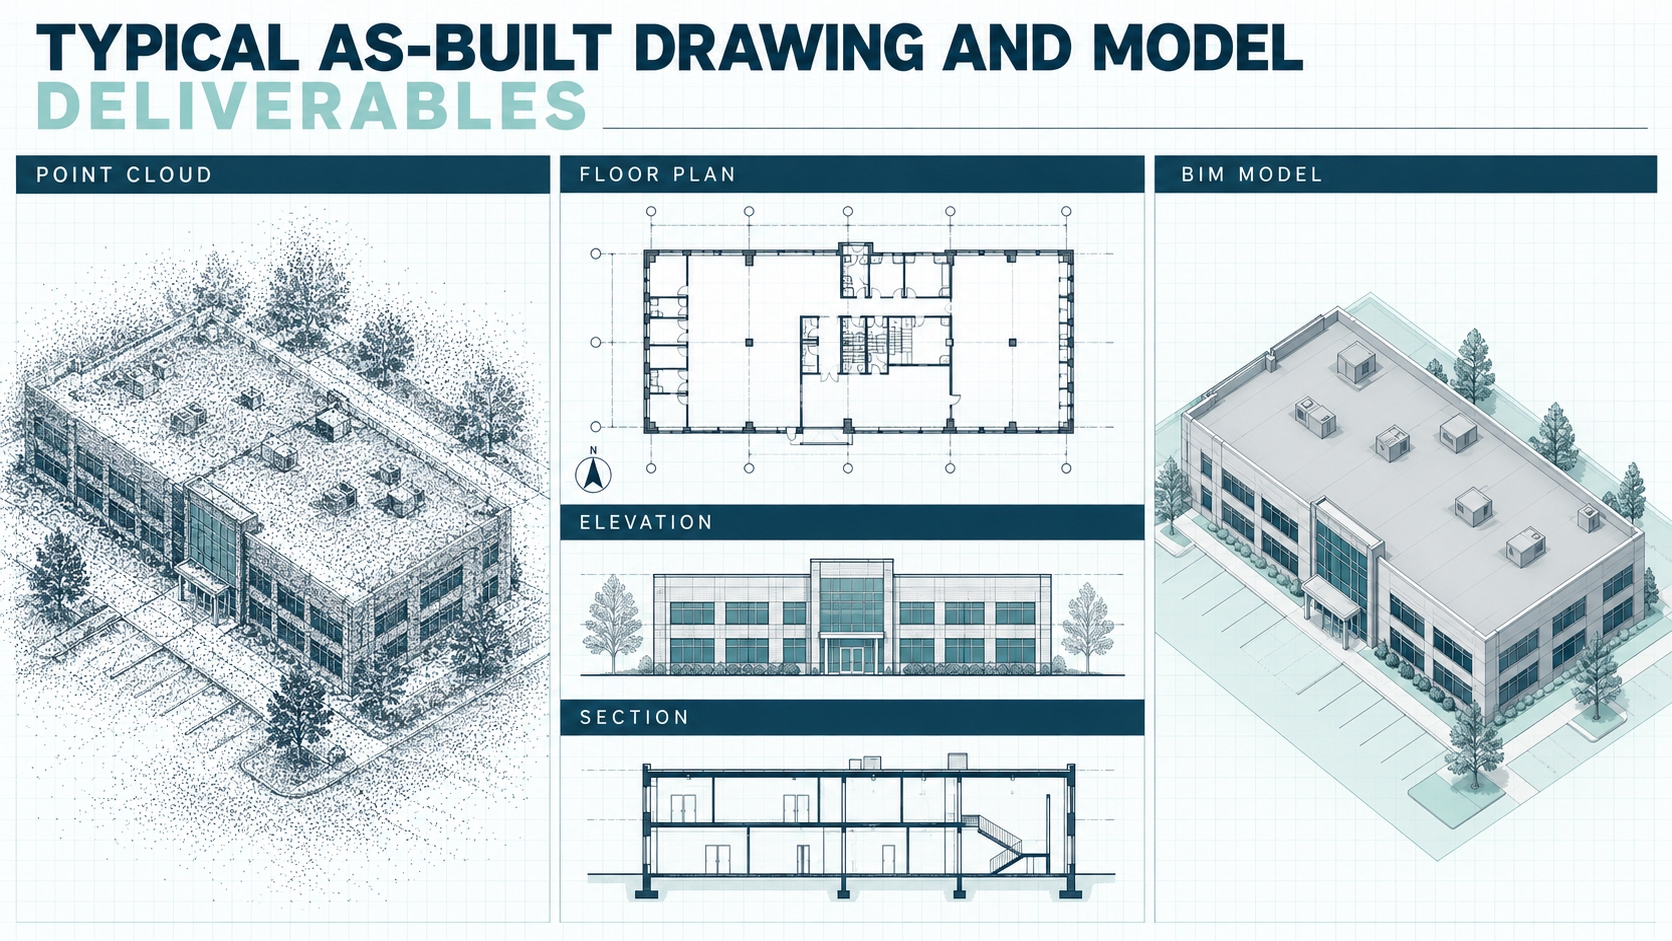
As-built drawings document the measured existing condition of a building rather than the original design intent. Depending on scope, the drawing set can include floor plans, elevations, building sections, reflected ceiling plans and site plans. The required information should be defined before field capture because a basic floor-plan survey and a detailed Scan-to-BIM assignment require different levels of documentation.
2D drawing deliverables
2D deliverables translate measured conditions into conventional architectural documentation. DWG and PDF are common outputs, with DXF sometimes used where broader CAD interoperability is required. Floor plans usually form the core of an as-built package, while elevations and sections are added when vertical geometry, façade conditions, ceiling relationships or multi-level coordination matter to the project.
Floor plans showing measured walls, openings, circulation and relevant fixed building elements.
Elevations documenting vertical existing conditions where façade or interior wall information is required.
Sections showing floor-to-floor relationships, ceiling conditions and vertical geometry.
Reflected ceiling plans where ceiling layouts and overhead conditions are part of the defined scope.
Site plans when exterior building relationships or surrounding measured features are required.
3D and BIM deliverables
3D deliverables can include a native Revit model, IFC export and the registered point cloud used as the geometric reference. Revit as-built model deliverables may represent architectural elements at an agreed level of development rather than attempting to model every visible feature. Published Scan-to-BIM service specifications commonly identify Revit files from LOD 200 through LOD 400, while MeasureBuilt project scopes may use Revit/BIM models within LOD 100–300 depending on the required purpose.
In brief: The file extension does not define the scope. A DWG may contain only a floor plan or a complete plan-section-elevation set, while an RVT file can range from a simplified existing-conditions model to a substantially more detailed BIM deliverable.
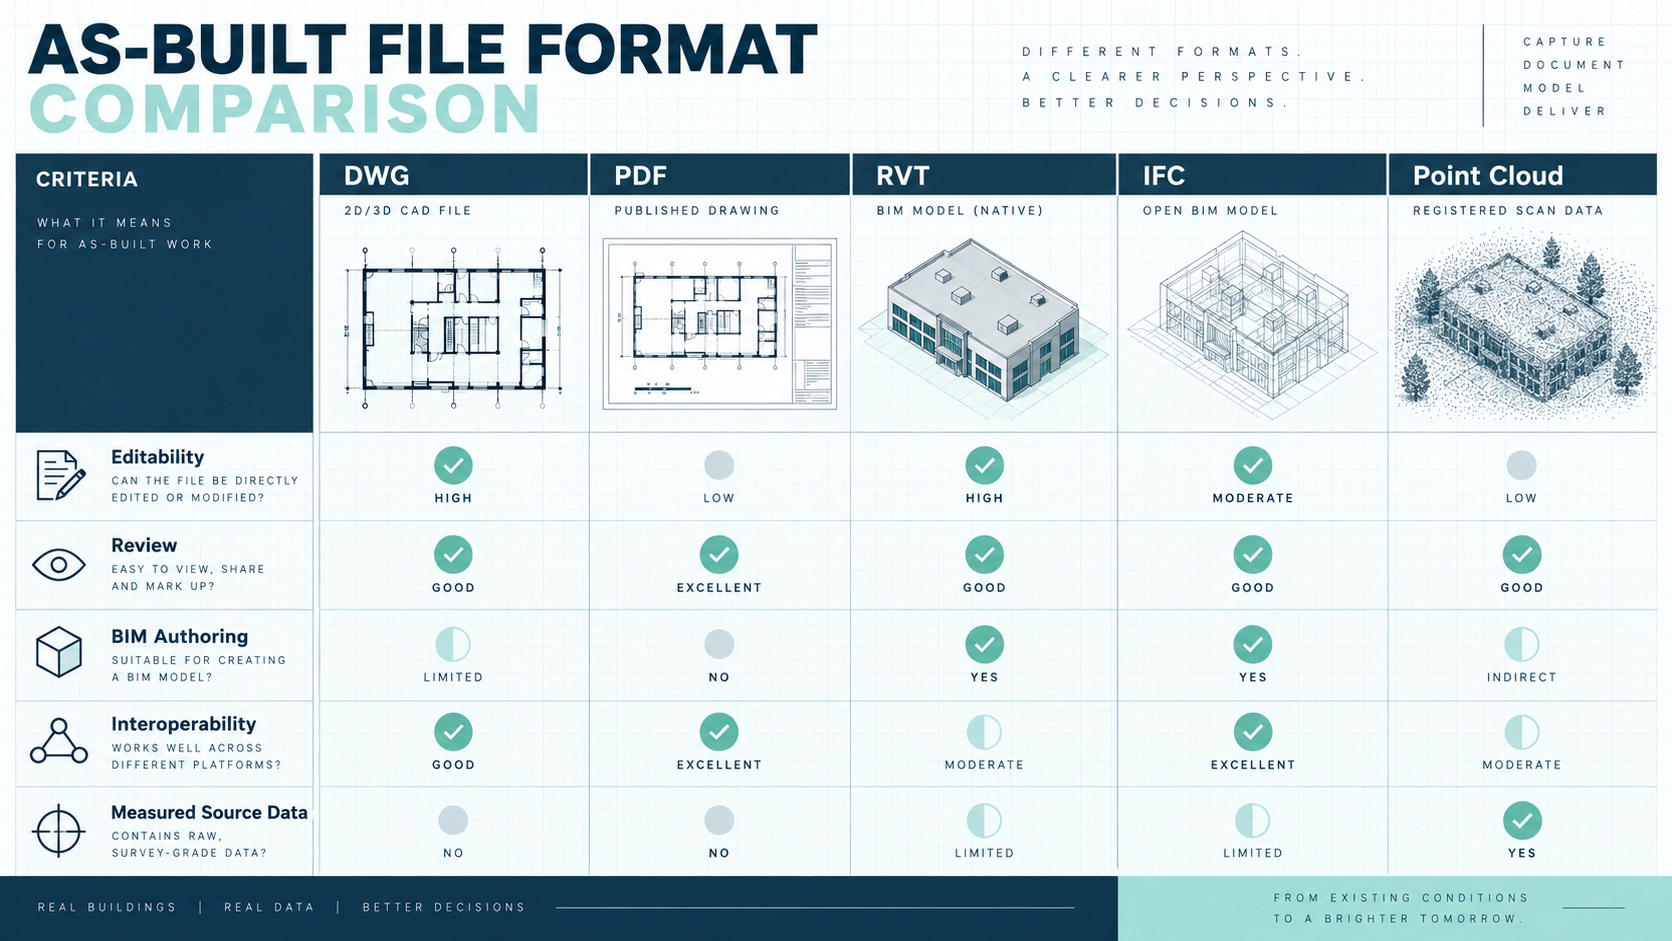
As-built file formats compared: DWG, PDF, RVT, IFC and point cloud
Each as-built file format solves a different downstream problem. DWG supports editable CAD production, PDF provides a stable human-readable sheet format, RVT provides a native Revit environment, IFC supports open BIM exchange, and point cloud formats preserve registered 3D scan data. Selecting more than one format is normal when several project teams need the same existing-condition survey.
Format
Typical content
Best suited to
Key consideration
DWG
Editable 2D plans, elevations, sections and other CAD geometry
Architects, designers, engineers, contractors
Best when the team needs to edit or reference geometry directly in CAD.
PDF
Published drawing sheets
Review, markup, permitting support, owners and field teams
Easy to distribute, but not intended as the primary editable design file.
RVT
Native Revit existing-conditions BIM model
Revit-based architectural and coordination workflows
Model scope and LOD should be defined before production.
IFC
Open BIM exchange model
Cross-platform BIM coordination and exchange
Useful for interoperability, but it does not replace the native authoring file when native editing is required.
E57
Registered point cloud and associated scan information
Cross-platform scan-data exchange and archive
Open interchange format widely used to move point cloud data between reality-capture workflows.
RCP/RCS
Autodesk-indexed point cloud project and scan data
Revit, ReCap, AutoCAD and Autodesk-centered workflows
Practical when the downstream team works primarily in the Autodesk ecosystem.
LAS/LAZ
LiDAR point cloud data
Civil, geospatial and survey-oriented workflows
Common where point clouds must move into geospatial or LiDAR-oriented software.
DWG vs PDF floor plans
The DWG vs PDF floor plans decision comes down to editability. A DWG gives the design team CAD geometry that can be referenced, modified and incorporated into project drawings. A PDF gives the same information in a published sheet format that is simpler to review and issue. Many projects benefit from receiving both: DWG for production and PDF for communication, checking and record keeping.
RVT vs IFC
A native RVT file is generally more useful than IFC when the project team will continue working in Revit. Professional Scan-to-BIM guidance recommends native editable BIM deliverables alongside IFC when interoperability is required. IFC is valuable as an open exchange format, but a native model preserves the authoring environment that Revit teams expect for editing, documentation and coordination.
Point cloud file formats: E57, RCP/RCS, LAS and other scan data
Point cloud file formats preserve the spatial data produced by 3D laser scanning or LiDAR workflows. A registered point cloud can remain the geometric reference for later design checks, Scan-to-BIM production or questions that arise after the original survey. Delivering the point cloud is especially valuable when the client wants access to measured source data in addition to interpreted drawings or models.
E57 for neutral exchange
E57 is widely used as an open point cloud exchange format and is supported by Autodesk ReCap for compliant files. It can carry 3D scan information and metadata, making it useful when data must move between software environments or remain available as a relatively software-neutral project archive. Multiple professional Scan-to-BIM sources recommend E57 as a practical interchange or master-delivery format.
RCP and RCS for Autodesk workflows
RCP and RCS are Autodesk point cloud formats commonly used with ReCap, Revit, AutoCAD and Navisworks workflows. RCS represents indexed scan data, while RCP acts as a project file that can organize point cloud resources. For Revit-centered teams, receiving an Autodesk-ready point cloud can reduce conversion work and make the survey data easier to link into the project environment.
LAS and LAZ for LiDAR and geospatial use
LAS is commonly associated with LiDAR and geospatial data exchange, while LAZ provides a compressed form used in similar workflows. These formats are often a better fit for civil, surveying or geospatial applications than for a purely architectural Revit workflow. Format selection should therefore follow the software and discipline that will actually consume the data.
In brief: If the project team is uncertain which point cloud format to request, confirm the downstream software first. E57 is a strong neutral exchange option, RCP/RCS suits Autodesk workflows, and LAS/LAZ is often preferred for geospatial or civil applications.
Which deliverables fit different project types?
The right deliverable package changes with project intent. A residential renovation may only need accurate floor plans and selected elevations, while a complex commercial or industrial project may benefit from a point cloud plus Revit model and CAD drawing exports. Defining who will use the files is the fastest way to avoid paying for unnecessary modeling or receiving documents that cannot support the next project phase.
Residential renovations
Residential renovation teams commonly need editable floor plans, selected elevations and sections. DWG plus PDF is often sufficient when the architect or designer will develop the renovation in 2D CAD. A Revit model becomes more useful when the design workflow is BIM-based or when complex vertical relationships make 3D coordination valuable.
Commercial tenant improvements
Commercial tenant improvement projects often benefit from floor plans, reflected ceiling plans, relevant sections and editable CAD or Revit files. Property managers and leasing teams may also require area calculations, where BOMA methodology is relevant when commercial square footage verification is specifically part of the assignment. BOMA calculations should be treated as a defined measurement service rather than assumed to be included in every as-built survey.
Heritage and geometrically irregular buildings
Buildings with irregular walls, complex façades or non-orthogonal geometry benefit from retaining point cloud data alongside drawings or BIM. The point cloud gives architects a direct spatial reference when simplified linework or model elements cannot communicate every existing deviation. The modeling scope should still identify which irregularities need to be represented and which can remain available only in the scan data.
Multi-unit and strata properties
Multi-unit and strata projects may require repeated floor plans, common-area documentation, elevations, sections and coordinated files across several levels. A structured DWG or Revit package can simplify downstream renovation, planning and property documentation, while a point cloud preserves measured source data for areas that may need to be revisited digitally.
Industrial and coordination-heavy projects
Industrial or coordination-heavy projects are strong candidates for point cloud plus BIM deliverables because multiple disciplines may need to reference complex existing geometry. Depending on scope, teams may request RVT, IFC, DWG and point cloud files, with Navisworks-compatible exports used where coordination or clash-review workflows require them.
Permitting and design documentation
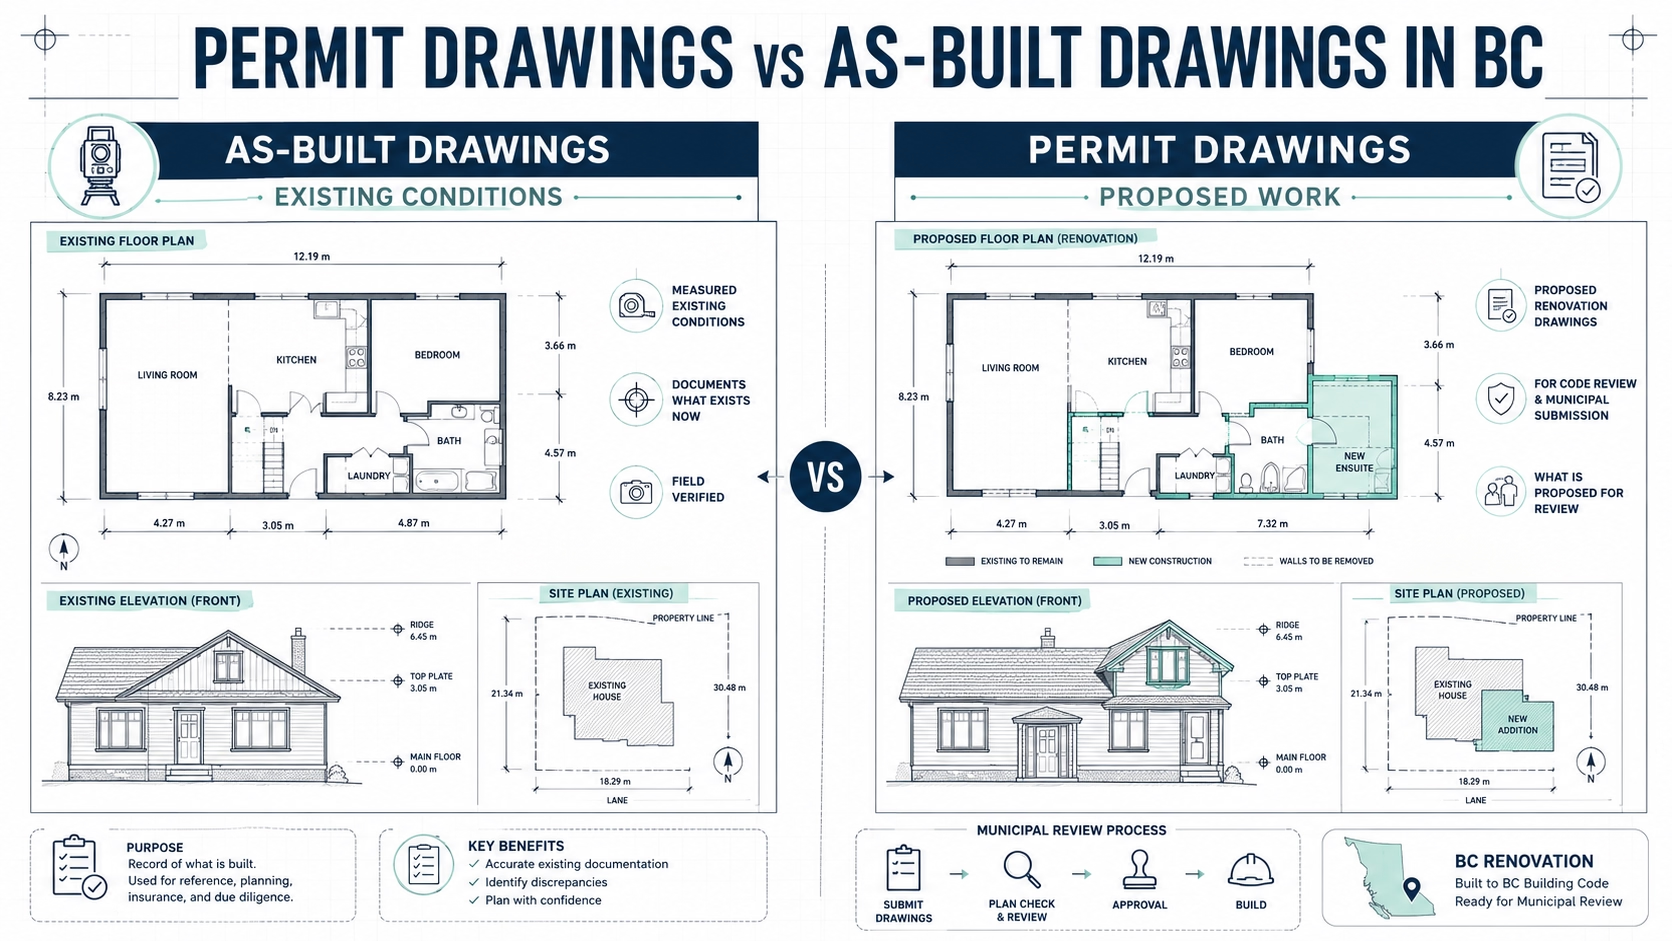
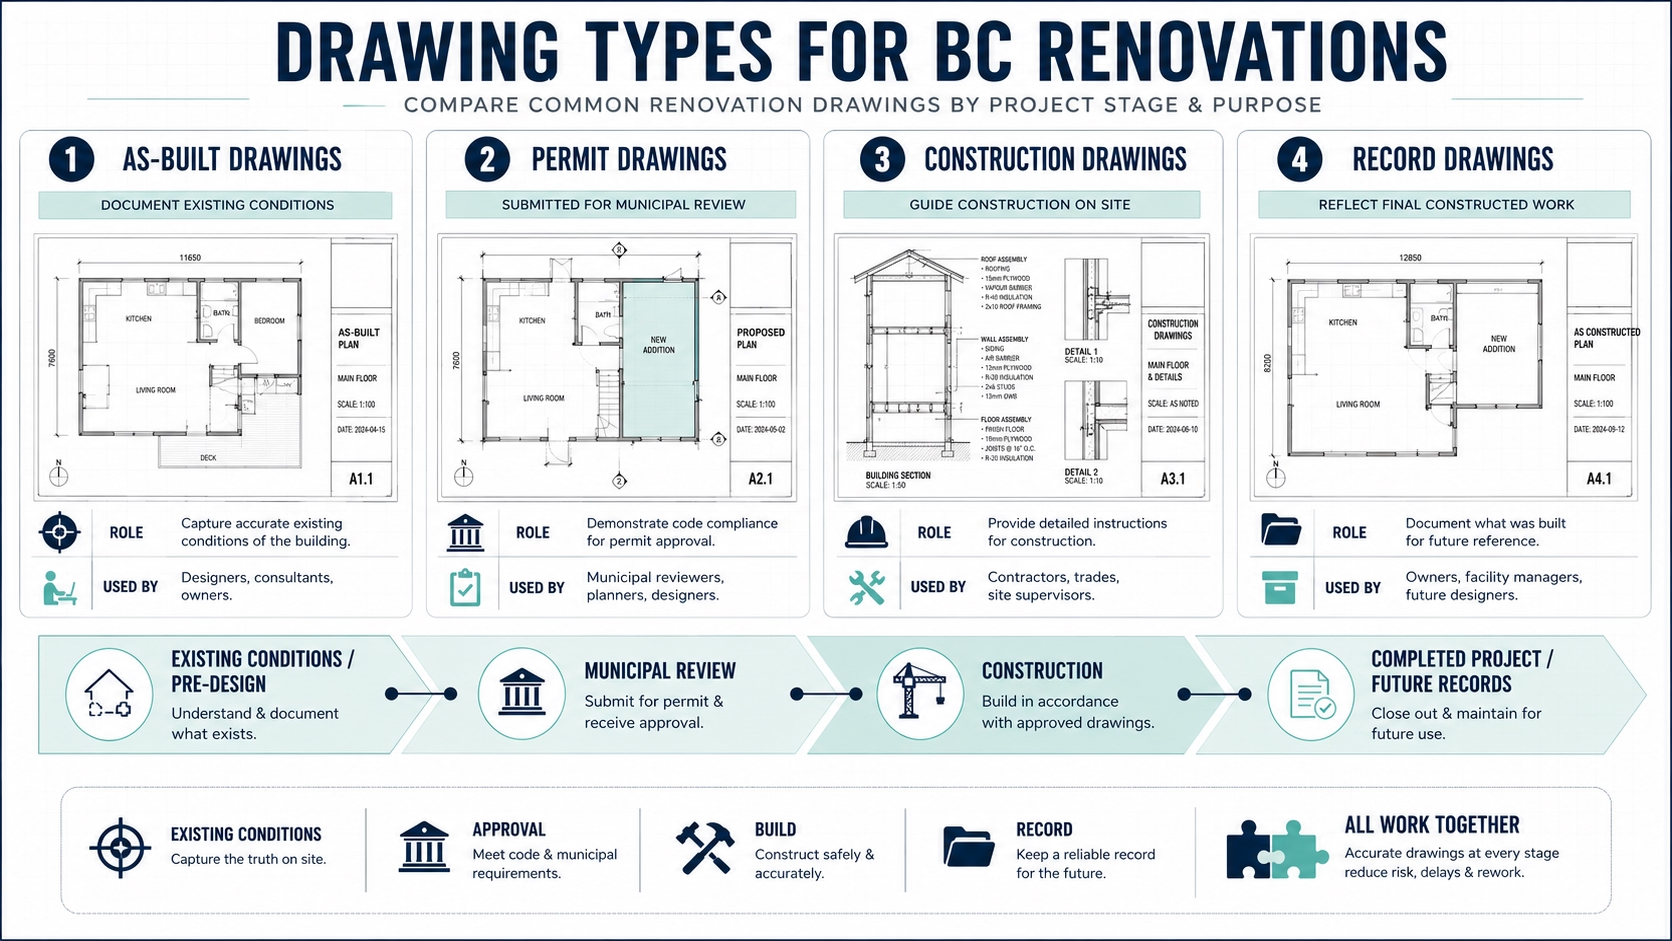
Permitting teams usually need clear existing-condition drawings rather than raw point cloud data. PDF sheets support review and issue workflows, while DWG or RVT files give the architect an editable base for preparing the permit set. The as-built survey should document existing conditions; the permit submission itself remains a separate design and regulatory process.
How to specify accuracy, model scope and file compatibility
A usable as-built scope defines more than the requested extensions. The survey provider and project team should agree on what must be measured, which building elements must appear in drawings or BIM, what coordinate basis is required, which software versions will consume the files and whether registered point cloud data must be included. These decisions affect both field capture and post-processing.
Define the required level of representation
Revit deliverables should state the required model scope and LOD rather than simply requesting a BIM model. MeasureBuilt workflows can support Revit/BIM models within LOD 100–300 depending on project needs. A schematic massing-level existing-condition model serves a different purpose from a model that must support detailed architectural documentation, so the required level should match the decisions the team intends to make from it.
Separate measurement accuracy from model interpretation
Measurement accuracy and model detail are related but not identical. A precise point cloud can contain more geometric information than the resulting CAD or BIM file because drawings and models intentionally simplify or classify the measured data. Where relevant to the project, MeasureBuilt may work to typical survey accuracy around ±5 mm, but the applicable requirement should be confirmed for the specific scope rather than treated as a universal guarantee.
Confirm coordinate and software requirements
Coordinate handling and software compatibility should be agreed before delivery. Scan-to-BIM specifications frequently include native BIM files, IFC exports, registered point clouds and coordinate transformation information where project coordinates matter. For simpler interior projects, a local project coordinate system may be sufficient; larger multi-discipline workflows may require a more explicitly coordinated basis.
In brief: A technically complete scope answers four questions: what must be measured, how it must be represented, which software will use the data, and whether the registered point cloud must remain part of the handoff.
Provider-selection checklist for as-built deliverables
A strong as-built provider should be able to define the relationship between field capture, point cloud processing and final drawings or models. The goal is not to receive the largest possible list of file formats. The goal is to receive files that the project team can open, trust as existing-condition documentation and use without unnecessary conversion or remodeling.
Technology: Confirm whether the provider uses appropriate as-built measurements, 3D laser scanning or LiDAR capture for the geometry and complexity of the project.
Deliverables: Specify floor plans, elevations, sections, reflected ceiling plans, site plans, Revit/BIM models and point cloud data individually rather than asking only for as-builts.
File formats: Confirm DWG, PDF, RVT, IFC, E57, RCP/RCS or other required formats before production begins.
Model scope: Define which architectural elements must be modeled and the required LOD for the intended Revit or BIM workflow.
Point cloud handoff: Decide whether registered scan data should be delivered as part of the project archive or design reference.
Compatibility: Confirm software versions and whether the downstream team works primarily in Autodesk, open BIM, CAD or geospatial tools.
Coordinates: State whether local project coordinates are acceptable or whether the deliverables must align with an established coordinate system.
Area calculations: If commercial leasing or square footage verification is required, specify whether BOMA-compliant area calculations are part of the scope.
The MeasureBuilt approach
MeasureBuilt structures existing-conditions work as a connected workflow: field measurement and 3D laser scanning → registered point cloud → required drawings or BIM model → project-ready delivery in agreed formats such as DWG, PDF and RVT. For projects across Greater Vancouver and the Lower Mainland, the scope is matched to the intended architectural, construction, development or property-management workflow rather than forcing every project into the same deliverable package.
The right as-built deliverables are the files your project team can use immediately and continue using throughout the next phase. DWG and PDF are efficient for conventional drawing workflows, RVT supports Revit-based design and coordination, IFC supports open BIM exchange, and registered point clouds preserve the measured 3D reference behind the documentation. Define the drawing scope, model scope, point cloud requirement, software compatibility and coordinate needs before the survey begins. Request a quote at measurebuilt.com/request-a-quote to get a fixed price and timeline for your as-built survey.
FAQ
What files should I request from an as-built survey?
Request the files that match your next project workflow. DWG and PDF are appropriate for most 2D architectural documentation, RVT is useful for Revit-based design, and a registered point cloud is valuable when the measured 3D source data must remain available. Complex projects often benefit from a combined package rather than a single file type.
Is DWG better than PDF for as-built floor plans?
DWG is better when the floor plan must remain editable, while PDF is better for review and distribution. Architects and designers typically use DWG as a production base because CAD geometry can be referenced or modified. PDF is useful for markup, printing, permitting support and sharing with stakeholders who do not need CAD access.
Should a Scan-to-BIM project include the point cloud?
Yes, retaining the registered point cloud is often useful when future validation or remodeling may be required. The Revit model interprets selected building elements, while the point cloud preserves the captured spatial reference. Professional Scan-to-BIM guidance commonly recommends delivering the original registered point cloud alongside the native BIM model when the client needs a durable existing-conditions record.
Which point cloud format is best for Revit?
RCP/RCS is a practical choice for Autodesk-centered Revit workflows. These indexed Autodesk formats are designed for use with ReCap and can be linked into Revit projects. E57 is often preferred as a neutral exchange or archive format, so some project teams request both E57 for portability and RCP/RCS for day-to-day Autodesk use.
What is the difference between a Revit RVT file and IFC?
RVT is the native Revit model, while IFC is an open BIM exchange format. Revit teams generally benefit from receiving the native RVT file because it preserves the authoring environment for continued editing and documentation. IFC is useful when the model must move between different BIM platforms or be exchanged through an open-format workflow.
Does an as-built Revit model include every visible building element?
No. An as-built Revit model should include the elements defined by the project scope and required LOD. Modeling every visible condition is rarely necessary. The point cloud can preserve additional measured geometry that does not need to become a modeled object, while the RVT file organizes the specific walls, floors, openings and other elements needed downstream.
Can as-built deliverables include BOMA area calculations?
Yes, when commercial area measurement or leasing square footage verification is specifically included in the scope. BOMA methodology applies to area calculations rather than automatically to every as-built drawing package. Property managers, landlords and commercial leasing teams should identify the required BOMA measurement basis before field work and documentation begin.
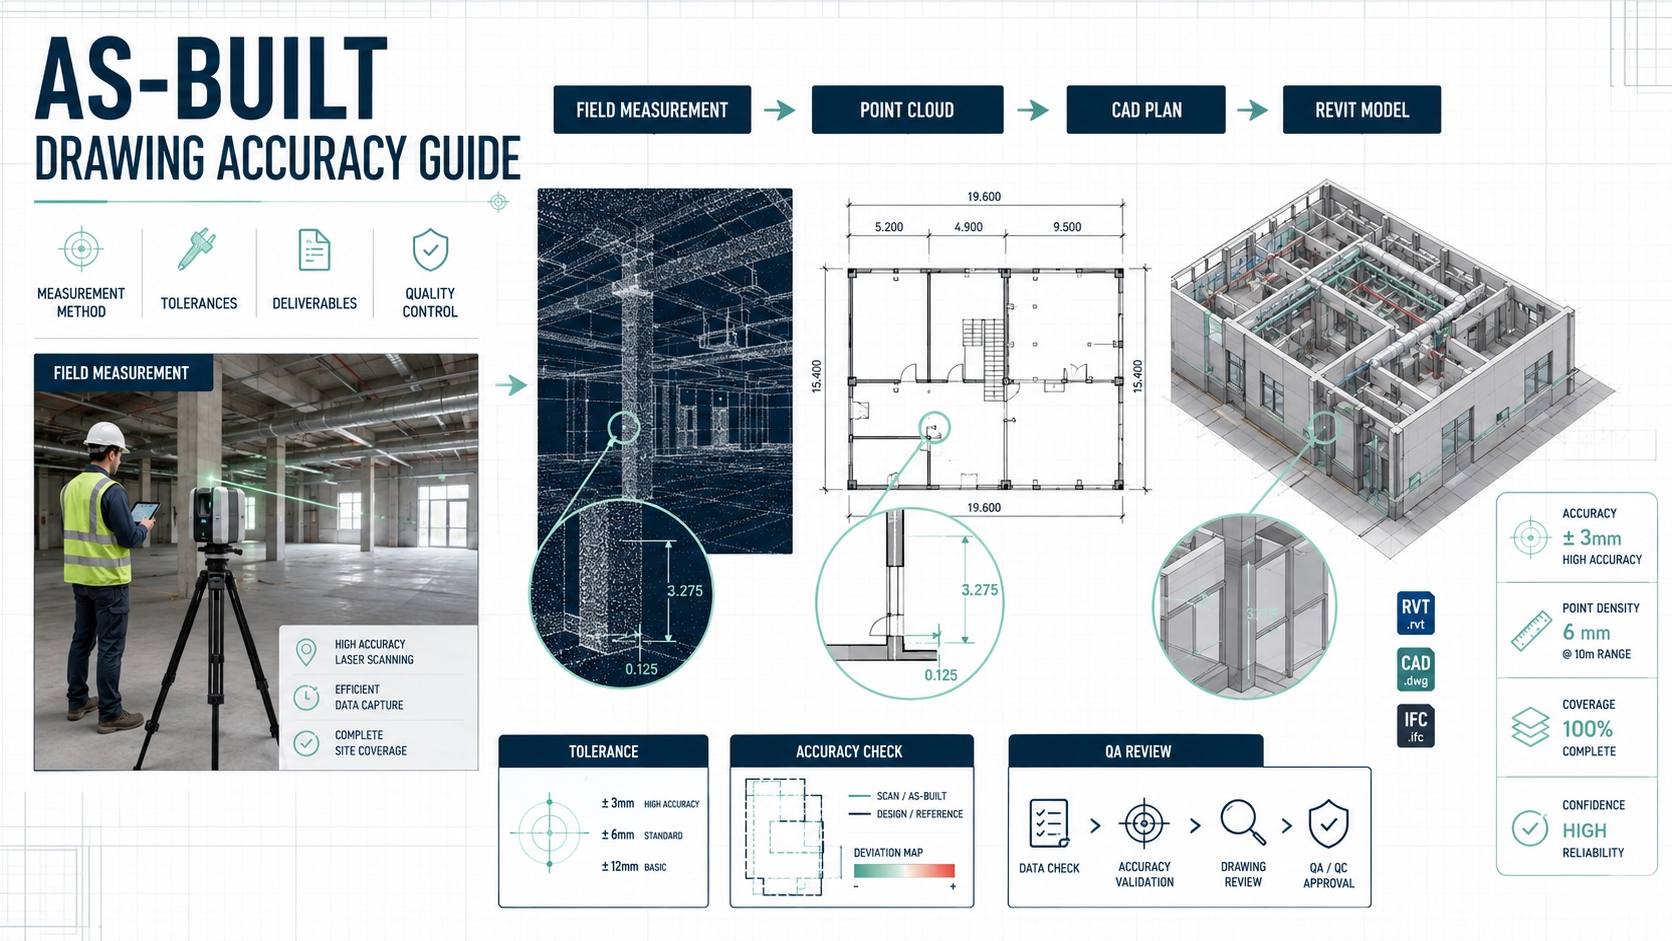
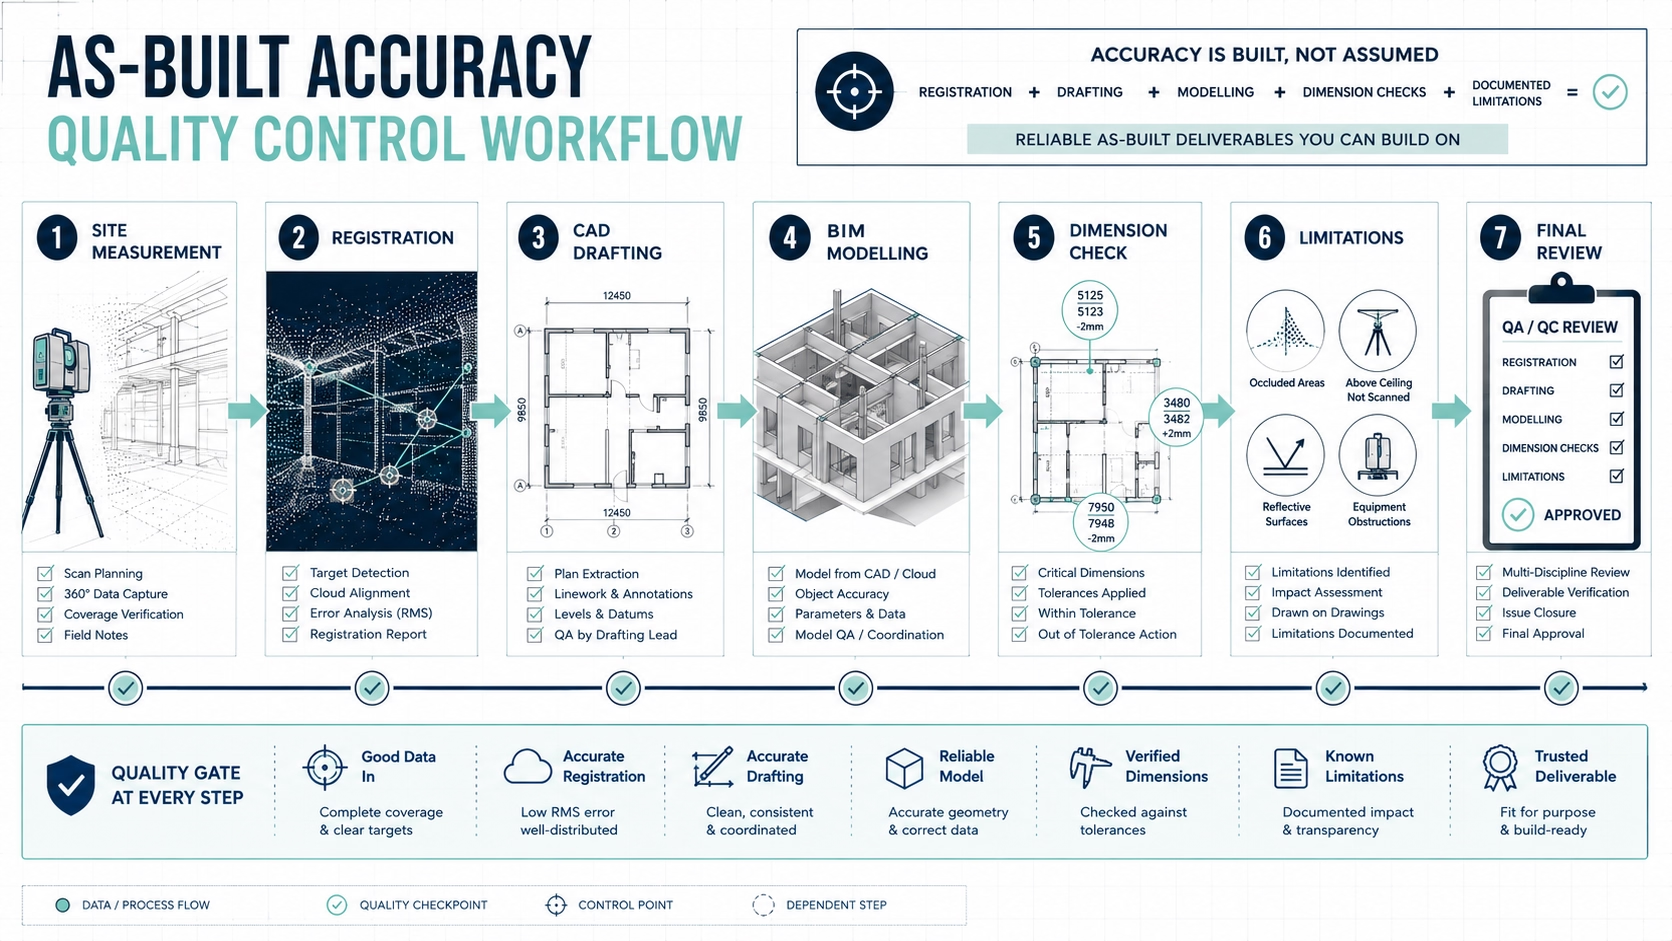
As-built drawing accuracy defines how closely as-built documentation matches the real building conditions measured on site. For architects, engineers, and contractors, accuracy should be discussed through measurement tolerances, Level of Accuracy standards, scan method, deliverable scope, and quality control. Accurate floor plans for renovation reduce design assumptions, support contractor coordination, and help prevent change orders caused by incorrect existing-condition information.
Executive Summary
As-built drawing accuracy matters because renovation, retrofit, construction coordination, and permit-related workflows depend on reliable existing-condition information. A drawing can look professional but still be wrong if it is based on outdated plans, rough field notes, incomplete site access, or unclear tolerances. Architects, engineers, and contractors should not ask only for “as-built drawings”; they should ask what accuracy is required, how it will be measured, what tolerance applies, which deliverables are included, and how the final files will be checked. Level of Accuracy standards, including USIBD LOA specifications, help project teams define how closely the documentation should represent real-world conditions. Manual measurement may be enough for simple low-risk spaces, while 3D laser scanning can provide a stronger measured base for complex buildings, tight coordination, CAD drafting, Revit modelling, and scan-to-BIM workflows. The practical takeaway is simple: accuracy should be specified before measurement begins, verified before delivery, and matched to the project risk.
As-Built Drawing Accuracy: Tolerances, LOA Standards, and Why They Matter
What As-Built Drawing Accuracy Means
As-built drawing accuracy is the degree to which drawings, CAD files, models, or floor plans represent the actual building as measured on site. It applies to wall locations, openings, levels, stairs, columns, visible structural elements, ceilings, exterior conditions, and other documented features within the agreed scope. For architects, engineers, and contractors, accuracy is not only about neat drafting. It is about whether the documentation can be trusted for design, coordination, pricing, and construction decisions.
As-built drawing accuracy depends on several factors. The measurement method matters. The building complexity matters. Site access matters. The deliverable format matters. A basic PDF floor plan, a renovation-grade CAD package, and a scan-to-BIM model do not need the same tolerance or level of detail. A project team should define accuracy expectations before the site visit so the measurement provider captures the right information from the start.
Accurate floor plans for renovation are especially important because renovation work starts from existing conditions, not from ideal design geometry. Older buildings may have walls that are not straight, floors that are not level, undocumented changes, tenant improvements, hidden constraints, or previous construction that does not match old drawings. If the as-built base is wrong, the proposed design may inherit the same errors. The practical rule is to verify existing conditions before building design decisions on top of them.
Why Accuracy Matters for Architects, Engineers, and Contractors
Architects need accurate as-built drawings because design decisions often depend on existing dimensions, openings, levels, ceiling heights, exterior relationships, and structural constraints. If the floor plan is wrong, the proposed layout may conflict with the real building. This can lead to redesign, additional site visits, consultant questions, or permit drawing revisions. Accurate documentation helps architects start from a more reliable base.
Engineers need accurate as-built information because structural, mechanical, electrical, and plumbing decisions often depend on real-world clearances and existing conditions. A beam location, slab edge, ceiling height, column position, shaft, or visible service route can change the feasibility of proposed work. Engineering assumptions based on outdated drawings can create coordination problems later. Better existing-condition documentation helps reduce those assumptions.
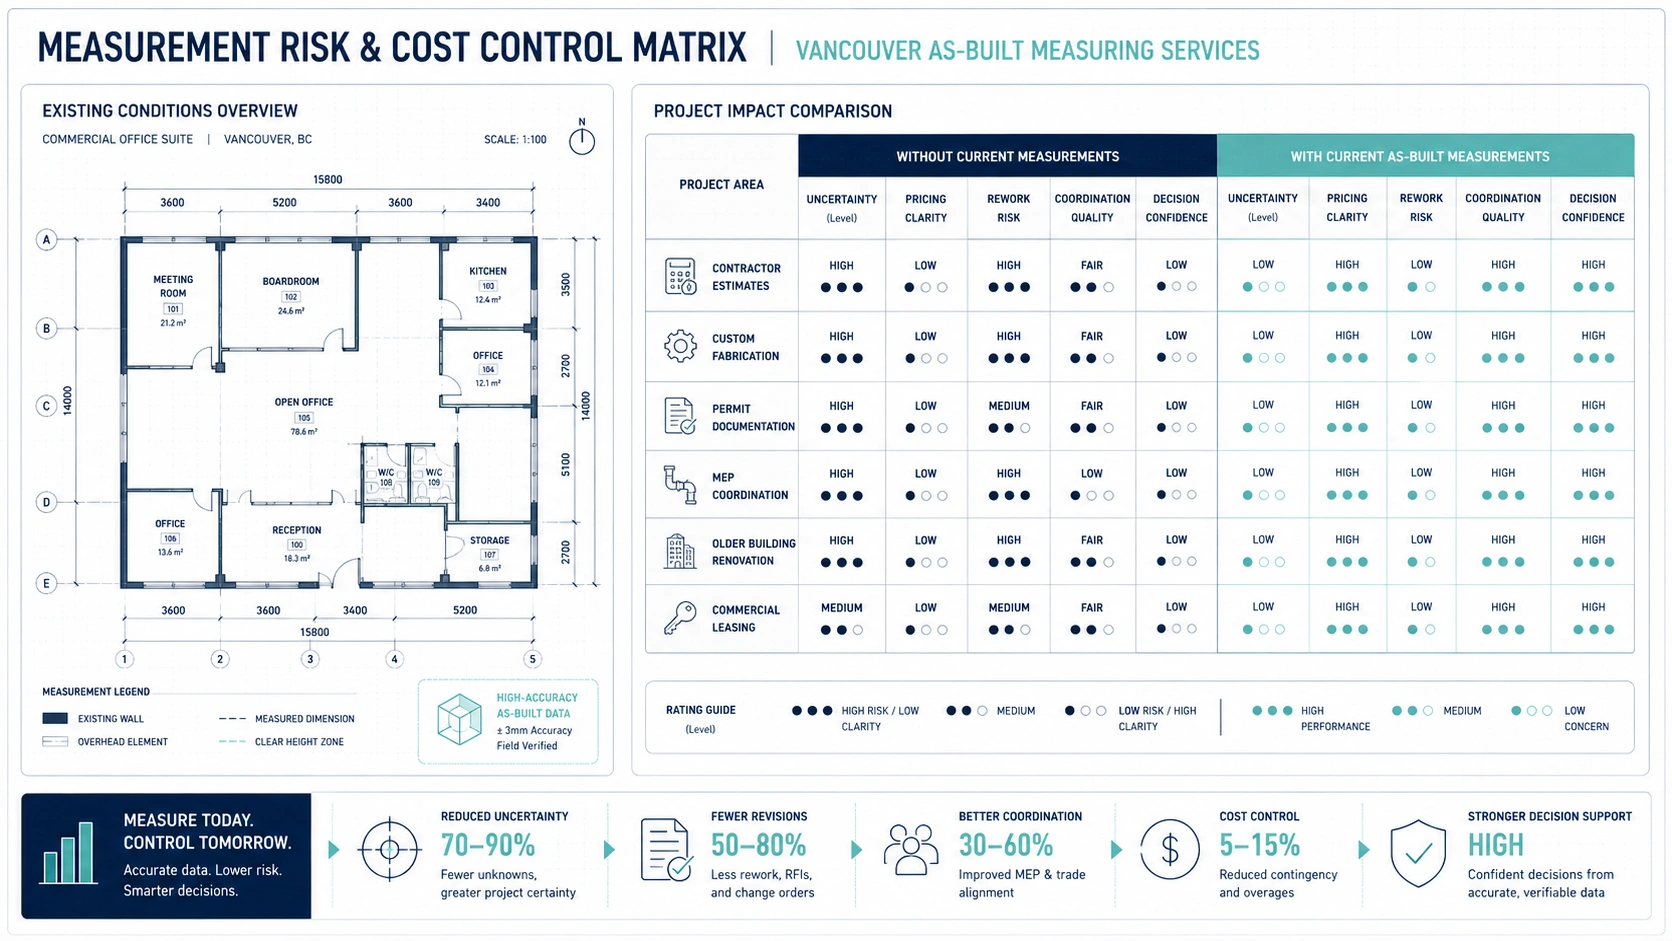
Contractors need accurate drawings because estimates, sequencing, material quantities, demolition scope, and installation planning depend on the drawings they receive. If the documentation is incomplete or inaccurate, contractors may add contingencies, exclude uncertain work, or issue change orders when field conditions differ. Accurate as-built drawings do not eliminate every construction unknown, but they can reduce avoidable measurement-related surprises.
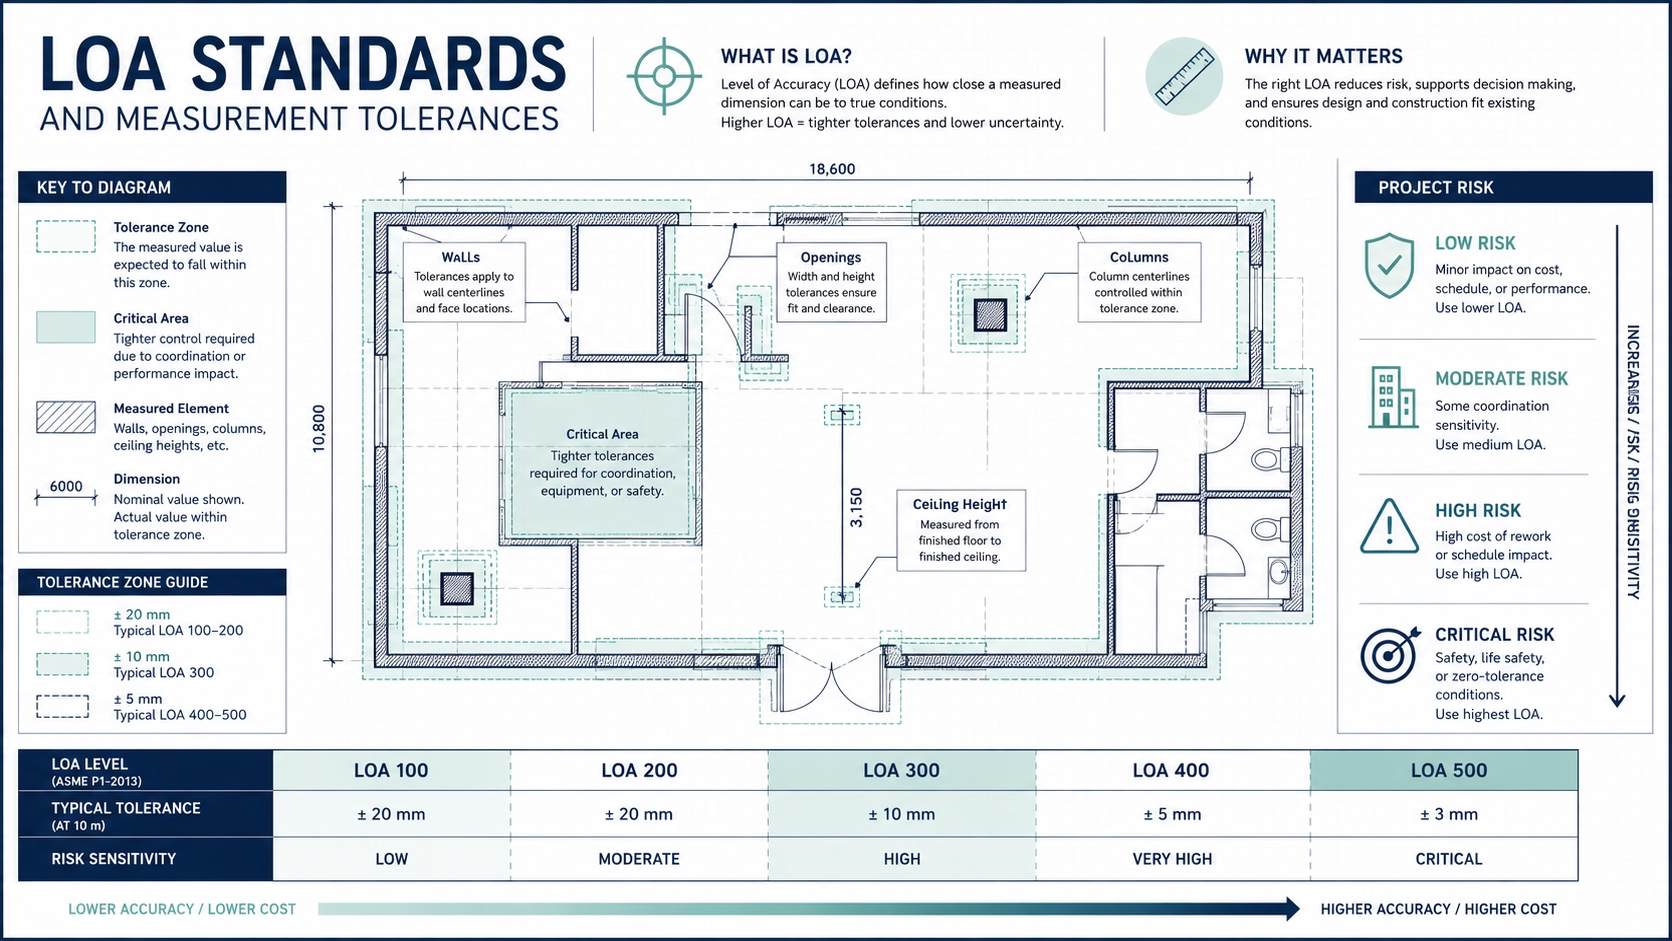
What LOA Means in Building Documentation
LOA stands for Level of Accuracy. In building documentation, LOA helps define how closely a drawing, model, or documented element should match the measured real-world condition. Instead of saying “make it accurate,” the project team can define what accuracy is required and where it matters most. This creates clearer expectations between the owner, architect, engineer, contractor, and measurement provider.
The USIBD LOA specification is commonly used in the building documentation industry to help standardize accuracy expectations. The main idea is simple: different project elements may need different accuracy levels. A wall used for early planning may not need the same tolerance as a steel connection, a prefabricated component, a tight MEP coordination zone, or a critical clearance. LOA helps avoid vague language and makes accuracy easier to discuss.
LOA should not be treated as a marketing label. A provider should be able to explain how they will achieve the required accuracy, what measurement method they will use, how the deliverable will be verified, and what areas or elements are outside scope. The practical takeaway is that LOA is useful only when it is tied to project purpose, deliverables, tolerances, and quality control.
LOA and USIBD Standards in Plain Language
USIBD Level of Accuracy standards give project teams a framework for specifying accuracy in building documentation. In plain language, the standard helps answer three questions: how accurate does this documentation need to be, how will that accuracy be described, and how will stakeholders know whether the deliverable meets the requirement. This is useful because “accurate” can mean different things to different teams.
LOA is especially helpful in scan-to-BIM and scan-to-CAD projects. A laser scan may capture detailed spatial data, but the final deliverable still depends on how that data is processed, drafted, or modelled. A Revit model, for example, is an interpreted representation of the point cloud. If the model scope is not defined, one team may expect detailed irregular geometry while another delivers simplified design-ready elements. LOA helps clarify that expectation.
LOA should be applied selectively. Not every element in a building needs the highest accuracy. A general planning model may need a lower accuracy level than a detailed coordination model. A corridor wall may not need the same tolerance as a stair, shaft, façade detail, or custom millwork area. The best practice is to define accuracy requirements for the elements that carry project risk.
Measurement Tolerances in As-Built Surveys
Measurement tolerances in as-built surveys define the acceptable difference between the documented condition and the measured site condition. A tolerance might apply to wall locations, openings, column positions, ceiling heights, floor levels, equipment locations, or modelled elements. Tolerance should be defined based on what the drawing or model will be used for. The more risk attached to a dimension, the more carefully tolerance should be specified.
A simple planning floor plan may allow broader tolerance because it supports early layout decisions. A renovation-grade CAD file usually needs tighter tolerance because it may support design and contractor pricing. A scan-to-BIM model used for coordination may require more specific accuracy by element type. A prefabrication or detailed coordination workflow may require even tighter control. The practical rule is to match tolerance to the consequence of being wrong.
Tolerance should also be realistic. Existing buildings are not perfect. Walls may be out of plumb, floors may slope, ceilings may vary, and older structures may not follow ideal geometry. The documentation team must decide whether to represent these irregularities exactly, simplify them for design use, or note them where they matter. Architects and engineers should discuss this before drafting or modelling begins.
Laser Scanning Accuracy for Buildings vs Manual Measurement
Laser scanning accuracy for buildings is usually stronger than manual measurement when the project involves complex geometry, many rooms, multiple levels, high ceilings, exposed structure, irregular conditions, or dense visible systems. A scanner captures a large amount of visible spatial data that can be registered into a point cloud. This point cloud can then support CAD drawings, Revit models, sections, elevations, and quality checks. The benefit is not only precision, but coverage.
Manual measurement can still be appropriate for simple, low-risk spaces. A small room, basic office, or early planning exercise may not require 3D laser scanning. Manual tools can produce useful drawings when the geometry is simple and the cost of small errors is low. The risk appears when manual measurements are used for complex renovation, contractor pricing, or coordination work where missed dimensions can create downstream cost.
The key difference is that manual measurement is selective, while laser scanning is more comprehensive for visible conditions. Manual measurement records chosen dimensions. Laser scanning records a broader measured environment. However, scanning still has limitations: it captures visible surfaces by line of sight and does not see through walls, ceilings, floors, or concealed assemblies. The practical takeaway is to choose the method based on project risk and required deliverables.
Typical Accuracy Expectations by Method and Use Case
Accuracy expectations should be defined by project use, not by a generic promise. The table below gives practical planning categories. These are not universal guarantees; they are examples of how project teams can think about tolerance, risk, and documentation method.
Use case
Common documentation method
Accuracy expectation
Practical note
Real estate or early planning
Basic measurement or simple floor plan
General layout accuracy
Good for communication, not technical coordination
Simple renovation planning
Manual measurement or measured CAD floor plan
Moderate tolerance may be acceptable
Suitable when geometry is simple and risk is low
Renovation-grade as-built CAD
Manual measurement with QA or scan-to-CAD
Tighter tolerance should be defined
Useful for architects, designers, and contractors
Complex existing building
3D laser scanning and CAD deliverables
Higher confidence in visible conditions
Useful when old drawings are unreliable
MEP coordination
3D laser scanning and scan-to-BIM
Element-specific tolerance should be defined
Important for visible services and tight clearances
Structural coordination
Scanning, survey control, CAD/BIM review
Critical elements need clear tolerance
Engineer input may be required
Prefabrication support
High-control scanning and model verification
Tight tolerance and QA required
Must be scoped carefully before capture
Facility records
Point cloud, CAD, BIM, or hybrid package
Depends on future use
Documentation should include limitations
The most important point is that “accurate” should not be treated as a single number for the entire building. A project may need high accuracy in one zone and moderate accuracy elsewhere. For example, a millwork wall, stair opening, mechanical room, or façade may need tighter tolerance than a general storage area. A good provider should help define these differences.
Why Scanner Accuracy Is Not the Same as Drawing Accuracy
Scanner accuracy and drawing accuracy are related, but they are not the same. A scanner may capture high-quality spatial data, but the final drawing or model still depends on registration, interpretation, drafting, modelling, and quality control. A point cloud can be highly detailed, while a floor plan created from it may still be simplified depending on scope. The deliverable accuracy is what matters to the project team.
Point cloud registration is one important step. Multiple scan positions must be aligned into a coordinated dataset. If registration is poor, the resulting drawings or models may inherit alignment issues. A provider should be able to explain how registration is checked and whether scan coverage is sufficient for the required deliverables. This is especially important for large or multi-level buildings.
Drafting and modelling decisions also affect accuracy. A drafter may trace walls from a point cloud into CAD. A BIM technician may model walls, columns, floors, and openings in Revit. Existing buildings often contain irregular geometry, so the team must decide how much to simplify and how much to represent exactly. The practical takeaway is to ask about deliverable verification, not only scanner specifications.
How Inaccurate As-Builts Create Change Orders and Rework
Inaccurate as-built drawings can create change orders when the proposed design does not fit the actual building. A wall may be in a different location than shown. A ceiling height may be lower than assumed. A stair opening may not align with the drawing. A column, beam, shaft, or visible service route may conflict with the proposed work. When these issues appear during construction, they can trigger redesign, delay, or additional cost.
Inaccurate as-builts can also affect contractor estimates. Contractors price work based on drawings, site visits, assumptions, and risk. If the drawings are unreliable, contractors may add contingencies or exclude uncertain work. If they rely on incorrect drawings, the project may face scope disputes later. Accurate floor plans for renovation help contractors understand the existing conditions more clearly before bidding.
Rework is especially expensive when materials are fabricated or ordered from incorrect dimensions. Custom millwork, glazing, steel, stairs, mechanical components, and prefabricated items can all be sensitive to measurement accuracy. If the as-built documentation is wrong, the project may need field modifications or replacement materials. The practical rule is to use stronger accuracy controls when fabrication or tight fit matters.
How Accuracy Supports Permit and Consultant Coordination
Accurate as-built drawings can support permit and consultant coordination by giving the design team a more reliable existing-condition base. Renovation projects often need to distinguish what exists from what is proposed. If the existing-condition drawings are inaccurate, the proposed drawing set may contain conflicts or inconsistencies. This can slow review, pricing, and coordination.
Accuracy does not guarantee permit approval. Permit approval depends on proposed design, zoning, building code requirements, municipality, consultant responsibility, and project-specific conditions. However, accurate existing-condition documentation can help architects, designers, engineers, and consultants prepare clearer drawings. The practical takeaway is that accuracy supports the process; it does not replace professional review.
Consultant coordination benefits when everyone works from the same measured base. Structural engineers, mechanical consultants, interior designers, contractors, and owners may all need to understand the same existing building. A shared CAD file, point cloud, or Revit model can reduce inconsistent assumptions. Accuracy matters because a shared base is only useful if it is reliable.
Accuracy Requirements for CAD vs BIM Deliverables
CAD deliverables and BIM deliverables should have different accuracy discussions. A CAD floor plan may focus on wall locations, openings, dimensions, elevations, and sections. A BIM model may focus on modelled element placement, levels, categories, object geometry, and coordination relationships. The project team should specify what needs to be accurate in the final format.
For CAD, accuracy questions often include: Are walls traced from field measurements or point cloud data? Are dimensions rounded or exact? Are wall thicknesses included? Are elevations and sections included? Are sloped or irregular conditions represented? Are inaccessible areas noted? These questions help define whether the CAD file is suitable for design or only for early planning.
For BIM, accuracy questions often include: What elements will be modelled? What level of accuracy applies to each element? Will irregular geometry be simplified or represented? Are visible MEP systems included? What Revit version is used? Will the model be checked against the point cloud? The practical recommendation is to define BIM accuracy by element and use case, not just by saying “Revit model.”
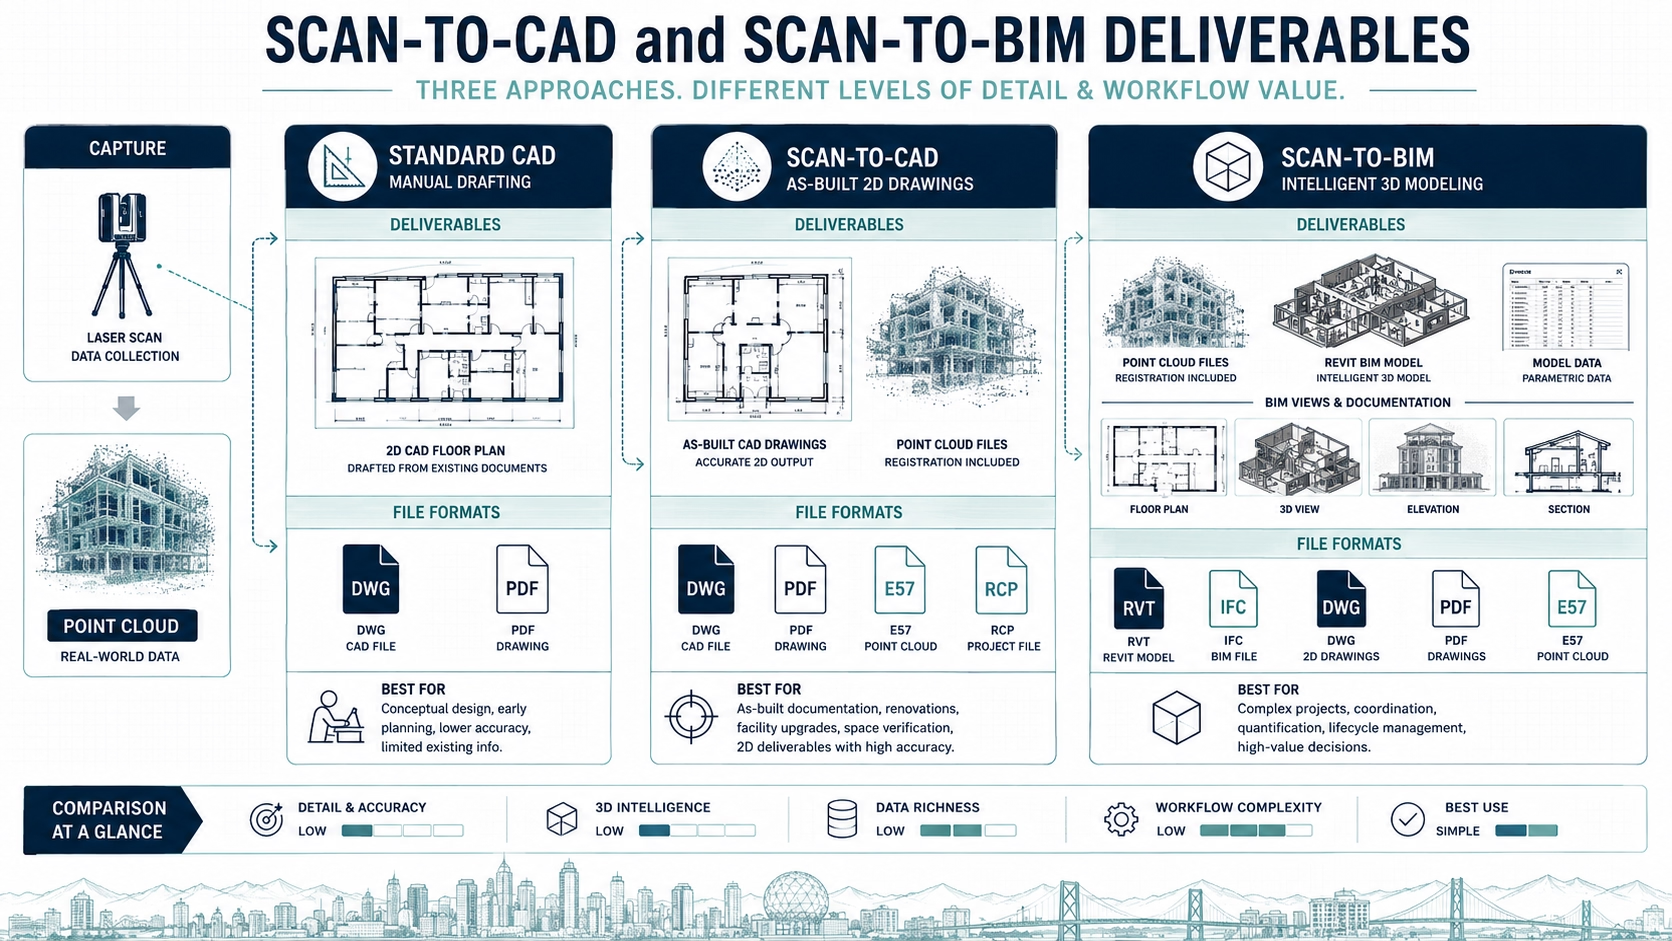
Scan-to-CAD vs Scan-to-BIM vs Standard Floor Plans
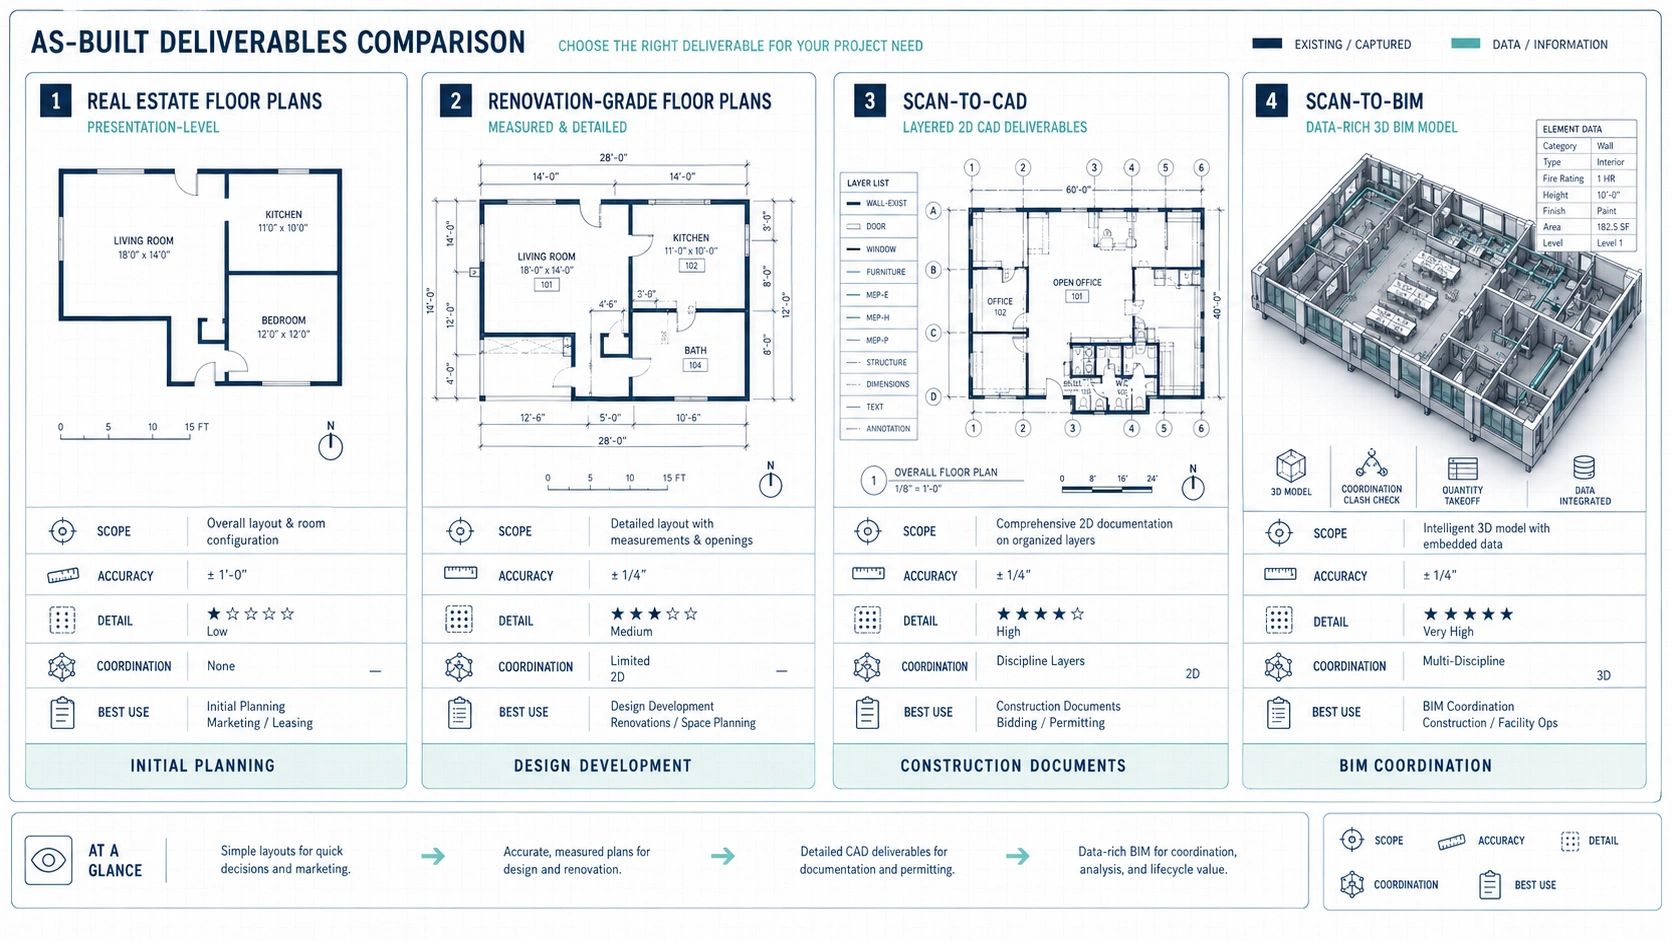
Scan-to-CAD, scan-to-BIM, and standard floor plans serve different accuracy needs. Standard floor plans may be enough for marketing or early planning. Scan-to-CAD is stronger when accurate 2D drawings are needed for renovation design, contractor pricing, or permit-support workflows. Scan-to-BIM is stronger when the project requires model-based coordination, Revit workflows, or complex existing-condition documentation.
Documentation type
Best used for
Accuracy considerations
Standard floor plans
Real estate, early planning, simple layouts
Suitable for communication, not high-risk coordination
Measured CAD floor plans
Renovation planning and design base
Tolerance should be defined if used for design decisions
Scan-to-CAD
Accurate 2D as-built drawings
Point cloud can improve visible-condition reliability
Scan-to-BIM
3D coordination and Revit workflows
Accuracy must be defined by model elements and scope
Point cloud only
Technical reference and future extraction
Useful if the project team can work directly with scan data
Should include scope, tolerances, file formats, and limitations
The correct deliverable depends on what the project team will do next. If the architect needs DWG files, a basic PDF is not enough. If the engineer needs a Revit model, CAD-only delivery may not support coordination. If the contractor only needs a dimensioned plan for a simple project, full BIM may be unnecessary. The practical takeaway is to match accuracy and deliverables to the actual workflow.
How to Verify As-Built Drawing Accuracy
As-built drawing accuracy can be verified through a combination of quality control steps. These may include checking dimensions against field measurements, comparing CAD linework to the point cloud, reviewing model elements against scan data, checking registration reports, validating critical dimensions, and documenting assumptions or exclusions. The verification method should match the project risk.
For laser scanning projects, ask how the point cloud is registered and checked. Ask whether the provider reviews the final drawings or model against the point cloud. Ask whether critical areas are checked separately. Ask whether inaccessible zones are marked. This helps the project team understand how the provider controls accuracy beyond the initial scan.
For manual measurement projects, ask how measurements are checked and whether critical dimensions are verified. A second check may be needed for key walls, stairs, openings, or custom-fit areas. Manual measurement can work well for simple projects, but quality control becomes more important when drawings are used for construction decisions. The practical rule is to verify the dimensions that carry the highest risk.
Accuracy Questions to Ask Your As-Built Contractor
Architects, engineers, and contractors should ask accuracy questions before hiring an as-built provider. The goal is to understand how the provider defines, captures, drafts, verifies, and communicates accuracy. A provider who only says “our drawings are accurate” is not giving enough information for a technical project.
Question
Why it matters
What tolerance will apply to the deliverables?
Prevents vague accuracy expectations
Do you follow LOA or another accuracy framework?
Helps align scope with project requirements
What measurement method will you use?
Manual measurement, laser scanning, or hybrid workflows differ
Will the deliverables be checked against a point cloud?
Important for scan-to-CAD and scan-to-BIM
What elements are included in the accuracy requirement?
Not every wall, ceiling, or system may be in scope
How are inaccessible areas documented?
Prevents false confidence in missing areas
How do you handle irregular geometry?
Existing buildings are rarely perfect
What file formats are delivered?
CAD, Revit, IFC, PDF, and point cloud workflows differ
What QA process is included?
Quality review affects deliverable reliability
What limitations will be stated in the final package?
Helps downstream teams use the documentation correctly
These questions are especially important for B2B projects where design liability, contractor pricing, and coordination risk are involved. A clear accuracy conversation protects both the client and the provider. The practical takeaway is to require accuracy requirements in writing before field capture begins.
Questions Engineers Should Ask About Accuracy
Engineers should ask which elements are captured and how they are represented. Structural elements, ceiling heights, slabs, columns, beams, openings, shafts, stairs, and visible services may all affect engineering decisions. If a required element is not included in scope, the engineer should know before relying on the documentation.
Engineers should also ask whether the documentation distinguishes measured data from interpreted data. A point cloud records visible surfaces, but modelled elements may involve assumptions, simplification, or interpretation. If hidden structure or concealed services are relevant, the project may require additional investigation. The practical takeaway is that as-built accuracy applies only to what was captured and included.
Engineers should ask for critical dimensions to be verified when those dimensions affect design decisions. Not every dimension carries the same risk. Load paths, clearances, openings, slab edges, stair geometry, and equipment zones may require special attention. The provider should know which dimensions are critical before the site visit.
Questions Contractors Should Ask About Accuracy
Contractors should ask whether the drawings are suitable for estimating, coordination, or construction planning. A marketing floor plan or early planning drawing may not have enough detail for contractor pricing. A renovation-grade as-built drawing should identify dimensions and conditions relevant to scope. The contractor should understand what the drawings include before relying on them.
Contractors should ask whether the site was fully accessible during measurement. Locked rooms, blocked walls, inaccessible ceilings, or occupied areas can create missing information. If the drawings include limitation notes, contractors should review them before pricing. The practical recommendation is to treat limitation notes as part of the drawing package.
Contractors should ask whether the drawings were created from manual measurement, laser scanning, CAD conversion, or scan-to-BIM. Each method has different strengths and limits. For high-risk projects, a point cloud or scan-to-CAD base may provide stronger confidence than manually redrawn old plans. The practical takeaway is to understand the data source before pricing from the drawings.
Common Accuracy Mistakes in As-Built Documentation
A common accuracy mistake is using old design drawings as current as-built drawings. Original drawings may not show field changes, previous renovations, tenant improvements, or building movement over time. They can be useful references, but they should be verified before being used as a design base. The practical rule is to treat old drawings as background information, not measured proof.
Another mistake is assuming a Revit model is automatically accurate. A BIM model may look precise, but it is only as reliable as the data and modelling process used to create it. A model created from old drawings may be less reliable than a CAD plan created from current laser scanning. Accuracy depends on source data, scope, modelling decisions, and QA.
A third mistake is failing to define tolerance by project area. Some elements may need high accuracy, while others may not. If the entire building is treated the same way, the client may overpay for unnecessary detail or under-document critical areas. Accuracy should be concentrated where it affects design, pricing, coordination, or construction risk.
A fourth mistake is ignoring hidden conditions. Laser scanning captures visible surfaces. Manual measurement records accessible dimensions. Neither method confirms concealed structure, pipes, wiring, or assemblies behind walls unless those conditions are visible or separately investigated. A good as-built package should state these limitations clearly.
Practical Decision Matrix: What Accuracy Level Do You Need?
A practical decision matrix helps teams match accuracy to project use. The goal is not always maximum accuracy. The goal is appropriate accuracy for the decision being made. Over-specifying accuracy can waste budget. Under-specifying accuracy can create rework.
Project situation
Recommended accuracy approach
Why it fits
Property marketing
Basic floor plan accuracy
Layout clarity matters more than technical tolerance
Supports landlord, tenant, designer, and contractor
Structural coordination
Critical elements verified and documented
Engineering decisions depend on real geometry
MEP retrofit
3D scanning and possible scan-to-BIM
Spatial coordination and clearances matter
Facility record
Point cloud, CAD, or BIM with notes
Long-term use requires clear limitations
Prefabrication
High-control scan and deliverable QA
Small errors can become expensive
The decision matrix should be discussed before the site visit. Once the provider knows which areas carry the highest risk, the measurement plan can be adjusted. The practical takeaway is that accuracy should be designed into the scope, not inspected after the fact.
The MeasureBuilt Existing Conditions Framework for Accuracy
The MeasureBuilt Existing Conditions Framework can be used to align accuracy requirements with project risk. The framework begins by identifying the project use: design base, contractor pricing, permit coordination, scan-to-CAD, scan-to-BIM, facility documentation, or critical coordination. This step matters because each use case requires a different level of accuracy and detail.
The second step is selecting the measurement method. Simple spaces may be documented with manual measurement and quality checks. Complex spaces may require 3D laser scanning. Projects involving Revit, point clouds, high ceilings, irregular geometry, or visible MEP systems may require scan-to-CAD or scan-to-BIM. The measurement method should match the accuracy requirement.
The third step is defining deliverables and limitations. The package should state file formats, included areas, modelled elements, tolerance expectations, inaccessible areas, hidden-condition exclusions, and QA process. This makes the documentation easier to use downstream. The practical takeaway is that accuracy is not only a technical outcome; it is a communication process.
How to Prepare for an Accuracy-Driven Survey
Preparing for an accuracy-driven survey starts with defining the required deliverables. Tell the provider whether you need PDF plans, DWG files, elevations, sections, point clouds, Revit models, IFC exports, or BIM documentation. If critical areas require tighter tolerance, identify them before the site visit. The provider cannot prioritize what they do not know.
Prepare the site by ensuring access to all required areas. Locked rooms, cluttered spaces, blocked walls, active construction zones, and inaccessible ceilings can reduce documentation quality. If 3D laser scanning is used, clear line of sight matters. The building does not need to be empty, but critical geometry should be visible and accessible.
Prepare by sharing available records. Old drawings, CAD files, previous permit drawings, tenant plans, photos, and renovation notes can help the measurement team understand the property. These records should not replace current measurement when accuracy matters, but they can help the team plan capture and compare known conditions. The practical takeaway is that preparation improves both accuracy and turnaround.
Key Takeaways
As-built drawing accuracy is not just a technical detail. It affects design confidence, contractor pricing, consultant coordination, change order risk, and construction planning. Architects, engineers, and contractors should define accuracy requirements before fieldwork begins.
USIBD LOA standards help project teams communicate accuracy expectations more clearly. LOA is useful because it moves the conversation from vague promises to specified requirements. The best accuracy approach defines tolerance, deliverables, included elements, verification method, and limitations.
3D laser scanning can provide a stronger measured base than manual measurement for complex buildings, but scanner accuracy is not the same as deliverable accuracy. The final CAD drawing or BIM model still depends on registration, drafting, modelling, QA, and scope. Talk to us about accuracy requirements for your project before choosing a measurement method.
FAQ
What is as-built drawing accuracy?
As-built drawing accuracy is the degree to which drawings, CAD files, floor plans, or BIM models match the actual building conditions measured on site. It affects wall locations, openings, levels, stairs, columns, ceiling heights, and other documented features within scope. Accuracy should be defined by tolerance, measurement method, deliverable type, and quality control process.
What are level of accuracy standards?
Level of accuracy standards help project teams define how closely building documentation should match real-world conditions. They are used to reduce ambiguity between clients, architects, engineers, contractors, and documentation providers. Instead of asking for “accurate drawings,” the team can specify the required accuracy level for different elements or deliverables.
What is the USIBD LOA specification?
The USIBD LOA specification is a building documentation accuracy framework used to define and communicate accuracy expectations. It helps teams align on how accurate a drawing, model, or documented element should be. In practice, it is most useful when tied to specific deliverables, tolerances, verification methods, and project risk areas.
Are laser-scanned as-built drawings always accurate?
Laser scanning can create a strong measured base, but the final drawing or model is only as reliable as the full workflow. Scan planning, point cloud registration, drafting, modelling, QA, scope, and site access all affect deliverable accuracy. A scanner may capture detailed data, but the CAD or BIM output still needs verification.
What are typical measurement tolerances in as-built surveys?
Typical measurement tolerances depend on project use. A marketing floor plan may allow broader tolerance, while renovation-grade CAD drawings, MEP coordination, structural work, or prefabrication may require tighter requirements. The correct tolerance should be defined before the survey based on what the drawings or model will be used for.
Is manual measurement accurate enough for as-built drawings?
Manual measurement can be accurate enough for simple, small, low-risk spaces when the deliverable is basic. It becomes less reliable for complex buildings, irregular geometry, many rooms, multiple floors, high ceilings, visible systems, or contractor coordination. For higher-risk projects, 3D laser scanning or scan-to-CAD may provide a stronger measured base.
How do inaccurate as-built drawings cause change orders?
Inaccurate as-built drawings can cause change orders when proposed work does not fit the actual building. Wrong dimensions, missed openings, incorrect ceiling heights, or unrecorded visible constraints can lead to redesign, material changes, fabrication problems, or installation delays. Better existing-condition documentation helps identify more issues before construction begins.
What should architects ask about as-built accuracy?
Architects should ask what tolerance applies, what measurement method is used, whether the drawings are checked against a point cloud, what deliverables are included, how irregular geometry is handled, and what limitations are stated. They should also confirm whether the files are suitable for design, permit support, CAD drafting, or Revit workflows.
What should contractors ask before pricing from as-built drawings?
Contractors should ask whether the drawings are renovation-grade, whether all required areas were accessible, what measurement method was used, what limitations apply, and whether critical dimensions were verified. They should also check whether the drawings are suitable for estimating or only for early planning. This reduces pricing assumptions and scope disputes.
How do I choose the right accuracy level for my project?
Choose the accuracy level based on risk. A simple planning project may need basic measured drawings. A renovation, tenant improvement, structural coordination, MEP retrofit, or prefabrication project may need tighter tolerances and stronger QA. Talk to us about accuracy requirements for your project so the measurement method and deliverables match the actual use case.
Conclusion
As-built drawing accuracy matters because existing-condition documentation becomes the base for design, engineering, contractor pricing, renovation planning, and coordination. A drawing can look clean but still fail the project if tolerances, source data, scope, and verification are unclear. LOA standards, including USIBD-based accuracy thinking, help project teams define what “accurate” should mean before fieldwork begins. Manual measurement may be appropriate for simple spaces, while 3D laser scanning can provide a stronger base for complex buildings, CAD drafting, Revit modelling, and scan-to-BIM workflows. The best approach is to define accuracy requirements early, identify critical areas, confirm deliverables, and ask how the provider verifies the final drawings or model. Talk to us about accuracy requirements for your project before choosing your as-built documentation scope.
The as-built survey process usually starts with a project request, scope review, quote, site visit, building measurement, drafting or modelling, quality review, and final deliverables. For homeowners, commercial tenants, and property managers, the timeline depends on property size, access, complexity, required drawings, and whether the project needs simple floor plans, CAD drawings, 3D laser scanning, or BIM documentation.
Executive Summary
The as-built survey process helps document a building as it exists today before renovation, design, leasing, contractor pricing, or permit coordination begins. For property managers, commercial tenants, and homeowners in Vancouver, the process usually begins with a request for measurement, followed by scope clarification, scheduling, site access planning, a site visit, measurement or 3D laser scanning, drafting, quality control, and final delivery. A small residential or office space may require a shorter site visit and simpler floor plan turnaround, while larger commercial, industrial, multi-level, or occupied properties may need more coordination and longer drafting or modelling time. The most important timeline factors are building size, number of rooms, number of floors, site access, required deliverables, point cloud processing, CAD drafting, Revit modelling, and revision scope. The practical takeaway is simple: prepare the building, confirm deliverables early, and schedule your measurement before design or contractor pricing starts.
The As-Built Survey Process: Timeline, Site Visit, and What to Expect
What the As-Built Survey Process Means
The as-built survey process is the step-by-step workflow used to measure and document the existing condition of a building. It may include manual measurement, 3D laser scanning, field notes, photography, point cloud registration, CAD drafting, BIM modelling, and final drawing delivery depending on project scope. The goal is to create accurate floor plans, as-built drawings, CAD files, or BIM documentation that reflect the building as it stands today. The practical rule is that an as-built survey records existing conditions before new decisions are made.
An as-built survey is often used before renovation planning, tenant improvements, permit coordination, contractor estimates, interior design, space planning, or property documentation. A homeowner may need measured floor plans before speaking with a designer. A commercial tenant may need current drawings before planning improvements. A property manager may need building records for leasing or future maintenance. The same process can support different use cases depending on deliverables.
The as-built survey process is not only the site visit. The site visit captures the building, but the final value comes from turning measurements into usable documentation. That may include PDF floor plans, DWG files, elevations, sections, reflected ceiling plans, Revit models, point cloud files, or area plans. Before booking the survey, clients should confirm what final files they need.
Step 1: Request and Scope Review
The process usually starts when the client requests a quote or contacts a building measuring services provider. At this stage, the provider needs to understand the property type, project goal, approximate size, location, number of levels, required deliverables, access conditions, and timeline. This step matters because measuring a condo for renovation planning is different from scanning a commercial facility for CAD or BIM documentation. The practical takeaway is to give enough information for an accurate scope.
A good scope review asks what the drawings will be used for. If the purpose is early design, basic floor plans may be enough. If the purpose is contractor pricing, the drawings may need more dimensions and CAD files. If the purpose is permit coordination, the design team may need more structured existing-condition documentation. If the purpose is facility management, a broader digital record may be useful. The deliverable should match the decision the client needs to make.
The scope review should also identify exclusions. Hidden conditions, concealed structure, locked rooms, inaccessible ceiling spaces, and areas outside the measurement scope should be clarified before the site visit. Laser scanning and manual measuring document visible or accessible conditions; they do not automatically verify everything behind walls or ceilings. A clear scope prevents misunderstandings later.
Step 2: Quote and Scheduling
After the scope review, the provider can prepare a quote. The quote should state the included areas, deliverables, file formats, timeline, measurement method, assumptions, and exclusions. A vague quote that only says “as-built survey” or “floor plans” may not be specific enough. Clients should ask whether the package includes PDF plans, DWG files, elevations, sections, Revit models, point cloud files, or only basic drawings.
Scheduling depends on site access and urgency. A vacant residential property may be easy to schedule, while an occupied office, retail unit, warehouse, or multi-tenant building may require coordination with staff, tenants, security, building managers, or operations. If the site requires off-hours access, escorts, safety orientation, or special permissions, scheduling may take longer. The practical recommendation is to coordinate access before confirming the appointment.
Clients should schedule the as-built survey before detailed design or contractor pricing begins. If measurement happens too late, designers or contractors may already be working from assumptions. Early measurement helps reduce rework and gives the project team a clearer existing-condition base. Schedule your measurement as soon as the project scope is serious enough to require accurate drawings.
Step 3: Preparing Your Building for Measurement
Preparing your building for measurement helps the site visit run faster and improves documentation quality. The measurement team needs access to the areas included in scope. This may include rooms, corridors, garages, basements, mechanical rooms, stairwells, balconies, exterior walls, tenant spaces, service areas, roof access, or storage areas. Locked doors and blocked areas can create missing information.
Clients should clear major obstructions where possible. The building does not need to be empty, but walls, doors, windows, stairs, fixed elements, and key measurement areas should be visible. Large furniture, stored boxes, vehicles, construction materials, or active work zones can slow the process or block important geometry. If 3D laser scanning is used, clear line of sight is especially important.
Commercial tenants and property managers should notify occupants before the appointment. Staff, tenants, security, cleaners, contractors, and building operators may need to know when the measurement team will arrive and which areas they need to access. For busy commercial spaces, low-traffic hours may be better. The practical takeaway is that good preparation reduces delays and helps avoid return visits.
Step 4: Site Visit and Measurement
The site visit is the fieldwork phase of the as-built survey process. A technician or measurement team visits the property, measures the required areas, captures notes, photographs, scan data, or field sketches, and verifies key existing conditions. Depending on scope, the team may use manual measurement tools, laser distance meters, 3D laser scanners, or a combination of methods. The practical goal is to capture enough information to create the agreed deliverables.
A simple residential or small office site visit may be relatively short. A multi-level home, commercial tenant space, warehouse, facility, or occupied building may take longer because there are more rooms, access points, details, or safety constraints. A scan-based survey may capture a large amount of data efficiently, but it still requires enough scan positions to cover the required areas. The site visit duration depends on the building, not only the square footage.
During the site visit, the client or site contact should be available for access questions. The team may need doors opened, alarms disabled, tenant areas accessed, exterior gates unlocked, or mechanical rooms made available. If questions come up, quick decisions help avoid missing information. The practical recommendation is to have one responsible site contact available during the appointment.
Typical Site Visit Duration by Property Type
Site visit duration varies by property type, access, complexity, and deliverables. The following table is a practical planning guide, not a fixed promise. The actual appointment may be shorter or longer depending on site conditions and scope.
Property type
Typical site visit expectation
What affects duration
Condo or small apartment
Often a short appointment
Unit size, furniture, access, balcony or storage areas
Small office or retail unit
Often short to half-day
Tenant access, rooms, ceiling conditions, service areas
Single-family home
Often several hours
Number of levels, basement, exterior, stairs, additions
The most common reason a site visit takes longer is not measurement itself, but access. If rooms are locked, tenants are unavailable, exterior areas are blocked, or equipment is in the way, the team may need additional time. Preparing the building is the easiest way to keep the appointment efficient.
Step 5: Processing Field Data
After the site visit, the field data must be processed. If manual measurement was used, the team organizes field notes, sketches, photos, and measurements before drafting. If 3D laser scanning was used, scan positions may need to be registered into a coordinated point cloud. This processing step is important because it turns raw capture data into a reliable drafting or modelling reference.
Point cloud processing may include registration, cleaning, alignment checks, export preparation, and review. The point cloud can then be used to create CAD drawings, Revit models, elevations, sections, or other deliverables. A point cloud alone may be useful for technical teams, but most clients need processed drawings or models. The practical takeaway is that the site visit is only one part of the timeline.
Processing time depends on data volume and deliverable complexity. A basic measured floor plan may move quickly into drafting. A large scan-to-CAD or scan-to-BIM project may require more time for registration, quality review, and modelling. Clients should ask whether turnaround time includes only fieldwork or the full delivery package.
Step 6: Drafting, CAD, or BIM Modelling
Drafting converts the measured information into usable drawings. For many projects, this means creating floor plans, dimensions, room labels, wall outlines, doors, windows, stairs, and fixed elements. For more technical projects, drafting may include elevations, sections, reflected ceiling plans, exterior drawings, area plans, or other views. The practical value is that raw measurement becomes readable documentation.
CAD deliverables may include DWG files and PDF sheets. Architects, designers, and contractors often use DWG files as a base for proposed layouts, permit drawings, or contractor pricing. If CAD files are needed, they should be included in the scope from the beginning. A PDF-only package may not be enough for a professional design workflow.
BIM modelling converts measured data or point cloud information into a model, often in Revit. This takes more time than basic floor plan drafting because elements must be modelled, organized, and reviewed. Scan-to-BIM is useful when the project requires model-based design, consultant coordination, facility records, or complex existing-condition documentation. Clients should only order BIM when the model will actually be used.
Step 7: Quality Review
Quality review is the step where the provider checks the drawings or model against the measurement data and project scope. This may include reviewing dimensions, checking scan alignment, confirming drawing completeness, checking layers or file organization, and verifying that required areas were included. Quality review is especially important when drawings support design, contractor pricing, or permit coordination.
A good quality review also identifies limitations. If some areas were inaccessible, if hidden conditions were not verified, or if certain elements were outside scope, the final package should say so. This protects the client and the project team from treating the drawings as more complete than they are. The practical rule is to deliver not only drawings, but also clarity about what the drawings represent.
Clients should ask whether the provider includes revisions or comments. Some projects may require minor adjustments after review by an architect, designer, owner, or property manager. Revision terms should be clear before work begins. A clear review process prevents delays near the end of the project.
Step 8: Final Deliverables
The final deliverables depend on the agreed scope. A simple package may include PDF floor plans. A design-ready package may include DWG files. A more detailed package may include elevations, sections, reflected ceiling plans, point clouds, or Revit models. A property manager may need area plans or building record files. The practical recommendation is to confirm deliverables before the site visit.
Final delivery should include the correct file format. If the architect needs DWG, a PDF may not be enough. If the BIM team needs Revit or point cloud files, that should be included from the start. If the owner only needs a readable floor plan, a technical model may be unnecessary. The deliverable should match the user.
As-Built Drawing Turnaround Time
As-built drawing turnaround time depends on property size, complexity, deliverables, and review needs. A simple floor plan package may be delivered faster than a full CAD or BIM package. A complex commercial property with elevations, sections, point cloud processing, and Revit modelling will require more time. The practical rule is that turnaround time follows deliverable complexity.
A typical timeline may include one appointment window for measurement, then several business days for basic drafting, and longer for detailed CAD, scan-to-CAD, or scan-to-BIM work. However, the timeline should always be confirmed by scope. A provider should not promise the same turnaround for a small apartment and a multi-level facility. Clients should ask for a delivery date based on the actual deliverables.
Rush delivery may be possible, but it can affect cost or available review time. If the project has a design meeting, lease deadline, contractor bid date, or permit schedule, tell the measurement provider early. The practical takeaway is to schedule the survey before the documentation becomes urgent.
What Affects the As-Built Measurement Timeline?
The as-built measurement timeline is affected by both fieldwork and office production. Fieldwork depends on property size, access, occupancy, and complexity. Office production depends on drafting scope, point cloud processing, CAD standards, BIM modelling, quality review, and revisions. A project can have a short site visit but still require a longer drafting timeline if deliverables are complex.
Access has a major impact on timeline. If the team cannot enter a required room, exterior area, roof, basement, tenant space, or mechanical room, the project may need a return visit or an exclusion note. Return visits can add time and cost. Preparing access is one of the best ways to keep the timeline predictable.
Deliverable changes also affect timeline. If the original scope was floor plans only and the client later requests elevations, sections, or a Revit model, the delivery date may change. The scanning or measuring team may also need additional site information. The practical recommendation is to define deliverables before the site visit whenever possible.
How Long Does an As-Built Survey Take?
How long does an as-built survey take? The honest answer is that it depends on the property and deliverables. A small, simple property may be measured quickly, while a large or complex building may need more time on site and more time in production. Site visit time and final drawing turnaround are different parts of the same process.
For homeowners, the site visit may often be completed in a single appointment if access is prepared. For commercial tenants, timing depends on operating hours, tenant access, and ceiling or service areas. For property managers, larger buildings may require phased access or coordination across several spaces. The practical takeaway is to ask for both the site visit estimate and the delivery estimate.
A good provider should explain what can affect the timeline before the appointment. Locked rooms, unclear scope, added deliverables, clutter, safety restrictions, tenant coordination, and complex geometry can all change the schedule. Clients can help by preparing the building and confirming the final use of the drawings early.
Site Measurement Process by Client Type
Different clients experience the site measurement process differently. A homeowner may focus on access, renovation goals, and design-ready floor plans. A commercial tenant may focus on business disruption and tenant improvement planning. A property manager may focus on tenant coordination, keys, safety, and long-term records. The process should be adjusted to the client’s situation.
Client type
What they usually need
Main preparation task
Homeowner
Floor plans, renovation base, possible elevations
Clear access, share renovation goals, gather old plans
Commercial tenant
Current space layout, CAD base, tenant improvement support
Coordinate business hours and access
Property manager
Building records, tenant areas, access planning
Arrange keys, tenant notice, security, escorts
Contractor
Existing-condition drawings for pricing
Define scope and areas affecting the estimate
Architect or designer
CAD/Revit base for design
Confirm file formats and level of detail
Developer
Due diligence, planning, building documentation
Define deliverables and timeline early
The site measurement process works best when the client explains the project goal. A measurement team captures different information for a retail tenant improvement than for a home renovation or facility record. Clear project context helps the team capture what matters.
Preparing Your Building for Measurement
Preparing your building for measurement begins with access. Unlock doors, provide keys or entry codes, arrange parking if needed, and make sure the site contact knows which areas are included. If the project includes exterior measurement, ensure gates, yards, alleys, or loading areas are accessible. If the project includes mechanical or service spaces, arrange access in advance.
Preparing the building also means reducing obstacles. Move major clutter away from walls, clear stair paths, make windows and doors visible where possible, and avoid scheduling active construction work during measurement. The building does not need to be perfectly empty, but the measurement team needs visibility and safe movement. This is especially important for 3D laser scanning.
Preparing occupants is just as important. Notify residents, tenants, staff, cleaners, or contractors that measurement will take place. Ask them to avoid blocking rooms or moving through active scanning zones if scanning is being used. If pets are present, secure them safely. The practical takeaway is that preparation reduces friction and improves documentation quality.
What Can Delay an As-Built Survey?
An as-built survey can be delayed by incomplete access, unclear scope, active construction, occupied areas, safety restrictions, or changing deliverables. Locked rooms are one of the simplest but most common causes of missing data. If the team cannot access a required space, the drawings may be incomplete or a second visit may be needed.
Clutter and movement can also delay the process. Heavy storage can block walls and openings. Active work crews can make scanning difficult. Moving people and equipment can create extra cleanup work in point cloud data. For commercial or industrial sites, operations may need to be coordinated around the survey.
Late changes to deliverables can also delay final delivery. If the client asks for BIM modelling, sections, elevations, or additional areas after the site visit, the timeline may need to be revised. The practical recommendation is to define scope early and prepare the site before the scheduled measurement.
How to Avoid Return Visits
The best way to avoid return visits is to provide complete access during the first appointment. Check keys, codes, tenant access, exterior gates, mechanical rooms, storage rooms, basements, garages, and roof access if they are in scope. If a required area is inaccessible, tell the measurement provider before the appointment so the scope can be adjusted.
Another way to avoid return visits is to confirm deliverables before fieldwork. If elevations, sections, ceiling plans, or Revit modelling are needed, the measurement team may need to capture additional information. If they only discover this after the site visit, they may need to come back. The practical takeaway is to decide what files are needed before measurement starts.
Sharing old drawings can also help. Existing plans, strata drawings, lease plans, renovation sketches, or previous permit drawings can help the team understand the property and identify areas to verify. These documents should not replace measurement, but they can reduce ambiguity. Clients should send them before the site visit if available.
Practical Timeline Matrix
A practical timeline matrix helps clients understand what to expect. The following ranges are planning categories, not guaranteed delivery promises. Exact timing should always be confirmed after scope review.
Project type
Site visit expectation
Drawing/model turnaround expectation
Basic residential floor plan
Short to several hours
Often several business days
Condo or apartment renovation base
Short to several hours
Often several business days
Single-family home as-built package
Several hours or more
Usually longer if elevations or sections are included
Commercial tenant improvement base
Half-day or more depending on size/access
Depends on CAD scope and review needs
Warehouse or facility survey
May require planned access window
Depends on size, point cloud processing, and deliverables
Scan-to-CAD package
Site scan plus processing
Longer than basic floor plans
Scan-to-BIM / Revit model
Site scan plus modelling scope
Longer than CAD because modelling and QA are required
Multi-tenant or occupied property
May require phased visits
Depends on tenant access and areas captured
The timeline matrix is best used for planning conversations. If the project has a permit deadline, lease deadline, contractor bid date, or design meeting, the provider should know before scheduling. Timeline planning is part of the survey process, not an afterthought.
Common Mistakes Before an As-Built Survey
A common mistake is booking measurement before deciding what deliverables are needed. If the project later needs elevations, sections, CAD files, or BIM, the original site capture may not be enough. This can lead to extra work or another site visit. Clients should ask the designer, architect, contractor, or property manager what files are needed before the survey.
Another mistake is failing to coordinate access. A site contact may assume all rooms are open, but tenants, locks, alarms, storage, or security rules can prevent access. This creates gaps in the drawings. Property managers should prepare keys, notices, escorts, and permissions before the measurement day.
A third mistake is using real estate floor plans as if they are as-built drawings. Real estate plans may help with layout understanding, but they are usually not detailed enough for renovation, permit coordination, or contractor pricing. If the project depends on accurate existing conditions, a proper as-built survey is safer.
A fourth mistake is waiting until the project is urgent. Measurement and drafting take time. If the survey is ordered right before a design deadline or contractor bid date, the project may be pressured. The practical recommendation is to schedule your measurement early.
Questions to Ask Before Booking
Before booking, ask what the as-built survey includes. Confirm whether the package includes site measurement, 3D laser scanning, point cloud processing, floor plans, DWG files, elevations, sections, Revit models, PDF drawings, or area plans. A clear deliverable list helps prevent surprises.
Ask how long the site visit is expected to take and how long final delivery will take. These are separate timeline questions. A site visit may be short, but drafting or modelling can still take time. Ask whether turnaround depends on the number of drawings, file formats, or review rounds.
Ask how to prepare the building. The provider should explain access, keys, clutter, tenant notice, safety, exterior areas, and occupant movement. Preparation instructions should be practical and specific. If the provider does not discuss access, missing information may become a problem later.
Ask what happens if an area is inaccessible. Will it be excluded? Will a return visit be required? Will the drawings include a limitation note? Knowing this before the appointment helps the client manage expectations.
How the As-Built Survey Leads to Building Measuring Services Deliverables
The as-built survey process naturally leads into building measuring services deliverables. The site visit captures existing conditions, and the office phase converts them into drawings, files, or models. These deliverables can then support renovation planning, design work, contractor pricing, lease planning, permit coordination, or facility records. The practical sequence is request, measure, draft, review, deliver.
Building measuring services should be scoped around the client’s next decision. A homeowner may need renovation-ready floor plans. A commercial tenant may need a tenant improvement CAD base. A property manager may need an area plan or updated building record. An architect may need DWG or Revit files. The deliverables should match the user.
The CTA should come naturally at this stage. If the client understands the process and is ready to proceed, the next step is to book a site visit or schedule your measurement. A prepared client will get a smoother appointment, better documentation, and a more predictable turnaround.
Key Takeaways
The as-built survey process includes scope review, quote, scheduling, site preparation, measurement or scanning, data processing, drafting or modelling, quality review, and final deliverables. The site visit is only one part of the process; office production and QA are also part of the timeline.
How long an as-built survey takes depends on property type, size, access, number of floors, complexity, deliverables, and whether the project requires CAD or BIM. A simple floor plan package is faster than a detailed scan-to-CAD or scan-to-BIM package. Clients should ask for both site visit duration and final turnaround time.
Preparing your building for measurement can reduce delays. Clear access, unlock rooms, notify occupants, reduce clutter, share old drawings, and confirm deliverables before the appointment. The best next step is to book a site visit or schedule your measurement before design, contractor pricing, or permit coordination begins.
FAQ
What is the as-built survey process?
The as-built survey process is the workflow used to measure and document a building as it exists today. It usually includes scope review, quote, scheduling, site visit, measurement or 3D scanning, drafting or modelling, quality review, and final delivery. The final files may include floor plans, CAD drawings, elevations, sections, point clouds, or Revit models depending on scope.
How long does an as-built survey take?
How long an as-built survey takes depends on property size, complexity, access, and deliverables. A small property may require a shorter site visit and simpler drafting, while a large commercial, industrial, or multi-level building may require more time. Ask separately about site visit duration and as-built drawing turnaround time because fieldwork and final delivery are different stages.
What affects the as-built measurement timeline?
The as-built measurement timeline is affected by building size, number of levels, site access, occupancy, clutter, complexity, measurement method, required deliverables, CAD drafting, point cloud processing, BIM modelling, and quality review. Late deliverable changes or inaccessible rooms can also extend the timeline. Clear scope and prepared access help keep the schedule predictable.
What happens during the site measurement process?
During the site measurement process, the technician visits the property, accesses the required areas, measures or scans existing conditions, takes notes, and captures the information needed for the agreed deliverables. Depending on scope, this may include manual measurement, 3D laser scanning, photographs, field sketches, or point cloud capture. The data is then processed into drawings or models.
How should I prepare my building for measurement?
Prepare your building for measurement by unlocking all required spaces, clearing major obstructions, notifying residents or tenants, providing keys or access codes, securing pets, and sharing old drawings if available. If exterior areas, mechanical rooms, roofs, basements, garages, or tenant spaces are included, make sure they are accessible during the appointment.
Do occupants need to leave during an as-built survey?
Occupants do not always need to leave during an as-built survey, but access and movement should be coordinated. For manual measurement, the team may work around occupants if rooms are accessible. For 3D laser scanning, it is better to reduce movement through active scan areas because moving people or objects can affect scan quality. The provider can advise based on scope.
What is as-built drawing turnaround time?
As-built drawing turnaround time is the time between the site visit and final delivery of drawings or models. It depends on deliverables, building complexity, file formats, and quality review. Basic floor plans may be faster than detailed CAD packages, elevations, sections, point clouds, or Revit models. Ask for a project-specific delivery estimate when booking.
Can I use old floor plans instead of an as-built survey?
Old floor plans can be useful references, but they should not automatically replace an as-built survey. Buildings may have changed through renovations, tenant improvements, additions, or field modifications. If accurate existing conditions matter for design, contractor pricing, permit coordination, or leasing, a current as-built survey is safer.
What deliverables do I receive after an as-built survey?
Deliverables may include PDF floor plans, DWG CAD files, elevations, sections, reflected ceiling plans, point cloud files, Revit models, area plans, or other documentation depending on the scope. Before booking, confirm which file formats are included and who will use them. The deliverables should match the project’s next step.
How do I book an as-built site visit?
To book an as-built site visit, provide the property type, location, approximate size, number of floors, project goal, required deliverables, access conditions, and timeline. Share old drawings if available and explain whether the survey is for renovation, tenant improvements, permit coordination, contractor pricing, or property records. Book a site visit or schedule your measurement once the scope is clear.
Conclusion
The as-built survey process is designed to turn existing building conditions into usable documentation for renovation, design, leasing, contractor pricing, permit coordination, and property records. For homeowners, commercial tenants, and property managers, the process is straightforward when the scope is clear: request a quote, confirm deliverables, prepare access, complete the site visit, allow time for drafting or modelling, review the final package, and use the drawings for the next project step. The timeline depends on size, complexity, access, number of floors, file formats, and whether the project needs CAD or BIM. To keep the process smooth, prepare the building before the appointment and confirm what files your team needs. Book a site visit or schedule your measurement when you are ready to move from planning to accurate existing-condition documentation.
As-built drawings cost depends on building size, property type, complexity, measurement method, level of detail, deliverable format, and site access. A simple residential floor plan costs less than a detailed scan-to-CAD or scan-to-BIM package for a commercial, industrial, or complex renovation project. The most accurate way to price as-built plans is to request a project-specific quote based on scope, not only square footage.
Executive Summary
How much do as-built plans cost in Vancouver? The honest answer is that pricing depends on what the drawings must support. A homeowner budgeting for a renovation may need accurate floor plans and basic elevations. A contractor may need as-built CAD drawings for pricing and construction coordination. A developer may need scan-to-CAD or scan-to-BIM documentation for a larger property. A property manager may need building measurement documentation for leasing, tenant improvements, or long-term records. As-built survey pricing is affected by area, access, building complexity, required detail, file formats, and whether the project uses manual measurement, 3D laser scanning, CAD drafting, or BIM modelling. Price per square foot can be useful for early budgeting, but it can be misleading when two buildings of the same size require very different deliverables. The practical takeaway is simple: define the use case, confirm deliverables, and request a free quote for your project before relying on a generic price range.
How Much Do As-Built Drawings Cost in Vancouver? Pricing Factors Explained
What “As-Built Drawings Cost” Really Means
As-built drawings cost is the price of documenting a building as it exists today. This may include measuring the property, capturing site conditions, drafting floor plans, creating CAD files, producing elevations or sections, and delivering drawings that architects, contractors, owners, or property managers can use. In Vancouver, as-built drawings are commonly used before renovations, additions, tenant improvements, permit coordination, contractor pricing, commercial leasing, and property documentation. The practical rule is that the cost depends on the purpose of the drawings.
A simple floor plan and a full as-built documentation package are not the same product. A basic plan may show room layout and general dimensions. A renovation-grade as-built package may include floor plans, elevations, sections, ceiling heights, stairs, exterior conditions, structural elements, and editable CAD files. A scan-to-BIM package may include a Revit model created from point cloud data. The cost of as-built floor plans depends heavily on which of these deliverables the project requires.
As-built drawing price should be understood as a risk-control investment, not only a drafting expense. If the drawings are used for renovation design, contractor estimates, permit coordination, or construction planning, inaccurate documentation can create redesign, change orders, repeated site visits, or scope confusion. Accurate as-built drawings help the project team understand the existing building before expensive decisions are made. The practical takeaway is that low-cost drawings are only a good deal if they are detailed enough for the next project step.
Why There Is No Single Fixed Price for As-Built Drawings
There is no single fixed price for as-built drawings because buildings and deliverables vary widely. A small condo with simple geometry is easier to measure and draft than a multi-level older home with additions, sloped floors, irregular stairs, and exterior changes. A basic PDF plan takes less work than a DWG package with elevations, sections, and ceiling information. A Revit model from laser scan data requires more processing than a simple floor plan. The practical rule is that price follows scope.
As-built survey pricing also depends on how the information will be used. If the drawings are only for early planning, a lighter package may be enough. If the drawings will support permit drawings, contractor bidding, structural review, or tenant improvements, the documentation needs to be more accurate and complete. A generic price does not tell you whether the package includes the right information. Owners should compare quotes by deliverables, not just by total cost.
Vancouver and Greater Vancouver projects often require custom pricing because site conditions are different from one property to another. Access restrictions, occupied spaces, strata coordination, commercial tenants, storage, exterior access, safety requirements, or limited site windows can all affect the time required. A quote should account for these conditions before the work begins. The practical takeaway is that a good quote asks questions before giving a final price.
Main Factors That Affect As-Built Survey Pricing
The first major pricing factor is building size. Larger buildings usually require more measurement time, more scan positions, more drafting time, and more review. However, size is only one part of the cost. A large open warehouse can sometimes be simpler to document than a smaller but highly complex home with several levels, additions, rooflines, and tight spaces. Square footage matters, but complexity can matter more.
The second pricing factor is building complexity. Complex stairs, split levels, sloped floors, curved walls, vaulted ceilings, dense mechanical rooms, exterior details, irregular façades, and previous renovations all increase documentation effort. These conditions often require more field time and more drafting judgment. A simple rectangular plan may be priced differently from an older character home or mixed-use property of the same size. The practical recommendation is to describe building complexity when requesting a quote.
The third pricing factor is the required level of detail. A basic floor plan may only show walls, doors, windows, and room dimensions. A more detailed as-built package may include exterior elevations, interior elevations, sections, roof plans, reflected ceiling plans, structural elements, fixed equipment, or visible building systems. Each additional drawing type adds time. Owners should order the detail that the project actually needs.
The fourth pricing factor is deliverable format. A PDF-only package usually requires less work than editable DWG files. A CAD package requires drafting standards, layers, scale, and file organization. A Revit or BIM package requires model creation, element classification, and model review. Point cloud files may also be included if 3D laser scanning is used. The practical takeaway is that “as-built drawings” can mean several different file packages.
The fifth pricing factor is site access. If the measurement team can access every required area easily, the work is more efficient. If rooms are locked, tenants are present, storage blocks walls, exterior access is limited, or mechanical areas require escorting, the fieldwork becomes more complicated. Poor access can also create documentation gaps or require a return visit. Good site preparation can help control building measurement cost Vancouver quotes.
Pricing Factors Checklist
A pricing checklist helps homeowners, contractors, developers, and property managers understand what affects the quote. The more clearly you can answer these questions, the easier it is for a measurement team to estimate the work. A vague request like “how much for as-built drawings?” usually leads to a less accurate quote. A clear scope leads to better pricing.
Pricing factor
Why it matters
What to tell the measurement team
Building size
Affects fieldwork and drafting time
Approximate square footage and number of levels
Property type
Different buildings require different documentation
Blueprints, strata plans, real estate plans, previous permits
The pricing checklist should be used before requesting a quote. If the measurement provider knows the property type, intended use, deliverables, and access conditions, they can give a more realistic estimate. If the provider gives a flat price without asking about scope, the quote may not include what the project actually needs. The practical rule is to make the quote specific before comparing providers.
As-Built Drawing Price Per Square Foot: Useful but Not Always Correct
As-built drawing price per square foot can be useful for early budgeting, especially when comparing similar buildings and similar deliverables. If two simple residential properties require the same floor plan package, square footage can help estimate relative cost. It gives owners a quick way to understand whether a project is small, medium, or large. The practical value is early orientation, not final pricing.
Price per square foot becomes misleading when building complexity and deliverables differ. A simple 5,000-square-foot warehouse and a 5,000-square-foot older mixed-use building may not cost the same to document. A PDF floor plan and a Revit model are not the same deliverable. A project with elevations, sections, and reflected ceiling plans will cost more than a simple floor plan even if the square footage is identical. Owners should not use price per square foot as the only pricing method.
Price per square foot also does not always account for minimum project effort. Even a small property may require travel, setup, file creation, drafting, review, and delivery. That means very small projects may not scale down perfectly by area. A fair quote often combines size, complexity, deliverables, and minimum service requirements. The practical takeaway is that square footage is a starting point, not a complete pricing model.
Cost Comparison by Property Type
Different property types create different measurement and drafting requirements. A single-family home, condo, commercial tenant space, warehouse, and mixed-use building may all need as-built drawings, but the work involved is different. A homeowner may need floor plans and elevations for renovation. A contractor may need accurate CAD drawings for pricing. A property manager may need area documentation. The practical recommendation is to compare pricing by property type and deliverable scope.
Property type
Typical documentation need
Cost drivers
Quote note
Condo or apartment
Floor plans, room dimensions, possible renovation base
A property type comparison helps set expectations, but it does not replace a project-specific quote. Two homes can have very different documentation needs. Two commercial units can vary widely depending on tenant improvements and ceiling conditions. The practical takeaway is to use property type as a starting category, then price the actual scope.
What Is Included in the Cost of As-Built Floor Plans?
The cost of as-built floor plans may include site measurement, field notes, drafting, drawing review, PDF export, and delivery. A basic package may show the existing layout, room dimensions, doors, windows, stairs, and key fixed elements. This can be enough for early renovation planning, contractor discussion, or design review. The practical rule is to confirm what is included before assuming a floor plan package is complete.
A more detailed as-built package may include additional drawings and file formats. These can include DWG files, exterior elevations, interior elevations, building sections, roof plans, reflected ceiling plans, area plans, point cloud files, or Revit models. Each deliverable adds value for specific project teams, but also adds cost. Owners should ask the architect, designer, contractor, or property manager what files are required.
The cost may also include quality control. A professional provider should review the drawings against field measurements, scan data, or project scope before delivery. Quality control helps reduce drafting errors and missed information. This is especially important when drawings support contractor estimates, permit coordination, or design work. The practical takeaway is that the cheapest drawing package may not include the review process needed for higher-risk projects.
What May Not Be Included in a Basic Quote
A basic quote may not include every drawing or file a project team expects. For example, a floor plan quote may not include elevations, sections, roof plans, reflected ceiling plans, Revit modelling, point cloud delivery, or revisions beyond the original scope. It may also exclude inaccessible areas, concealed conditions, exterior measurement, or structural analysis. Owners should ask about exclusions before approving the quote.
A basic as-built quote may also exclude design services. Measuring a building and drawing existing conditions is different from designing a renovation, preparing engineering, or managing permit submission. A measurement team can provide the base documentation, but architects, designers, engineers, or code consultants may still be required for proposed work. The practical recommendation is to clarify roles early.
Hidden conditions are usually not included unless they are visible or separately investigated. Laser scanning and measurement capture visible conditions; they do not see through walls, ceilings, floors, or concealed assemblies. If hidden plumbing, structure, electrical systems, or hazardous materials matter, additional investigation may be needed. Owners should treat as-built drawings as existing visible-condition documentation, not proof of everything concealed inside the building.
Manual Measuring vs 3D Laser Scanning Cost
Manual measuring can be cost-effective for simple, low-risk spaces. A small condo, basic room layout, simple office, or early planning project may not require 3D laser scanning. Manual measurement can produce useful floor plans when the building is regular, accessible, and the deliverable is not highly complex. The practical rule is to use manual measuring when the project risk is low.
3D laser scanning is often worth the added cost when the building is complex, large, irregular, occupied, or difficult to measure manually. Scanning captures visible geometry as point cloud data and can support scan-to-CAD or scan-to-BIM deliverables. This is useful for older homes, commercial tenant improvements, industrial spaces, heritage buildings, facilities, and projects requiring elevations or sections. Owners should consider scanning when missed measurements could create expensive downstream issues.
The right measurement method depends on the cost of being wrong. If a small measurement error would only affect early discussion, simple measuring may be enough. If a measurement error could affect custom millwork, structural coordination, contractor pricing, tenant improvements, or permit drawings, stronger documentation may be safer. The practical takeaway is to choose the measurement method based on risk, not only upfront cost.
How Deliverables Affect As-Built Drawings Cost
Deliverables are one of the biggest pricing factors because each file type requires different work. A PDF floor plan is usually less demanding than a full CAD package. A CAD package is usually less demanding than a detailed Revit model. A point cloud may require scanning, registration, and export. Elevations and sections require additional drafting or modelling effort. The practical rule is that more deliverables usually mean more cost.
Deliverable
Relative cost impact
Best used for
Buyer question
PDF floor plans
Lower
Owner review, early planning, contractor discussion
Stairs, levels, ceiling heights, structural coordination
How many sections are needed?
Reflected ceiling plans
Medium to higher
Lighting, ceiling, mechanical planning
Are ceiling elements visible and within scope?
Registered point cloud
Medium to higher
Technical reference, future CAD/BIM work
Is the point cloud delivered or used internally only?
Revit / BIM model
Higher
Model-based design, coordination, facility records
What level of detail is required?
Full as-built package
Higher
Renovation, commercial, facility, or complex projects
Which drawings and formats are included?
A client should not order every deliverable by default. A homeowner may only need floor plans and elevations. A contractor may need dimensioned PDFs and DWG files. An architect may need CAD files or a Revit model. A facility manager may need a long-term documentation package. The practical takeaway is to order the files that the project team will actually use.
How Building Complexity Changes the Quote
Building complexity changes the quote because complex geometry takes more time to capture and document. A simple rectangular layout can be measured and drafted quickly. A building with split levels, stair complexity, sloped floors, irregular walls, rooflines, exterior details, or old additions requires more fieldwork and more drafting judgment. Complexity increases both measurement and processing time.
Mechanical and structural complexity can also affect pricing. Exposed ducts, pipes, beams, columns, mezzanines, loading areas, equipment zones, and ceiling spaces may require additional documentation if they affect the project. If these elements are included in the scope, the price should reflect the added capture and drafting work. Owners should explain whether the project requires only architectural floor plans or also structural and visible systems documentation.
Occupied or restricted buildings can be more expensive to document than empty spaces. Commercial tenants, active warehouses, healthcare spaces, strata buildings, or industrial facilities may require scheduling, escorts, safety procedures, or off-hours access. These conditions can increase field time and coordination effort. The practical recommendation is to tell the measurement provider about access restrictions before the quote is finalized.
How As-Built Drawings Affect Contractor Estimates and Change Orders
As-built drawings affect contractor estimates because contractors use drawings to understand scope, dimensions, access, demolition, material quantities, and site constraints. If drawings are incomplete or inaccurate, contractors may add contingencies or exclude uncertain work. Accurate as-built drawings make it easier for contractors to price the same scope from the same information. Owners should provide the same drawing package to every bidder.
As-built drawings can reduce change order risk by identifying visible existing-condition issues before construction begins. If proposed work is based on wrong dimensions, conflicts may appear after demolition, ordering, or installation. Accurate floor plans, elevations, sections, and CAD files help the project team resolve more issues during planning. The practical takeaway is that better documentation can move some problems out of construction and into pre-construction.
As-built drawings do not eliminate every change order. Hidden conditions, concealed structure, hazardous materials, design revisions, owner changes, and permit-related changes can still affect cost. The value of as-built drawings is that they reduce avoidable uncertainty about visible and measured existing conditions. Owners should view as-built documentation as one part of cost control, not a guarantee of a fixed construction budget.
Why Cheap As-Built Drawings Can Become Expensive
Cheap as-built drawings can become expensive if they are not detailed enough for the next project step. A low-cost plan may be fine for early planning, but not for renovation design, contractor estimates, or permit coordination. If the project team needs the building measured again, the original savings disappear. The practical rule is to judge price against usefulness.
Cheap drawings can also create hidden costs if the file format is wrong. A PDF-only plan may not help an architect who needs editable DWG files. A basic CAD plan may not help a Revit-based team that needs BIM documentation. A plan without elevations may not support exterior changes. Before choosing the lowest quote, owners should confirm whether the deliverables match the workflow.
Cheap drawings can also lack quality control. If measurements are not reviewed, inaccessible areas are not noted, or assumptions are not documented, errors may move into design and construction. Professional documentation should explain what was measured, what was included, and what was excluded. The practical takeaway is that saving money should not mean losing clarity.
How to Save Money Without Losing Quality
The best way to save money is to define the scope clearly before fieldwork. Tell the provider exactly what the drawings will be used for, which areas are included, which deliverables are needed, and which professionals will use the files. Clear scope prevents over-ordering and under-ordering. The practical recommendation is to request only the documentation needed for the current project phase.
Another way to save money is to prepare the site before the appointment. Unlock rooms, clear major obstructions, provide access to exterior areas, notify tenants, and gather available drawings. Better access reduces fieldwork delays and lowers the chance of return visits. Site preparation is one of the simplest ways to protect the quote.
A third way to save money is to ask the design team what file formats are actually required. If the architect only needs DWG files, a full Revit model may be unnecessary. If the owner only needs early budgeting plans, elevations or sections may not be needed yet. If the project later becomes more complex, additional deliverables can be added. The practical takeaway is to match deliverables to current decisions.
A fourth way to save money is to provide existing records, while still verifying them. Old blueprints, real estate plans, strata plans, previous permit drawings, or renovation sketches can help the measurement team understand the building. They should not replace current measurement when accuracy matters, but they can help scope the work efficiently. Owners should share available documents before the quote.
How to Get an Accurate Quote for As-Built Drawings
To get an accurate quote for as-built drawings, provide the property address or general location, building type, approximate size, number of levels, intended use, required deliverables, and site access details. Also explain whether the drawings are for renovation planning, contractor pricing, permit coordination, commercial leasing, or facility documentation. The more specific the request, the more accurate the quote.
A good quote should list deliverables clearly. It should state whether the package includes PDF floor plans, DWG files, elevations, sections, point cloud files, Revit models, or area calculations. It should also state assumptions, exclusions, timeline, revision terms, and whether a site visit or 3D scan is included. Owners should avoid vague quotes that do not define the final files.
A good quote should also explain what could change the price. Additional areas, new deliverables, inaccessible spaces, rush timelines, or expanded modelling detail may affect cost. This does not mean the provider is unreliable; it means the scope must be managed. The practical takeaway is to request a quote that is transparent enough to prevent surprise add-ons.
As-Built Survey Pricing by Project Stage
As-built survey pricing also depends on the project stage. Early budgeting may need a lighter documentation package, while design development may need more detailed CAD files. Permit coordination may require additional existing and proposed drawings prepared by the right professionals. Construction planning may require sections, elevations, or more detailed documentation. The practical rule is to match the package to the current stage.
Project stage
Recommended documentation
Pricing logic
Early feasibility
Basic measured floor plans
Keep cost controlled while testing options
Renovation design
Accurate as-built floor plans and CAD files
Give designers a reliable base
Permit coordination
Existing drawings plus required proposed/consultant drawings
Scope depends on municipality and project type
Contractor pricing
Dimensioned drawings, relevant elevations or sections
Reduce assumptions in bids
Complex coordination
3D scan, scan-to-CAD, or scan-to-BIM
Use stronger documentation when risk is high
Facility records
CAD/BIM package and organized digital documentation
Invest in reusable long-term records
The project stage approach prevents overspending too early while avoiding under-documentation later. For example, a homeowner may start with floor plans and add elevations if the design requires exterior changes. A commercial owner may start with scan-to-CAD if tenant improvements are likely. The practical takeaway is to order documentation in the level needed for the next decision, while keeping future needs in mind.
Cost Drivers by Deliverable Type
Cost drivers vary by deliverable type. A floor plan mainly depends on size, access, and layout complexity. Elevations depend on exterior visibility, façade complexity, and number of sides. Sections depend on levels, stairs, ceiling heights, and structural relationships. Revit models depend on level of detail, building systems, and modelling scope. The practical rule is that each deliverable should have a reason.
Deliverable type
Main cost drivers
When it is worth adding
Floor plans
Area, rooms, access, dimensions
Almost every renovation or property documentation project
Elevations
Exterior complexity, façade access, number of elevations
Levels, stairs, ceiling heights, structural relationships
Split-level homes, additions, major renovations
Reflected ceiling plans
Ceiling access, lighting, services, visible elements
Interior design, lighting, commercial fit-outs
CAD files
Drafting standards, layering, editable output
Architects, designers, contractors need DWG
Point cloud
Scanning, registration, export
Technical teams need scan reference
Revit model
LOD, categories, model organization, QA
Revit-based design or coordination
Area plans
Measurement method, space boundaries, reporting
Leasing, property management, commercial use
This table helps clients avoid paying for deliverables that do not support the project. If the renovation does not affect the exterior, exterior elevations may not be needed. If no one will use Revit, BIM modelling may be unnecessary. If the project involves contractor pricing, CAD files may be valuable. The practical takeaway is to ask “who will use this file?” before adding it to the scope.
Common Mistakes When Budgeting for As-Built Drawings
A common mistake is budgeting for basic floor plans when the project actually needs renovation-grade as-built documentation. A simple plan may look useful, but it may not include the detail required for design, permits, or contractor pricing. This can lead to remeasurement and redrafting later. Owners should budget based on project use, not the cheapest floor plan product.
Another mistake is assuming price per square foot gives the full answer. Square footage matters, but deliverables, access, complexity, and level of detail can change the quote significantly. Two properties of the same size may require very different work. Owners should use price per square foot only as an early budgeting tool.
A third mistake is ignoring file formats. A contractor may be able to use a dimensioned PDF, while an architect may need DWG files, and a BIM team may need Revit or point cloud data. If the correct files are not included, the project may need extra drafting. Clients should confirm file requirements before approving the quote.
A fourth mistake is waiting too long. If as-built drawings are ordered after design work has already started, existing-condition errors may already be built into the concept. This can cause revisions and delay. The practical recommendation is to order as-built drawings early in the budgeting or design phase.
Practical Decision Matrix: What As-Built Package Do You Need?
A practical decision matrix helps match as-built drawing price to project need. The right package depends on whether the project is for budgeting, design, permit coordination, construction pricing, commercial leasing, or facility records. The goal is not to buy the most expensive documentation, but to buy the documentation that prevents avoidable problems. The practical rule is to pay for the level of certainty the project requires.
Project situation
Recommended package
Why it fits
Early homeowner budgeting
Basic measured floor plans
Helps estimate scope before deeper design
Interior renovation
Accurate floor plans, PDF and DWG
Gives designers and contractors a usable base
Kitchen or millwork project
Floor plans and selected interior elevations
Reduces fit and dimension risk
Addition or exterior work
Floor plans, exterior elevations, sections
Existing and proposed conditions must align
Permit-support workflow
Measured existing drawings for design team
Supports permit drawing development
Contractor bidding
Dimensioned CAD drawings and relevant views
Helps compare estimates
Commercial tenant improvement
Existing CAD base, tenant areas, service spaces
Supports landlord, tenant, designer, and contractor
Warehouse or facility
3D scanning, CAD, possible BIM
Captures larger and more complex conditions
Complex Revit workflow
Scan-to-BIM package
Supports model-based coordination
Long-term property records
Organized CAD/BIM documentation
Useful for future renovations and management
The decision matrix should be discussed with the people who will use the files. If the architect needs CAD, a PDF-only package may be insufficient. If the contractor only needs a dimensioned plan, a full BIM model may be unnecessary. Owners should request a quote that matches the decision matrix for their specific project.
How As-Built Drawings Connect to Permit and Building Measuring Services
As-built drawings often connect directly to building measuring services because accurate permit and renovation work starts with measured existing conditions. A building measuring service captures what exists, then the drafting team turns that information into as-built drawings. Those drawings can then support proposed design, permit coordination, contractor estimates, or property documentation. The practical sequence is measure first, design second.
As-built drawings can also support permit drawing preparation. They provide the existing-condition base that architects, designers, and consultants may use to prepare proposed drawings. As-built drawings do not guarantee permit approval, because approval depends on the proposed design, municipality, zoning, building code requirements, and professional responsibility. However, they can help make the permit drawing process clearer and better grounded.
For MeasureBuilt, the natural next step is to connect the cost discussion to the as-built drawings and building measuring services pages. A reader asking “how much do as-built plans cost?” is usually close to requesting a quote. The article should guide that reader from pricing education to action. Request a free quote for your project to get pricing based on your property, scope, access, and deliverables.
Key Takeaways
As-built drawings cost depends on building size, property type, complexity, access, level of detail, measurement method, and final deliverables. Price per square foot can help with early budgeting, but it should not be the only pricing method. A small complex building can require more effort than a larger simple space.
The cost of as-built floor plans should be compared by usefulness, not only by price. A basic floor plan may be enough for early planning, while CAD drawings, elevations, sections, point clouds, or Revit models may be needed for renovation, permit coordination, contractor pricing, or facility documentation. The correct deliverable saves more money than the cheapest deliverable.
The best way to get accurate as-built survey pricing is to request a project-specific quote. Provide building type, approximate size, number of levels, access conditions, project goal, required deliverables, and timeline. Request a free quote for your project so the scope can be priced correctly from the beginning.
FAQ
How much do as-built plans cost in Vancouver?
As-built plans cost depends on the building size, property type, complexity, level of detail, measurement method, and final deliverables. A basic residential floor plan package will not cost the same as a commercial scan-to-CAD or scan-to-BIM package. The most accurate way to answer “how much do as-built plans cost?” is to request a quote based on your specific property and project scope.
What affects as-built drawings cost the most?
The biggest factors affecting as-built drawings cost are square footage, building complexity, access, required deliverables, level of detail, and whether the project uses manual measurement or 3D laser scanning. Deliverable format is especially important. PDF floor plans, DWG CAD files, elevations, sections, point clouds, and Revit models all require different levels of work.
Is as-built drawing price per square foot accurate?
As-built drawing price per square foot can be useful for early budgeting, but it is not always accurate as a final pricing method. Two buildings with the same square footage can require very different work if one is simple and the other has multiple levels, irregular geometry, tenant spaces, or complex deliverables. Use square footage as a starting point, then request a scoped quote.
What is included in the cost of as-built floor plans?
The cost of as-built floor plans may include site measurement, drafting, dimensioned floor plans, PDF delivery, drawing review, and file preparation. More detailed packages may include DWG files, elevations, sections, reflected ceiling plans, point clouds, or Revit models. Always ask what is included and what is excluded before comparing quotes.
Do I need 3D laser scanning for as-built drawings?
You may need 3D laser scanning if the building is complex, older, irregular, large, occupied, or difficult to measure manually. Scanning is useful when the project needs scan-to-CAD, scan-to-BIM, elevations, sections, or a more complete existing-condition record. Simple measuring may be enough for small, regular, low-risk spaces.
Why is one as-built drawing quote higher than another?
One quote may be higher because it includes more deliverables, more detail, 3D laser scanning, CAD files, elevations, sections, BIM modelling, point cloud registration, site complexity, or additional quality control. A lower quote may only include basic floor plans. Compare quotes by scope and file formats, not just by total price.
Can I save money by using old blueprints?
Old blueprints can help the measurement team understand the building, but they should not automatically replace current measurement. Buildings may have changed through renovations, additions, tenant improvements, or field modifications. Using old drawings without verification can create errors in design and construction. Share old blueprints, but verify current conditions when accuracy matters.
Do as-built drawings help reduce contractor change orders?
As-built drawings can reduce some change order risk by documenting visible existing conditions before construction starts. Accurate drawings help contractors understand dimensions, access, demolition scope, and constraints before pricing. They do not eliminate every change order, especially hidden conditions or owner changes, but they can reduce avoidable measurement-related surprises.
Are as-built drawings required for permits in Vancouver?
As-built drawings may be needed to support permit drawings when a renovation depends on existing conditions. Exact requirements depend on the municipality, project type, scope, and professionals involved. As-built drawings do not guarantee permit approval, but they can give designers, architects, and consultants a more reliable base for preparing proposed permit drawings.
How do I get an accurate quote for as-built drawings?
To get an accurate quote, provide the property type, approximate square footage, number of levels, address or general location, project goal, required deliverables, timeline, and access conditions. Also explain whether the drawings are for renovation, contractor pricing, permit coordination, commercial leasing, or facility records. Request a free quote for your project to receive pricing based on your actual scope.
Conclusion
As-built drawings cost in Vancouver cannot be reduced to one universal number because each project has different size, complexity, access, deliverables, and risk. A basic floor plan for early budgeting is very different from a scan-to-CAD package for renovation drawings or a scan-to-BIM model for complex coordination. Price per square foot can help with early planning, but final as-built survey pricing should be based on the actual scope. Homeowners, contractors, developers, and property managers should define what the drawings need to support, confirm the required file formats, and choose a measurement method that matches the project risk. To get the most accurate building measurement cost Vancouver estimate, request a free quote for your project and provide clear details about the property, access, deliverables, and timeline.
Permit drawings vs as-built drawings are different types of construction documentation used at different stages of a renovation. As-built drawings document the existing building as it stands today, while permit drawings show the proposed work for municipal review. In BC renovations, an accurate as-built survey is often needed first because permit drawings should be based on verified existing conditions, not outdated plans or assumptions.
Executive Summary
Permit drawings and as-built drawings serve different purposes in BC renovation projects. As-built drawings show the current condition of a property, including existing walls, openings, stairs, levels, rooms, structural elements, and other visible building features within the agreed scope. Permit drawings show proposed changes and help architects, designers, engineers, and municipalities review the planned work against applicable requirements. In Vancouver and Greater Vancouver, many renovations begin with old drawings, real estate floor plans, or incomplete records that no longer match the building. This can create problems when the design team prepares permit drawings from inaccurate information. An accurate as-built survey helps establish a reliable existing-condition base before design, consultant coordination, contractor pricing, or permit submission begins. The practical takeaway is simple: document what exists before drawing what will change.
Permit Drawings vs As-Built Drawings in BC: What You Need Before a Renovation
What Permit Drawings vs As-Built Drawings Means Before a Renovation
Permit drawings vs as-built drawings describes the difference between proposed-work documentation and existing-condition documentation. As-built drawings show what currently exists in the building, while permit drawings show what the owner wants to change, add, remove, or build. These two drawing types often work together, but they are not interchangeable. The practical rule is to create reliable as-built drawings before using them as the base for permit drawings.
As-built drawings are existing-condition records. In a renovation context, as-built drawings may document floor plans, wall locations, doors, windows, stairs, ceiling heights, exterior elevations, sections, structural elements, fixed equipment, or visible building systems depending on scope. These drawings help architects, designers, engineers, and contractors understand the current building before proposed work begins. Property owners should use as-built drawings to establish the factual starting point for the renovation.
Permit drawings are proposed-work documents used for municipal review and project coordination. Permit drawings may include existing and proposed floor plans, elevations, sections, structural details, site information, code-related notes, and other project-specific drawings prepared by qualified professionals where required. The exact permit drawing requirements depend on the municipality, building type, and renovation scope. Owners should treat permit drawings as project-specific documentation, not as a generic drawing package.
Why As-Built Drawings Often Come Before Permit Drawings
As-built drawings often come before permit drawings because the design team needs to know the existing building before designing the proposed changes. If the existing floor plan is wrong, the proposed renovation layout may also be wrong. This can affect stairs, walls, openings, ceiling heights, additions, structural coordination, accessibility planning, or contractor pricing. The practical takeaway is that permit drawings are only as reliable as the existing-condition base used to create them.
An accurate as-built survey helps prevent design work from being built on outdated records. Many Vancouver and BC properties have previous renovations, enclosed areas, basement changes, tenant improvements, additions, or field-built conditions that do not appear on original drawings. Real estate floor plans may show room layout, but they are usually not detailed enough for renovation-grade documentation. Owners should verify existing conditions before asking a designer or architect to prepare permit drawings.
As-built drawings also help the project team distinguish existing conditions from proposed work. This distinction matters because renovation drawings usually need to show what is already there and what will change. If the existing condition is unclear, the proposed design becomes harder to review, price, and coordinate. The practical recommendation is to prepare accurate existing drawings before the renovation design becomes detailed.
What As-Built Drawings Usually Include
As-built drawings usually include the existing layout and dimensions of a building within the agreed scope. For a residential renovation, this may include existing floor plans, room dimensions, doors, windows, stairs, wall locations, ceiling heights, and relevant exterior information. For commercial or industrial spaces, as-built drawings may also include tenant areas, columns, loading areas, mezzanines, service rooms, or fixed equipment zones. The practical rule is to include the elements that affect the next project decision.
As-built drawings can be delivered in different formats depending on how the project team will use them. A homeowner may need PDF floor plans for review, while an architect may need DWG files, Revit models, elevations, sections, or point cloud data. Contractors may need clear drawings for estimating and scope review. The deliverable should match the workflow of the professionals who will use the drawings.
As-built drawings should also state assumptions and limitations. If certain rooms were inaccessible, ceiling spaces were closed, exterior areas were blocked, or hidden conditions were not verified, those limitations should be documented. This matters because as-built drawings represent what was measured or observed within scope, not everything concealed inside a building. Owners should ask for clear scope notes with the as-built package.
What Permit Drawings Usually Include
Permit drawings usually show the proposed renovation work and how it relates to the existing building. Depending on the project, permit drawings may include existing plans, proposed plans, elevations, sections, details, structural information, energy-related information, site information, or consultant drawings. The exact requirements depend on the municipality and project scope. The practical recommendation is to confirm permit requirements with the appropriate professionals and local authority before submission.
Permit drawings must communicate the design intent clearly enough for review. For a renovation, this often means showing demolition, new construction, altered rooms, proposed openings, additions, stairs, structural changes, or building envelope changes. If the drawings do not clearly distinguish existing and proposed conditions, reviewers and contractors may not understand the scope. Owners should make sure the drawing set communicates what exists, what changes, and what remains.
Permit drawings are not the same as construction-ready trade documentation in every case. Some permit drawing sets focus on municipal review, while construction drawings may include additional details for pricing, coordination, fabrication, and site execution. The amount of detail needed depends on the project and the professionals involved. Property owners should ask whether they need permit drawings only or a fuller construction documentation package.
Permit Drawings vs As-Built Drawings: Practical Comparison
Permit drawings and as-built drawings answer different questions. As-built drawings answer, “What exists now?” Permit drawings answer, “What is proposed, and how will it be reviewed?” This distinction is important because using one drawing type for the other purpose can create confusion. The practical takeaway is to use as-built drawings as the existing-condition base and permit drawings as the proposed-work package.
Municipal reviewers, architects, designers, consultants
Submission may be unclear or incomplete
Construction drawings
Communicate buildable details and scope
After or alongside permit documentation
Contractors, trades, consultants, owners
Pricing and site execution may rely on unclear information
Record drawings
Document final or updated conditions after work
After construction or project closeout
Owners, facility managers, future project teams
Future renovations may start from outdated records
A renovation project may need more than one drawing type. A homeowner may first need as-built floor plans, then permit drawings, and later construction details or record drawings. A commercial project may require as-built documentation, consultant drawings, tenant improvement drawings, and final owner records. The practical rule is to order the documentation that supports the current project phase without confusing it with another drawing type.
Why Original Blueprints Are Not Always Enough
Original blueprints are not always enough because original drawings may not show what was actually built or changed later. Buildings can be modified during construction, renovated by previous owners, altered by tenants, or changed through small undocumented improvements. Even when original drawings are available, they may not reflect current wall locations, openings, stairs, ceiling heights, or existing services. Property owners should treat old blueprints as reference material, not verified existing conditions.
Original blueprints can still be useful. They may help the measurement team understand the building history, structural intent, or previous design logic. They can also provide clues about areas that deserve closer review. However, old drawings should be checked against the actual building before being used as the basis for renovation design. The practical takeaway is to compare historical documents with measured site conditions.
Real estate floor plans are also not the same as as-built drawings for renovation. A real estate plan may help buyers or tenants understand layout, but it is usually created for presentation rather than detailed renovation coordination. Permit drawings and contractor estimates often require more precise existing-condition documentation. Owners should not rely on a listing floor plan as the base for permit drawings unless a qualified professional confirms it is suitable.
When an Accurate As-Built Survey Is Needed First
An accurate as-built survey is usually needed first when the project changes the layout, structure, exterior, stairs, openings, building envelope, or building systems. These changes depend on current conditions, so weak existing documentation can affect the proposed design. If a wall, stair, roofline, or opening is documented incorrectly, the permit drawings may need revision later. The practical rule is to survey first when the renovation depends on precise existing geometry.
An accurate as-built survey is also important when original drawings are missing, incomplete, old, or inconsistent. Many Vancouver homes, commercial spaces, and older buildings have incomplete documentation. A new as-built survey gives the project team a current record that can support design, permit coordination, and contractor pricing. Property owners should commission as-built drawings before paying for detailed design when existing records are unreliable.
An accurate as-built survey is especially useful when several professionals need the same baseline. Architects, interior designers, engineers, contractors, and consultants may all interpret a building differently during a renovation. A shared as-built drawing set reduces inconsistent assumptions. The practical takeaway is that the more people depend on the existing layout, the more important accurate as-built documentation becomes.
When 3D Laser Scanning Helps with As-Built Drawings
3D laser scanning helps with as-built drawings when the building is complex, irregular, large, or difficult to measure manually. A laser scan captures visible geometry as point cloud data that can be converted into CAD drawings, Revit models, floor plans, elevations, and sections. This is useful for older homes, commercial units, industrial spaces, heritage buildings, and multi-level properties. Owners should consider scanning when manual measurement may miss important spatial relationships.
3D laser scanning is not required for every renovation. A small, simple, low-risk project may only need manual measurement or basic floor plans. A full scan-to-BIM workflow may be unnecessary if the project does not require model-based coordination. The right method depends on the building complexity, required deliverables, and cost of measurement errors. The practical recommendation is to choose the measurement method based on risk, not technology hype.
3D laser scanning also has limitations. Laser scanners capture visible surfaces by line of sight; they do not see through walls, floors, ceilings, or concealed assemblies. Hidden pipes, concealed structure, internal wall framing, and underground services require other verification methods. A responsible as-built survey should explain what was captured and what remains unverified. Owners should use laser scanning as a strong visible-condition record, not as proof of hidden conditions.
How As-Built Drawings Affect Contractor Estimates and Change Orders
As-built drawings affect contractor estimates because contractors price renovation work from the information they receive. Contractors need dimensions, layout, access conditions, demolition scope, openings, ceiling heights, structural relationships, and project constraints to estimate materials and labour. If the existing drawings are incomplete or inaccurate, contractors may add contingencies or exclude uncertain work. Owners should provide the same accurate as-built documentation to every bidding contractor.
As-built drawings can reduce change order risk by identifying existing-condition issues before construction begins. If the proposed work is based on inaccurate existing dimensions, conflicts may appear after demolition, ordering, or installation. Accurate as-built drawings help the design team resolve more issues during planning, when changes are usually easier to manage. The practical takeaway is that accurate existing documentation supports cost control by reducing avoidable surprises.
As-built drawings do not eliminate every change order. Hidden conditions, concealed damage, hazardous materials, design changes, owner changes, and code-related revisions may still affect cost. The value of accurate as-built drawings is that they reduce uncertainty about visible and measured existing conditions. Owners should treat as-built surveys as one part of renovation risk management, not as a guarantee of a fixed construction cost.
How Permit Drawings Support Renovation Permits Vancouver Projects
Permit drawings support renovation permits Vancouver projects by showing proposed work in a format that can be reviewed. The drawings should communicate what is being changed and how the proposed work relates to the existing building. Depending on scope, permit drawings may need to show floor plans, elevations, sections, structural changes, life-safety information, or consultant input. The practical recommendation is to confirm requirements before preparing the drawing set.
Permit drawings are usually stronger when they are based on accurate as-built drawings. If the existing-condition base is wrong, the proposed drawing set can contain conflicts that need correction later. This can slow down design coordination, contractor pricing, and permit preparation. Owners should not wait until the permit stage to discover that the existing building was measured poorly.
Permit drawings do not guarantee approval simply because they are detailed. Permit outcomes depend on the proposed design, zoning, building code requirements, municipality, professional responsibility, and project-specific conditions. Accurate as-built drawings can support clearer documentation, but they do not replace qualified design review or municipal authority. Property owners should treat permit drawings as part of a regulated process, not as an automatic approval tool.
Construction Documentation BC: How the Drawing Types Work Together
Construction documentation BC projects often require several drawing types to work together. As-built drawings show the current building, permit drawings show the proposed work for review, and construction drawings may provide additional details for pricing and building. Record drawings may later document the final condition after the project is complete. The practical takeaway is that each drawing type supports a different project phase.
For a renovation, the documentation sequence often begins with existing conditions. The project team measures the building, prepares as-built drawings, develops proposed designs, coordinates consultants, and then prepares permit drawings where required. Contractors may then need more detailed construction information for pricing and execution. This sequence helps prevent proposed work from being designed on top of weak existing data.
The drawing sequence may vary by project. A small renovation may need only basic existing drawings and a simple permit package, while a complex commercial or structural project may require as-built surveys, CAD files, BIM models, consultant drawings, and detailed construction documentation. Owners should ask their architect or designer which documents are required for the project scope. The practical rule is to match documentation to risk and review requirements.
Practical Decision Matrix: What Do You Need Before a Renovation?
A practical decision matrix helps owners decide whether they need as-built drawings, permit drawings, or both. The correct answer depends on the renovation scope, existing records, municipality, and professionals involved. Some projects only need simple documentation, while others need detailed existing-condition surveys and permit drawing packages. The practical rule is to identify what exists before deciding what will be submitted.
Renovation situation
As-built drawings needed?
Permit drawings needed?
Practical reason
Painting, finishes, minor cosmetic updates
Usually not detailed
Often not required, depending on scope
Low-risk work with limited design impact
Kitchen or bathroom layout change
Often useful
May be required depending on scope
Dimensions and services affect design
Basement renovation or suite planning
Strongly recommended
Often required depending on scope
Existing layout, ceiling heights, stairs, and access matter
Removing or altering walls
Strongly recommended
Often required, especially for structural work
Existing structure and proposed changes must be coordinated
Addition or exterior change
Needed
Usually required
Existing building, site, elevations, and proposed work must align
Commercial tenant improvement
Strongly recommended
Often required depending on work
Existing demising walls, exits, services, and layout matter
Heritage or older building renovation
Strongly recommended
Often required depending on scope
Existing details and irregular conditions affect design
Facility or industrial upgrade
Strongly recommended
May be required depending on scope
Documentation supports coordination, safety, and contractor pricing
The decision matrix should be used before design work becomes detailed. If the owner waits too long to verify existing conditions, the design may need to be corrected later. Early as-built documentation helps the project team identify constraints, choose the right permit pathway, and prepare more reliable cost information. Owners should discuss documentation needs with their project professionals at the beginning.
Common Mistakes with Permit Drawings and As-Built Drawings
A common mistake is using old drawings as if they are current as-built drawings. Old drawings may be helpful, but they may not show renovations, field changes, settling, additions, or tenant improvements. If the project team uses them without verification, the proposed design may be based on incorrect information. Owners should verify existing conditions before relying on historical drawings.
Another common mistake is asking for permit drawings before the existing building is properly documented. A designer may be able to start with sketches or old plans, but detailed permit drawings usually need accurate existing information. If the existing base is weak, the drawing package may require revisions. The practical takeaway is to build the proposed design on a reliable measured base.
A third mistake is assuming permit drawings are the same as construction drawings. Permit drawings may be prepared for review, while construction drawings may require more detail for pricing, sequencing, and trade coordination. Depending on the project, the contractor may need additional drawings or specifications beyond the permit package. Owners should ask what documentation is needed for both approval and construction.
A fourth mistake is assuming accurate drawings guarantee approval or eliminate all site risk. As-built drawings and permit drawings improve documentation quality, but they do not replace code review, engineering, contractor due diligence, or municipal decision-making. Hidden conditions may still be discovered during construction. Owners should use good documentation to reduce uncertainty, not to promise certainty.
Questions to Ask Before Ordering As-Built or Permit Drawings
The first question to ask is what the drawings will be used for. A floor plan for early planning is different from an as-built survey for architectural design, and both are different from permit drawings. The required detail depends on whether the project involves design, contractor estimates, municipal review, or construction. Owners should define the purpose before ordering drawings.
The second question to ask is what existing-condition information is already available. Old blueprints, real estate plans, strata plans, previous permit drawings, or renovation records may help, but they should be verified against the building. If records are missing or inconsistent, a new as-built survey may be needed. The practical recommendation is to gather old documents but not rely on them blindly.
The third question to ask is which file formats the design team needs. Architects may need DWG files, Revit models, PDFs, elevations, sections, or point cloud data. Contractors may need dimensioned PDFs and clear scope drawings. Owners may need readable floor plans for review. Choosing the wrong file format can slow the project later. Confirm deliverables before measurement begins.
The fourth question to ask is who is responsible for permit drawings. In some projects, a designer, architect, engineer, or other qualified professional may need to prepare or review specific drawings. Measurement teams can provide accurate as-built documentation, but they may not be responsible for design, engineering, or code compliance unless that is part of the agreed service. Owners should clarify roles before the project starts.
How to Prepare for an As-Built Survey or 3D Laser Scan
Owners should prepare for an as-built survey by making all relevant areas accessible. The measurement team may need to access rooms, basements, garages, crawlspaces, attics, mechanical rooms, exterior walls, tenant areas, or service spaces depending on scope. Locked doors, stored materials, parked vehicles, and blocked areas can create missing information. The practical recommendation is to clear access before the appointment.
Owners should provide old drawings and project context before the survey. Old blueprints, real estate floor plans, sketches, renovation records, and previous permits can help the measurement team understand the building history. These documents should be treated as references, not verified facts. A good as-built survey compares available records with current site conditions.
Owners should explain the renovation scope before measurement begins. A kitchen renovation, basement suite, addition, wall removal, tenant improvement, or exterior change may require different measurement detail. If the team knows what the permit drawings or design work must support, the as-built survey can be scoped more appropriately. The practical takeaway is that better project context leads to better documentation.
Key Takeaways
Permit drawings vs as-built drawings is a project sequence issue as much as a drawing definition issue. As-built drawings document the existing building, while permit drawings communicate proposed work for review. For many BC renovations, an accurate as-built survey should come first because proposed drawings depend on reliable existing conditions.
Accurate as-built drawings can support better design, clearer contractor estimates, and stronger permit drawing coordination. They do not guarantee permit approval, eliminate hidden conditions, or replace professional design and engineering responsibilities. Their value is that they reduce avoidable uncertainty about the existing building.
The best next step before a renovation is to confirm the scope of work, gather any old drawings, ask the design team what deliverables are needed, and commission an accurate as-built survey if current conditions are uncertain. Once the existing building is documented, the project team can prepare permit drawings with a clearer and more reliable base.
FAQ
What is the difference between permit drawings vs as-built drawings?
Permit drawings show proposed work for municipal review, while as-built drawings document the existing building as it currently stands. As-built drawings answer “what exists now?” and permit drawings answer “what is proposed?” In BC renovation projects, the two often work together because permit drawings are usually clearer when they are based on accurate existing-condition documentation.
Do I need as-built drawings before permit drawings in BC?
You often need as-built drawings before permit drawings in BC when the renovation depends on existing layout, structure, stairs, openings, ceiling heights, or building systems. Accurate as-built drawings give the design team a reliable base for proposed work. If old drawings are missing, outdated, or inconsistent, an as-built survey should usually happen before detailed permit drawings are prepared.
What are permit drawings BC used for?
Permit drawings BC are used to communicate proposed construction or renovation work for municipal review. Depending on scope, they may include floor plans, elevations, sections, structural information, site information, consultant drawings, or code-related notes. Permit drawings help reviewers understand what is being changed, but requirements vary by municipality, property type, and project scope.
What are as-built drawings Vancouver used for?
As-built drawings Vancouver are used to document the existing condition of a property before renovation, design, contractor pricing, or permit coordination. They may show floor plans, doors, windows, stairs, elevations, sections, levels, and other visible conditions within scope. Architects, designers, contractors, engineers, owners, and property managers use as-built drawings as the factual starting point for project decisions.
Can I use old blueprints instead of new as-built drawings?
Old blueprints can be useful references, but they should not automatically replace new as-built drawings. A building may have been changed during construction, renovated later, or altered by previous owners or tenants. If the renovation depends on accurate existing conditions, the old drawings should be verified against the current building. A new as-built survey is safer when records are unreliable.
Can as-built drawings guarantee renovation permit approval?
As-built drawings cannot guarantee renovation permit approval. Permit approval depends on the proposed design, zoning, building code requirements, municipal review, consultant input, and project-specific conditions. Accurate as-built drawings can support clearer permit drawings by documenting existing conditions more reliably, but they do not replace professional design responsibility or municipal decision-making.
When should I use 3D laser scanning for as-built drawings?
3D laser scanning is useful when the building is complex, older, irregular, large, multi-level, or difficult to measure manually. It can help create point clouds, CAD drawings, Revit models, elevations, sections, and accurate floor plans from visible existing conditions. Simple projects may only need manual measurement, but scanning is stronger when measurement errors could affect design, pricing, or coordination.
Are permit drawings the same as construction drawings?
Permit drawings are not always the same as construction drawings. Permit drawings are prepared for municipal review, while construction drawings may include more detail for pricing, sequencing, trade coordination, and site execution. Some projects use overlapping drawing sets, but owners should ask whether the contractor needs additional construction documentation beyond the permit package.
How do as-built drawings help contractor estimates?
As-built drawings help contractor estimates by giving contractors clearer information about the existing layout, dimensions, access, openings, stairs, and project constraints. When contractors price from accurate existing-condition drawings, they can reduce assumptions and compare scope more consistently. As-built drawings do not remove every construction unknown, but they can reduce avoidable uncertainty before bidding.
What should I prepare before an as-built survey?
Before an as-built survey, prepare access to all relevant spaces, including rooms, basements, garages, exterior areas, mechanical rooms, tenant spaces, or service areas included in the scope. Share old drawings, real estate plans, renovation records, and the intended project scope. Clear access and project context help the measurement team produce documentation that better supports design and permit drawings.
Conclusion
Permit drawings and as-built drawings are both important in BC renovation planning, but they do different jobs. As-built drawings document the existing building, while permit drawings communicate the proposed renovation for review. The common mistake is starting permit drawings from old blueprints, real estate plans, or rough measurements without verifying the current building. For many Vancouver and BC projects, the safer sequence is to complete an accurate as-built survey first, then use that measured base to prepare proposed design and permit drawings. Before beginning a renovation, owners should confirm the project scope, gather available records, ask the design team what deliverables are required, and document existing conditions clearly before submitting or pricing proposed work.
CAD drafting services Vancouver help turn building measurements, site information, and design intent into usable digital drawings for renovation, permitting, construction, real estate, and as-built documentation. These services may include as-built CAD drawings, permit drawings, construction plans, floor plans, elevations, sections, and scan-to-CAD deliverables. The best drafting workflow starts with accurate existing-condition measurement before design or construction decisions are made.
Executive Summary
CAD drafting services in Vancouver support homeowners, architects, designers, contractors, developers, property managers, and real estate professionals who need reliable building documentation. CAD drawings can be used for as-built surveys, renovation planning, permit coordination, construction plans, tenant improvements, area documentation, and long-term property records. The quality of CAD drafting depends heavily on the quality of the source information. If drawings are created from outdated blueprints, rough sketches, or incomplete measurements, the final files may look professional but still contain inaccurate building information. For many Greater Vancouver projects, accurate as-built measurement should come before drafting, especially when the work affects layout, structure, stairs, exterior conditions, tenant spaces, or contractor pricing. The practical takeaway is that CAD drafting is not only drawing production; it is the process of translating measured existing conditions and project requirements into clear, usable construction documentation.
CAD Drafting Services in Vancouver: As-Built Drawings, Permit Drawings, and Construction Plans
What CAD Drafting Services Vancouver Means for Building Projects
CAD drafting services Vancouver refers to the creation of digital drawings used to document, design, review, price, permit, or build a project. CAD drafting can produce floor plans, elevations, sections, details, site plans, as-built drawings, permit-support drawings, and construction plans. In renovation and property documentation work, CAD drawings are often the bridge between physical building measurements and the professionals who need to use that information. The practical rule is that CAD drafting should turn building information into drawings that support a specific project decision.
CAD drafting services are most useful when the drawing purpose is clear. A real estate floor plan, an as-built CAD drawing, a permit drawing, and a construction plan may all be created in CAD, but they do not require the same information. A broker may need readable area plans, while an architect may need editable DWG files, and a contractor may need dimensioned drawings for pricing. Property owners should define the intended use before ordering drafting services.
CAD drawings are only as reliable as the information used to create them. A clean digital drawing based on outdated blueprints or rough measurements can still be wrong. For Vancouver renovations, tenant improvements, additions, and older buildings, accurate building measurement often needs to happen before CAD drafting begins. The practical takeaway is to verify existing conditions before converting them into polished CAD files.
How CAD Drafting Connects to Building Measurement and As-Built Documentation
CAD drafting connects to building measurement by converting measured site conditions into digital drawings. A measurement team may collect dimensions manually, use laser distance tools, or capture the building with 3D laser scanning. The drafting team then turns that information into floor plans, elevations, sections, or other CAD deliverables. This workflow is especially important when old drawings are missing, incomplete, or no longer match the property.
As-built CAD drawings document a building as it exists today. These drawings may show walls, rooms, doors, windows, stairs, ceiling heights, exterior conditions, tenant boundaries, columns, and other visible elements depending on scope. Architects, designers, contractors, and owners use as-built drawings as the factual base before planning changes. The practical recommendation is to create as-built CAD drawings before preparing proposed renovation layouts.
Accurate as-built documentation helps prevent design and construction decisions from being based on assumptions. Many Vancouver and Greater Vancouver buildings have previous renovations, older records, undocumented changes, or field-built conditions. If CAD drafting starts from unreliable information, the proposed design may conflict with the real building. Property owners should treat as-built measurement as part of the drafting process, not as a separate optional step.
As-Built CAD Drawings vs Permit Drawings vs Construction Plans
As-built CAD drawings, permit drawings, and construction plans serve different roles. As-built drawings show what exists now. Permit drawings show proposed work for municipal review. Construction plans may include additional information for pricing, coordination, sequencing, and site execution. The practical rule is to use each drawing type for the correct stage of the project.
Before construction or during contractor coordination
Contractors, trades, consultants, owners
Is there enough detail to build and price the scope?
Real estate floor plans
Present layout or area information
Listing, leasing, early review
Brokers, owners, tenants, managers
Is this for marketing or technical planning?
Record drawings
Document final or updated condition
After work is completed
Owners, facility managers, future teams
How will future changes be tracked?
As-built CAD drawings often come first because proposed drawings need a reliable base. If an existing stair, wall, opening, roofline, or tenant boundary is wrong, the permit drawing or construction plan may need to be revised later. This can slow design, pricing, and coordination. Owners should order as-built documentation early when the project depends on existing building conditions.
Permit drawings and construction plans may overlap, but they are not always the same package. Permit drawings are prepared to communicate proposed work for review, while construction plans may require more detail for contractors and trades. A project may need both, depending on scope and complexity. The practical takeaway is to ask whether the drafting package is for permit review only, construction pricing, or full execution.
When CAD Drafting Services Are Enough and When Measurement Comes First
CAD drafting services are enough when the project team already has reliable source information. If current as-built drawings exist, the scope is simple, and the building has not changed, drafting may focus on updating layouts, preparing proposed plans, or organizing files. In this situation, drafting is mostly a documentation and coordination task. The practical rule is that drafting can move faster when existing information is already verified.
Measurement should come first when the existing building record is uncertain. If the owner only has old blueprints, real estate plans, photos, sketches, or incomplete PDFs, the drafting team may not have enough reliable information to prepare accurate CAD drawings. This is common in Vancouver renovations, tenant improvements, older houses, and commercial properties with previous modifications. Owners should measure the building before asking for technical as-built CAD drawings.
Measurement is also important when the project affects cost-sensitive or layout-sensitive decisions. Custom millwork, wall removals, additions, tenant improvements, contractor estimates, and permit-support drawings all depend on current dimensions. A drafting error caused by weak measurement can move into design and construction. The practical takeaway is that the more expensive the downstream decision, the more important accurate measurement becomes.
When 3D Laser Scanning Supports CAD Drafting
3D laser scanning supports CAD drafting when the building is complex, irregular, large, or difficult to measure manually. A laser scan captures visible building geometry as a point cloud, which drafters can use to create CAD floor plans, elevations, sections, and other as-built deliverables. This workflow is often called scan-to-CAD. The practical benefit is a stronger measured reference for CAD drawings.
3D laser scanning is useful for buildings with many rooms, multiple levels, high ceilings, exposed structure, mezzanines, heritage details, or irregular geometry. Manual measurement may capture selected dimensions, but scanning can provide a more complete visible-condition record. This matters when architects, engineers, and contractors need to work from the same existing-condition base. Owners should consider scanning when missing details could affect design, pricing, or construction coordination.
3D laser scanning is not required for every CAD drafting project. A small, simple, low-risk space may only need manual measurement or basic floor plans. A full scan-to-CAD or scan-to-BIM package may be unnecessary if the project does not require detailed existing-condition documentation. The practical recommendation is to choose the measurement method based on complexity, deliverables, and the cost of being wrong.
CAD Drawings Vancouver Deliverables: What Clients Usually Receive
CAD drawings Vancouver deliverables vary by project type and end user. A homeowner may need PDF floor plans for renovation planning, while an architect may need DWG files, elevations, and sections. A contractor may need dimensioned drawings for pricing, and a property manager may need area plans or digital records. The practical rule is to define deliverables before drafting begins.
Deliverable
What it provides
Best used for
Who usually uses it
PDF floor plans
Readable layout drawings
Owner review, contractor discussion, early planning
Existing floor plans, elevations, sections, and notes
Renovation and documentation workflows
Project teams
A good CAD drafting package should clearly state what is included. A “floor plan” may mean a basic layout, a dimensioned renovation base, or a full as-built package depending on provider and scope. If elevations, sections, ceiling heights, exterior conditions, or DWG files are needed, they should be included in the quote. Clients should not assume a generic drafting package includes every drawing type.
CAD deliverables should also include limitations where needed. If some areas were inaccessible, hidden conditions were not verified, or existing drawings were used without field confirmation, the package should say so. This prevents future users from treating the drawing as more complete than it is. The practical takeaway is to request scope notes with technical CAD deliverables.
CAD Drafting for Real Estate, Renovation, and Property Documentation
CAD drafting for real estate focuses on clear layout communication and area understanding. Real estate floor plans are useful for listings, leasing, tenant discussions, and early space review. These drawings are usually simpler than renovation-grade as-built drawings. A real estate plan may be enough for marketing, but not enough for construction or permit coordination. Property owners should avoid using marketing plans as technical drawings unless the scope confirms they are suitable.
CAD drafting for renovation focuses on existing conditions and proposed changes. Designers and architects may use as-built CAD drawings as a base for new layouts, demolition plans, additions, interior changes, or permit-support documentation. Contractors may use the drawings to understand scope and price work. The practical takeaway is that renovation CAD drawings should be more detailed than basic real estate floor plans.
CAD drafting for property documentation focuses on long-term records. Owners, landlords, facility managers, and strata-related stakeholders may need accurate digital drawings to track spaces, tenant areas, equipment zones, or future renovation history. This type of documentation can help reduce reliance on staff memory or old files. Owners should update CAD records when buildings change so the documentation stays useful.
CAD Drafting Services for Permit Drawings in BC
CAD drafting services can support permit drawings by creating clear existing and proposed plans for review. Depending on the project, permit-support drawings may include floor plans, elevations, sections, details, demolition plans, and consultant information. The exact requirements depend on the municipality, building type, occupancy, and renovation scope. The practical recommendation is to confirm permit requirements with the appropriate professionals before the drafting package is finalized.
Permit drawings should be based on accurate existing conditions. If the existing CAD base is wrong, the proposed work may be unclear or inconsistent. This can create problems during design review, contractor pricing, or permit coordination. As-built CAD drawings often help the design team distinguish existing conditions from proposed changes. Owners should verify existing dimensions before preparing detailed permit-support drawings.
CAD drafting does not guarantee permit approval. Permit approval depends on the proposed design, applicable requirements, municipal review, zoning, building code considerations, consultant input, and professional responsibility. CAD drawings can support clearer documentation, but they do not replace qualified design, engineering, or code review. Property owners should treat drafting as documentation support, not as approval assurance.
CAD Drafting Services for Construction Plans
CAD drafting services for construction plans help communicate how the project should be priced, coordinated, and built. Construction plans may include more detail than early design drawings or basic permit-support drawings. Contractors may need dimensions, sections, details, wall types, notes, schedules, and references to understand scope. The practical takeaway is that a drawing set should be detailed enough for the decision it supports.
Construction plans reduce ambiguity when they are based on coordinated existing and proposed information. In renovation work, the contractor needs to know what remains, what is removed, and what is new. If existing conditions are unclear, construction planning becomes harder. A strong CAD workflow begins with as-built documentation and then layers proposed work onto that base. Owners should ask whether the construction plan package includes both existing and proposed information.
Construction plans should still be reviewed by the correct professionals. CAD drafters may prepare drawings, but structural design, code compliance, engineering, and specialized details may require qualified consultants. The drafting provider’s role should be clear. Property owners should confirm who is responsible for measurement, drafting, design decisions, engineering, and final submission or construction coordination.
Scan-to-CAD vs Scan-to-BIM vs Standard CAD Floor Plans
Scan-to-CAD, scan-to-BIM, and standard CAD floor plans serve different project needs. Standard CAD floor plans can be created from manual measurements, old drawings, or basic site information. Scan-to-CAD uses a point cloud from 3D laser scanning to create more reliable CAD drawings. Scan-to-BIM converts scan data into a model-based deliverable such as a Revit model. The practical rule is to choose the deliverable based on how the project team will use it.
Documentation type
Best used for
Typical output
Main advantage
Standard CAD floor plans
Simple planning, real estate, small updates
PDF, DWG
Efficient and easy to share
As-built CAD drawings
Renovation base, contractor pricing, permit support
DWG, PDF, elevations, sections
Editable existing-condition documentation
Scan-to-CAD
Complex existing conditions needing CAD
DWG, PDF, sections, elevations
Strong measured base from point cloud
Scan-to-BIM
Model-based coordination and complex projects
RVT, IFC, point cloud, model views
3D coordination and digital building record
Real estate floor plans
Marketing and leasing
PDF, JPEG, area plans
Clear layout presentation
Scan-to-CAD is often the right choice when architects or designers need editable 2D drawings from accurate measured conditions. Many Vancouver renovations, tenant improvements, and as-built documentation projects can use CAD drawings effectively. Scan-to-BIM becomes more useful when the project requires model-based coordination, complex geometry, or long-term digital building records. Clients should ask the design team which format is required before commissioning measurement or drafting.
Standard CAD floor plans may be enough for simple projects. If the building is straightforward and the drawings are used only for early planning or marketing, a lighter drafting scope may be appropriate. However, standard CAD should not be used as a substitute for measured as-built documentation when design or construction depends on accuracy. The practical takeaway is to match the drafting scope to project risk.
How CAD Drafting Affects Contractor Estimates and Change Orders
CAD drafting affects contractor estimates by defining the information contractors use to price work. Contractors may review floor plans, dimensions, elevations, sections, demolition scope, proposed layouts, and site constraints before preparing a bid. If drawings are incomplete, contractors may add contingencies or exclude uncertain work. Owners should provide the same CAD drawing package to all bidders when comparing estimates.
As-built CAD drawings can reduce change order risk by improving existing-condition clarity before construction begins. If proposed construction is based on inaccurate existing drawings, conflicts may appear after demolition, fabrication, or installation. Accurate as-built CAD drawings help the design team identify visible constraints earlier. The practical takeaway is that better drawings can move some problem-solving into planning instead of the field.
CAD drafting does not remove every construction unknown. Hidden conditions, concealed structure, hazardous materials, design changes, owner changes, and site discoveries can still affect cost. The value of CAD drafting is that it reduces avoidable uncertainty related to documented building information. Owners should use accurate CAD drawings as part of risk control, not as a guarantee that no change orders will occur.
Common Mistakes When Ordering CAD Drafting Services
A common mistake is ordering “CAD drawings” without defining what the drawings must do. A CAD file for real estate presentation is different from a CAD file for permit coordination or construction pricing. If the purpose is unclear, the deliverable may be too simple or too detailed. Clients should define the drawing use before requesting a quote.
Another mistake is assuming old blueprints can be converted into accurate as-built CAD drawings without verification. Converting an old PDF into DWG format may make the file editable, but it does not make the information current. If the building has changed, the converted CAD file may still be wrong. Owners should verify existing conditions before relying on converted drawings.
A third mistake is ignoring file format and software requirements. Some teams need DWG, while others need PDF, DXF, RVT, IFC, or point cloud files. If the wrong format is delivered, the project may need conversion or redrafting. Buyers should ask the architect, contractor, or consultant what file types are required before the drafting work begins.
A fourth mistake is expecting drafting services to include design, engineering, or permit approval. CAD drafting can support these workflows, but it does not automatically include professional design responsibility or municipal approval. If engineering, code review, or permit submission support is required, that should be included in the project scope separately. Owners should clarify roles before work begins.
Questions to Ask Before Hiring a Drafting Services Vancouver Provider
The first question to ask a drafting services Vancouver provider is what deliverables are included. Ask whether the package includes PDF drawings, DWG files, elevations, sections, area plans, permit-support drawings, or construction details. A quote that only says “CAD drawings” may not be specific enough. Buyers should request a written deliverable list.
The second question to ask is what source information will be used. The drafting provider may work from field measurements, 3D laser scans, point clouds, old blueprints, sketches, or design markups. Source quality affects drawing reliability. If the project depends on existing conditions, ask whether the building will be measured or whether old drawings are being redrafted.
The third question to ask is whether the provider understands the project type. Residential renovations, commercial tenant improvements, industrial facilities, property measurement, and permit-support drawing packages require different levels of documentation. A provider that only creates marketing floor plans may not be the best choice for construction plans. Buyers should match provider experience to project use.
The fourth question to ask is how revisions and limitations are handled. Drafting projects often require comments from owners, designers, contractors, or consultants. The quote should explain revision rounds, scope changes, excluded items, inaccessible areas, and assumptions. Buyers should prefer transparent scope communication over vague promises.
Practical Decision Matrix: Which CAD Drafting Package Do You Need?
A practical decision matrix helps owners choose the right CAD drafting services Vancouver package. The right package depends on project type, building complexity, professional workflow, and risk level. Some projects only need basic plans, while others need detailed as-built CAD drawings or full permit and construction documentation. The practical rule is to choose the package based on the next decision the drawings must support.
Existing and proposed CAD drawings with required views
Supports municipal and consultant coordination
Contractor pricing
Dimensioned CAD plans, sections, scope drawings
Helps contractors understand quantities and constraints
Commercial tenant improvement
Existing CAD base, demising walls, service areas, proposed layout
Helps landlords, tenants, and contractors align
Complex existing building
3D laser scanning with scan-to-CAD or scan-to-BIM
Reduces uncertainty in irregular or detailed conditions
Facility documentation
CAD record set, area plans, optional BIM
Supports long-term building records
The decision matrix should be reviewed before the site visit or drafting work begins. If the project team defines the required package early, the measurement and drafting process can be scoped correctly. If deliverables are decided after drafting starts, missing information may require additional site work. Owners should ask the end users of the drawings what they need before ordering.
How to Prepare for a Measurement or CAD Drafting Appointment
Property owners should prepare for a measurement appointment by making all relevant areas accessible. The measurement team may need access to rooms, basements, garages, exterior walls, mechanical spaces, tenant areas, roof areas, or service rooms depending on scope. Locked doors, clutter, parked vehicles, or active work areas can create missing information. The practical recommendation is to coordinate access before the appointment.
Property owners should gather existing documents before drafting begins. Old blueprints, real estate plans, previous permit drawings, renovation sketches, strata plans, lease plans, or survey information can help the drafting team understand building history. These documents should be treated as references unless they are verified against current conditions. The practical takeaway is that old drawings can help, but they should not replace measurement when accuracy matters.
Property owners should explain the project goal before the site visit. A drafting team will measure and document differently for a kitchen renovation, tenant improvement, addition, permit-support package, real estate plan, or facility record. Clear project context helps the team capture the right information. Owners should brief the drafting provider on the intended use before fieldwork begins.
Key Takeaways
CAD drafting services Vancouver help translate building measurements, existing conditions, and project requirements into usable digital drawings. The most common deliverables include floor plans, as-built CAD drawings, permit-support drawings, construction plans, elevations, sections, DWG files, and PDFs. The best drafting package depends on how the drawings will be used.
As-built CAD drawings are often the foundation for renovation, permit coordination, and construction planning. If the existing building is not measured accurately, the proposed drawings may inherit the same errors. For complex or high-risk projects, 3D laser scanning and scan-to-CAD can create a stronger measured base.
CAD drafting should be scoped before work begins. Owners should confirm deliverables, source information, file formats, project purpose, revision process, and professional responsibilities. The practical next step is to define whether the project needs real estate floor plans, as-built CAD drawings, permit-support drawings, construction plans, scan-to-CAD, or BIM documentation.
FAQ
What are CAD drafting services Vancouver?
CAD drafting services Vancouver create digital drawings for building documentation, renovation planning, permit support, construction coordination, real estate, and property records. These services may include floor plans, elevations, sections, as-built CAD drawings, permit drawings, construction plans, and CAD file conversion. The best drafting service starts by understanding how the drawings will be used and what information must be documented.
What is the difference between CAD drawings and as-built CAD drawings?
CAD drawings are digital drafting files, while as-built CAD drawings specifically document the existing condition of a building. A CAD drawing can show existing conditions, proposed work, details, or construction information. As-built CAD drawings show what currently exists, usually based on measurement, site verification, old records, or 3D laser scanning. Renovation projects often need as-built CAD drawings before proposed design begins.
When do I need architectural drafting services?
You may need architectural drafting services when you are planning a renovation, addition, tenant improvement, permit-support package, construction plan, or property documentation project. Architectural drafting can help turn measurements, sketches, design intent, and existing conditions into organized drawings. The required scope depends on whether the drawings are for planning, municipal review, contractor pricing, or construction coordination.
Can CAD drafting services help with permit drawings in BC?
CAD drafting services can help prepare permit-support drawings in BC by creating clear existing and proposed plans, elevations, sections, and related views. However, permit requirements depend on the municipality, building type, project scope, and professional responsibilities. CAD drafting does not guarantee permit approval and may need to be coordinated with architects, designers, engineers, or code consultants where required.
Are original blueprints enough for CAD drafting?
Original blueprints may be useful references, but they are not always enough for accurate CAD drafting. Buildings may have changed through renovations, field adjustments, additions, or tenant improvements. Converting old blueprints into CAD does not make them current. If the project depends on existing conditions, the building should be measured or verified before the CAD drawings are used for design or construction.
What are as-built CAD drawings used for?
As-built CAD drawings are used to document the current condition of a building before renovation, design, contractor pricing, permit coordination, or long-term property records. They can show walls, rooms, openings, stairs, elevations, sections, tenant areas, and other visible features depending on scope. Architects, designers, contractors, owners, and property managers use as-built CAD drawings as a reliable existing-condition base.
What is the difference between scan-to-CAD and scan-to-BIM?
Scan-to-CAD converts 3D laser scan data into CAD drawings such as floor plans, elevations, and sections. Scan-to-BIM converts scan data into a model-based deliverable such as a Revit model. Scan-to-CAD is often enough for 2D renovation planning and permit support, while scan-to-BIM is useful for complex projects, Revit workflows, consultant coordination, and digital building records.
Do CAD drawings help reduce contractor change orders?
CAD drawings can help reduce some change order risk when they accurately document existing conditions and proposed scope. Contractors use drawings to price materials, labour, access, demolition, and construction work. If the drawings are inaccurate or incomplete, assumptions may lead to pricing gaps or field conflicts. CAD drawings do not eliminate all change orders, but they can reduce avoidable uncertainty.
What file formats should I ask for?
You should ask for file formats based on who will use the drawings. Owners often need PDFs, architects and designers often need DWG files, BIM teams may need Revit or IFC files, and technical teams may need point clouds. Before ordering CAD drafting services, ask your architect, contractor, or consultant which formats are required for the next project phase.
How should I prepare for a CAD drafting or measurement appointment?
Prepare by clearing access to relevant spaces, unlocking rooms, gathering old drawings, and explaining the project goal. The measurement team may need access to rooms, basements, garages, exterior walls, mechanical areas, tenant spaces, or roof areas depending on scope. Good preparation helps the drafting team create more complete and useful as-built CAD drawings.
Conclusion
CAD drafting services in Vancouver are most valuable when they connect accurate building measurement with the drawings people actually need for renovation, real estate, permit coordination, and construction planning. A CAD file is not automatically reliable just because it is digital; the accuracy depends on the source information, measurement method, drafting scope, and quality control. For many Vancouver and BC projects, the right sequence is to verify existing conditions, create as-built CAD drawings, and then develop permit-support drawings or construction plans from that base. Before ordering drafting services, owners should define the project purpose, required deliverables, file formats, source information, and whether simple measurement, scan-to-CAD, or BIM documentation is the best fit.
Building measurement services near me should provide accurate existing-condition documentation, not just basic room measurements. In Vancouver and across BC, a qualified local measurement team can create floor plans, as-built drawings, CAD files, BIM models, and property measurement records that help homeowners, architects, designers, contractors, and property managers plan renovation, permitting, leasing, and construction decisions from verified site conditions.
Executive Summary
Choosing building measurement services near me in Vancouver starts with understanding what the measurement team must deliver. A reliable local measurement company should document the existing property accurately, explain the right measurement method, and provide usable deliverables for the project team. For simple spaces, basic property measurement may be enough. For renovations, additions, tenant improvements, heritage homes, older buildings, commercial spaces, or permit coordination, as-built drawings, scan-to-CAD documentation, or scan-to-BIM documentation may be required. Local Vancouver and BC experience matters because buildings often include older records, previous renovations, strata coordination, municipal drawing expectations, site access limitations, and project-specific documentation needs. The practical takeaway is to ask about deliverables, file formats, measurement methods, scope exclusions, quality control, and experience before hiring a building measuring company.
Building Measurement Services Near Me: How to Choose a Local Measurement Team in Vancouver
What “Building Measurement Services Near Me” Means in Vancouver
Building measurement services near me refers to local professionals who measure existing buildings and convert site conditions into usable documentation. These services may include residential floor plans, commercial floor plans, as-built surveys, scan-to-CAD drawings, scan-to-BIM models, area calculations, elevations, sections, and point cloud documentation. In Vancouver, building measurement services are commonly used before renovations, additions, tenant improvements, leasing, permit coordination, and property management decisions. The practical rule is to hire a measurement team that can deliver the exact documentation your project team needs.
Building measuring services are different from casual room measuring because professional measurement teams create drawings that other professionals can use. A homeowner may only need room dimensions for early planning, but an architect, designer, contractor, or property manager may need CAD files, elevations, wall openings, ceiling information, exterior conditions, or a Revit model. If the measurement output is too basic, the project team may need to repeat site work later. Before hiring a measuring company in Vancouver, confirm whether the final deliverables match the project workflow.
A local as-built survey company should document the property as it exists today, not as old drawings suggest it exists. Many Vancouver and Greater Vancouver properties have previous renovations, additions, field-built conditions, undocumented layout changes, or older records that no longer match the current building. Accurate property measurement in Vancouver helps the design and construction team start from verified existing conditions. The practical takeaway is to measure the building before relying on old blueprints, real estate plans, or rough sketches.
Why Local Vancouver and BC Experience Matters
Local Vancouver and BC experience matters because building measurement is not only about dimensions. Local measurement teams often understand common property types, older homes, commercial tenant spaces, strata buildings, mixed-use properties, access constraints, and the documentation expectations of local design teams. A team that regularly works in Vancouver, Burnaby, Richmond, North Vancouver, West Vancouver, Surrey, Coquitlam, New Westminster, Delta, Langley, Port Moody, or Maple Ridge is more likely to understand regional building conditions. The practical recommendation is to choose a measurement team familiar with the type of property and municipality involved.
Local measurement experience matters for renovation planning because many buildings in Greater Vancouver have changed over time. A house may have an altered basement, enclosed area, renovated kitchen, changed stair, or previous addition. A commercial unit may have tenant improvements, demising wall changes, mezzanine areas, or modified service spaces. A measurement team with local renovation experience is more likely to ask the right questions before fieldwork begins. Property owners should choose a local team that understands how existing-condition gaps can affect design and contractor pricing.
Local measurement experience also matters for communication with architects, designers, engineers, and contractors. A building measuring company should understand how professionals use floor plans, CAD files, sections, elevations, and BIM models. If the measurement team only delivers a marketing-style plan, the architect may still need a more technical survey. The practical takeaway is to hire a local measurement team that can speak the same documentation language as the people who will use the drawings.
What a Building Measuring Company Should Provide
A building measuring company should provide clear deliverables before the site visit begins. The scope should state whether the client will receive PDF floor plans, DWG CAD files, Revit models, point clouds, elevations, sections, reflected ceiling plans, area calculations, or other documentation. Without a clear deliverable list, the client may receive drawings that look useful but do not support the next project step. Always ask for the output format and level of detail before approving the measurement work.
A local as-built survey company should also explain what is included and what is excluded. A basic floor plan may show walls, doors, windows, stairs, and room dimensions. A more detailed as-built package may include exterior elevations, roof lines, ceiling heights, structural columns, fixed equipment, service areas, and sections. A scan-to-BIM package may include a model with a defined level of detail. The practical rule is to define the scope around project decisions, not around a generic drawing package.
A professional property measurement Vancouver service should include quality control. Measurement errors can affect contractor estimates, design layouts, permit drawing coordination, and renovation planning. Quality control may include scan registration checks, drafting review, field notes, photo references, point cloud verification, or internal drawing review before delivery. Property owners should ask how the measurement company checks its work before sending final files.
Deliverables to Ask for Before Hiring a Measurement Team
The most important buyer question is not “Can you measure the building?” but “What will I receive after the building is measured?” Different projects require different deliverables, and the wrong file type can slow down the design team. A homeowner planning a kitchen renovation may only need accurate floor plans, while an architect preparing a larger renovation may need DWG files, elevations, sections, and site context. The practical takeaway is to confirm deliverables before price.
Stairs, ceiling heights, levels, structural relationships
Architects, engineers, builders
Important for complex renovations
Reflected ceiling plan
Lighting, ceiling work, mechanical coordination
Designers, architects, contractors
Useful when ceiling layout affects the project
Point cloud
Measured spatial reference
Survey, drafting, architecture teams
Ask whether the team will share the point cloud
Revit / BIM model
Model-based design and coordination
Architects, engineers, larger project teams
Confirm level of detail before ordering
Building measurement services near me should be selected based on deliverable usefulness. A low-cost floor plan may be acceptable for early planning, but it may not help a professional team prepare renovation drawings. A more detailed as-built survey may cost more upfront, but it can reduce repeated site visits and redrafting later. Property owners should compare measurement companies by deliverables and project fit, not by price alone.
Questions to Ask a Local Measurement Company in Vancouver
The first question to ask a local measurement company is what type of projects the team usually measures. A company that focuses on real estate floor plans may be excellent for listings, but not necessarily the right choice for renovation-grade as-built drawings. A company that works with architects and contractors may be better suited for construction documentation. Buyers should choose a team whose experience matches the project type.
The second question to ask is which measurement method the company will use. Some projects can be measured with laser distance meters and manual drafting, while more complex properties may need 3D laser scanning. A good measurement team should explain why a method is appropriate for the building, the budget, and the required deliverables. Buyers should be cautious when a company recommends the same method for every property without asking about project goals.
The third question to ask is whether the measurement team can provide files that the design team can actually use. Architects may need DWG files, Revit models, sections, elevations, or point cloud data. Contractors may need clear PDF drawings with dimensions and scope context. Property managers may need area plans and digital records. The practical recommendation is to ask the designer, architect, or contractor what format they need before hiring the measurement company.
The fourth question to ask is how the company handles missing access or blocked areas. Building measurement depends on site access, and inaccessible rooms, cluttered spaces, locked areas, or unsafe zones can create gaps in the documentation. A professional company should explain how gaps are noted and whether a return visit may be required. Buyers should choose a team that communicates limitations clearly instead of hiding uncertain measurements.
Buyer Checklist for Building Measurement Services Near Me
A buyer checklist helps property owners compare building measuring services without relying only on price. The right company should understand the property type, explain the measurement method, define deliverables, and communicate limitations clearly. A good measurement team should also be comfortable working with homeowners, architects, designers, contractors, landlords, tenants, and property managers. The practical rule is to choose the company that reduces uncertainty for the next stage of the project.
What to check
Why it matters
What to ask
Local experience
Vancouver and BC buildings often have older records and previous changes
Have you measured similar properties locally?
Project type fit
Real estate plans and renovation as-builts are different
Do you specialize in marketing plans, as-built surveys, or both?
Deliverables
The design team may need specific files
Will I receive PDF, DWG, Revit, point cloud, or area plans?
Measurement method
Manual measurement and 3D scanning serve different needs
How will you measure this building and why?
Level of detail
Missing detail can cause redrafting
What elements are included in the drawings?
Quality control
Measurement errors affect downstream decisions
How do you verify the drawings before delivery?
Access planning
Blocked areas create documentation gaps
What needs to be accessible during the appointment?
Timeline
Design and permit schedules depend on documentation
When will fieldwork and final delivery be complete?
Scope exclusions
Assumptions can become disputes later
What is not included in the quote?
The buyer checklist should be used before the appointment, not after the drawings are delivered. If the scope is unclear, the measurement team may provide a package that does not support the renovation, permit, or contractor workflow. Clear questions help prevent mismatched expectations. Buyers should ask for written confirmation of scope, deliverables, timeline, and file formats.
Manual Measurement vs 3D Laser Scanning Services
Manual measurement can be appropriate for simple spaces, early planning, or low-risk property documentation. A small rectangular room, simple office, or basic residential layout may not require a full 3D laser scan. Manual measurement can be efficient when the project only needs basic dimensions and the consequence of missing detail is low. The decision rule is to use manual measurement when the building is simple and the drawings will not carry heavy design or construction risk.
3D laser scanning services are often better for complex buildings, older properties, commercial spaces, detailed renovations, and projects requiring CAD or BIM deliverables. Scanning captures dense spatial data that can be used to create floor plans, elevations, sections, point clouds, and models. This is useful when the building has irregular geometry, many rooms, multiple levels, exposed structure, or tight design constraints. Property owners should consider 3D laser scanning when missing information could lead to redesign, remeasurement, or contractor uncertainty.
The choice between manual measurement and 3D laser scanning should be based on project use, not marketing language. 3D scanning is powerful, but not every small project needs a full scan-to-BIM workflow. Manual measurement is simpler, but it may not be enough for renovation-grade documentation. A strong measuring company in Vancouver should explain the trade-off honestly and recommend the method that fits the project scope.
How Accurate Floor Plans Affect Design, Pricing, and Change Orders
Accurate floor plans improve design because designers and architects can work from the real dimensions of the building. If a kitchen, office, tenant improvement, or addition is designed from rough measurements, the proposed layout may conflict with walls, openings, stairs, ceiling heights, or structural elements. Accurate floor plans do not remove every design challenge, but they reduce avoidable conflicts caused by weak existing-condition information. Property owners should complete measurement before detailed design work begins.
Accurate floor plans improve contractor estimates because contractors need dimensions to price materials, labour, demolition, finishes, and site logistics. If contractors receive incomplete drawings, they may add contingencies or exclude uncertain work from the estimate. When all contractors receive the same measured drawings, the owner can compare bids with fewer hidden assumptions. The practical takeaway is to include accurate property measurement in the pre-construction package.
Accurate floor plans can reduce change order risk by moving measurement issues into the planning stage. A change order may occur when site conditions do not match the drawings used for pricing or design. As-built drawings help identify existing constraints before construction begins, when revisions are usually easier to manage. Property owners should not treat measurement as an administrative task; accurate measurement is part of cost and risk control.
How Local As-Built Survey Companies Support Permit Coordination
A local as-built survey company can support permit coordination by documenting existing conditions before proposed drawings are prepared. Many renovation and alteration projects require a clear distinction between what exists and what is proposed. If the existing-condition base is inaccurate, the design team may need to correct drawings later or request additional site verification. As-built drawings do not guarantee permit approval, but they can support clearer documentation.
Vancouver and BC permit requirements depend on the municipality, property type, building use, and project scope. A measurement team does not replace an architect, engineer, code consultant, or municipal reviewer. However, accurate existing-condition documentation can help those professionals prepare drawings that are based on the current building. Property owners should use measurement services as a documentation foundation, not as legal or permitting advice.
Local experience can help because different project types require different drawing information. A residential addition may need floor plans, elevations, and sections. A tenant improvement may need existing layouts, demising walls, exits, and service areas. A commercial renovation may need accurate floor plans and CAD files for consultant coordination. Buyers should ask whether the measurement team has supported similar permit-related projects in Vancouver or nearby BC municipalities.
Red Flags When Choosing Building Measuring Services
A major red flag is a measurement company that cannot clearly explain deliverables. If the quote only says “floor plans” without file formats, level of detail, area method, or revision policy, the buyer may not know what is actually included. This can create problems when an architect or contractor asks for CAD files, elevations, or more detail. Buyers should ask for a written scope before approving the work.
Another red flag is a company that treats all building measurement projects the same. A real estate listing, residential renovation, commercial tenant improvement, and industrial facility survey do not require the same documentation. If the measurement company does not ask about project use, the final drawings may be too simple or unnecessarily complex. Buyers should choose a team that scopes the work around the intended decision.
A third red flag is unrealistic certainty about permits, code compliance, or approval timelines. Accurate measurements can support better documentation, but measurement services do not guarantee permit approval or replace professional design review. A trustworthy company should avoid making legal, code, or approval promises outside its role. Buyers should prefer clear, practical communication over exaggerated claims.
A fourth red flag is no discussion of site access. If rooms are locked, areas are cluttered, or exterior access is blocked, the measurement team may not capture complete information. A professional team should tell the client how to prepare the site and how inaccessible areas will be handled. Buyers should be cautious if the company promises complete documentation without understanding access conditions.
What Good Scope Definition Looks Like
Good scope definition starts with the reason the building is being measured. A homeowner renovating a house, a landlord preparing a commercial unit, an architect designing an addition, and a property manager updating records all need different information. The measurement team should ask what decisions the drawings will support. The practical takeaway is that the scope should begin with the project goal.
Good scope definition also identifies the spaces and elements to be documented. The scope may include interior rooms, exterior walls, stairs, rooflines, mechanical rooms, ceiling heights, openings, structural columns, tenant areas, parking areas, or site-related conditions. If these elements are not discussed, the final package may omit information the project team expected. Buyers should request a clear inclusion list.
Good scope definition includes delivery format and review process. A client may need PDFs for review, DWG files for design, Revit models for BIM workflows, or point clouds for technical reference. Some companies may include one revision for drafting corrections, while others may charge for changes outside the original scope. Buyers should clarify file formats, delivery timeline, and revision terms before the site visit.
How to Prepare for a Building Measurement Appointment
Property owners should prepare for a building measurement appointment by ensuring that all relevant spaces are accessible. The measurement team may need to access rooms, garages, basements, attics, crawlspaces, mechanical rooms, exterior walls, commercial service areas, or tenant spaces depending on the scope. Locked doors, storage, pets, parked vehicles, or active work areas can slow the process or create documentation gaps. The practical recommendation is to clear access before the appointment.
Property owners should also provide available background documents before measurement begins. Old drawings, real estate plans, renovation sketches, strata plans, leasing plans, or permit records can help the measurement team understand the building history. These documents should be treated as references, not as verified current conditions. A good measurement team can compare background information against the measured building.
Property owners should tell the measurement team about project priorities before the site visit. If the renovation depends on a kitchen wall, stair opening, ceiling height, loading area, exterior elevation, or tenant boundary, the team should know that in advance. Clear priorities help the measurement team focus on the details that matter most. Buyers should brief the measurement company before fieldwork instead of assuming every possible detail will be captured.
Practical Decision Matrix: Which Measurement Package Do You Need?
A practical decision matrix helps buyers choose the right level of building measurement services near me. The right package depends on the property type, project risk, professional workflow, and required deliverables. A basic package may be enough for early planning, while a detailed as-built survey may be needed for renovation or permit coordination. The practical rule is to match the package to the most important decision the drawings must support.
Project situation
Recommended measurement package
Why this package fits
Real estate listing or early space review
Basic floor plan and area summary
Useful for presentation and general understanding
Home renovation planning
Renovation-grade floor plans, key dimensions, PDF and possibly DWG
Supports designers and contractors
Addition or major remodel
Floor plans, elevations, sections, CAD files, possible 3D scanning
Existing conditions affect design and permit coordination
Commercial tenant improvement
Existing floor plans, demising walls, service areas, CAD files
Helps landlord, tenant, designer, and contractor align
Complex older building
3D laser scanning with scan-to-CAD or scan-to-BIM
Reduces uncertainty in irregular geometry
BIM-based architecture project
Scan-to-BIM model and agreed level of detail
Supports model-based design workflow
Property management documentation
Floor plans, area records, digital drawing archive
Helps long-term facility and lease management
The decision matrix should be discussed with the project team before hiring a measurement company. An architect may prefer DWG files, while a contractor may need dimensioned PDFs, and a facility manager may need area plans. If the measurement package is chosen without professional input, the buyer may receive useful-looking drawings that are not sufficient for the next stage. Buyers should ask end users of the drawings what they need before ordering.
Key Takeaways
Building measurement services near me should be evaluated by project fit, deliverables, measurement method, quality control, and local experience. The cheapest quote may not be the best choice if the final drawings do not support renovation, permit coordination, contractor pricing, leasing, or property management needs. A strong local measurement team should explain what will be measured, how it will be measured, and what files will be delivered.
A measuring company in Vancouver should understand the difference between real estate floor plans, renovation-grade as-built drawings, scan-to-CAD documentation, and scan-to-BIM models. Each deliverable supports a different level of decision-making. Buyers should not order a generic floor plan when the project requires technical documentation for designers, architects, contractors, or consultants.
Local Vancouver and BC experience matters because buildings, workflows, and documentation needs vary by property type and municipality. Accurate measurement does not guarantee permit approval or remove the need for professional design review, but it gives the project team a better existing-condition baseline. The practical next step is to define the project goal, ask the right buyer questions, and confirm the exact deliverables before the site visit.
FAQ
What should I look for in building measurement services near me?
Building measurement services near me should offer clear deliverables, relevant local experience, appropriate measurement methods, and usable file formats. A reliable measurement team should explain whether the project needs basic floor plans, as-built drawings, scan-to-CAD files, scan-to-BIM models, elevations, sections, or area calculations. Buyers should choose a company that understands how the drawings will be used by homeowners, designers, architects, contractors, or property managers.
What is the difference between building measuring services and real estate floor plans?
Building measuring services can include renovation-grade as-built drawings, CAD files, BIM models, area calculations, and existing-condition documentation. Real estate floor plans are usually simpler drawings used for marketing, listings, leasing, or general property presentation. A real estate floor plan may be enough for basic review, but renovation, permit coordination, and contractor pricing often require more detailed building measurement services.
Why should I hire a local as-built survey company in Vancouver?
A local as-built survey company in Vancouver is useful because local teams are more familiar with regional building types, older properties, strata access, commercial tenant spaces, and Greater Vancouver renovation workflows. Local experience can help the team ask better scope questions and prepare more relevant documentation. The main benefit is not location alone, but local experience combined with accurate deliverables and clear communication.
Do I need 3D laser scanning for property measurement in Vancouver?
You may need 3D laser scanning for property measurement in Vancouver if the building is complex, older, multi-level, irregular, commercial, or being renovated in detail. Manual measurement may be enough for simple spaces or early planning. 3D laser scanning is usually stronger when the project needs CAD files, BIM models, elevations, sections, point cloud data, or a more complete existing-condition record.
What deliverables should I ask a measuring company in Vancouver to provide?
You should ask a measuring company in Vancouver whether the package includes PDF floor plans, DWG files, Revit models, point clouds, elevations, sections, reflected ceiling plans, area calculations, or other documents. The right deliverables depend on the project. Before hiring the company, ask your architect, designer, contractor, or property manager what file formats and drawing details they need.
Can building measurement services help with contractor estimates?
Building measurement services can help contractor estimates by providing accurate existing-condition drawings for pricing. Contractors use floor plans and as-built documentation to review dimensions, quantities, access, demolition scope, and layout constraints. Accurate drawings do not eliminate every construction unknown, but they reduce guesswork and make bids easier to compare because contractors are working from the same building information.
Can as-built drawings guarantee permit approval in Vancouver or BC?
As-built drawings cannot guarantee permit approval in Vancouver or BC. Permit approval depends on the proposed design, applicable regulations, municipal review, zoning, building code requirements, and project-specific conditions. However, accurate as-built drawings can support clearer permit coordination by documenting the existing building more reliably. Property owners should use measurement services as a documentation foundation, not as legal or permit advice.
How much detail should an as-built survey include?
An as-built survey should include the level of detail needed for the next project decision. A simple renovation may need floor plans with walls, doors, windows, stairs, and key dimensions. A larger renovation may need elevations, sections, ceiling heights, exterior conditions, structural elements, or CAD files. A complex project may need scan-to-BIM documentation. The scope should be defined before measurement begins.
How do I compare quotes from building measurement companies?
Compare quotes from building measurement companies by reviewing deliverables, file formats, level of detail, site access assumptions, timeline, revision policy, and measurement method. A cheaper quote may exclude CAD files, elevations, sections, point cloud data, or revisions. Buyers should ask each company to explain exactly what is included and what is not included before choosing a provider.
How should I prepare for a building measurement appointment?
Prepare for a building measurement appointment by clearing access to relevant rooms, exterior areas, basements, garages, mechanical rooms, tenant spaces, or other areas included in the scope. Share old drawings, real estate plans, renovation sketches, or permit records if available. Also tell the measurement team how the drawings will be used. Good preparation helps the team produce more complete and useful documentation.
Conclusion
Building measurement services near me should be chosen carefully because the final drawings can affect renovation planning, contractor estimates, leasing decisions, permit coordination, and long-term property records. In Vancouver and across BC, the best local measurement team is not simply the closest provider; the best team is the one that understands the property type, asks about the project goal, recommends the right measurement method, and delivers files the project team can actually use. Before hiring a measuring company in Vancouver, confirm the scope, deliverables, file formats, level of detail, access requirements, and quality control process. Accurate building measurement is a practical first step toward better design, clearer pricing, and more reliable property documentation.
Professional Vancouver as-built measuring services create accurate floor plans, as-built drawings, scan-to-CAD files, and scan-to-BIM documentation from verified existing conditions. Architects, contractors, designers, and property owners use Vancouver as-built measuring services before renovation, permitting, leasing, and construction planning. The main benefit is risk reduction: better documentation supports clearer design decisions, tighter contractor estimates, fewer site surprises, and more reliable Greater Vancouver renovation documentation.
Vancouver as-built measuring services provide the measured foundation for renovation-grade design, contractor pricing, permit documentation, and construction coordination. In Greater Vancouver, many homes, commercial spaces, and older buildings have missing drawings, outdated blueprints, undocumented alterations, or site conditions that no longer match municipal records. Accurate floor plans and as-built drawings help architects, contractors, engineers, designers, and property owners work from verified existing conditions instead of assumptions. For simple spaces, manual laser measurement may be enough. For complex renovations, irregular structures, older buildings, mechanical rooms, multi-level commercial interiors, or scan-to-BIM workflows, 3D laser scanning services provide a more reliable point-cloud baseline. The practical recommendation is to order Vancouver as-built measuring services before design begins, before contractor estimates are finalized, and before building permit drawings depend on existing-condition accuracy.
The Ultimate Guide to Vancouver As-Built Measuring Services: What’s Included, Who Needs Them, and When to Order
1. What Vancouver As-Built Measuring Services Include for Existing Building Documentation
Vancouver as-built measuring services document the current physical condition of an existing property. Architects, interior designers, contractors, engineers, property owners, and real estate professionals use accurate floor plans and as-built drawings when original blueprints are missing, outdated, incomplete, or no longer reflect the building. Measurement professionals capture walls, openings, ceiling heights, stairs, structural elements, exterior elevations, and other existing features so design teams can begin with verified spatial information. The practical takeaway is that Vancouver as-built measuring services replace guesswork with measured existing-condition documentation.
Accurate floor plans are the core deliverable in most Greater Vancouver renovation documentation workflows. A renovation-grade floor plan is not just a marketing layout; renovation-grade floor plans show dimensions, wall positions, doors, windows, stairs, key structural elements, and other details needed for design, pricing, and coordination. In Vancouver, Burnaby, Richmond, Surrey, North Vancouver, and nearby municipalities, renovation projects often involve older buildings, additions, basement suites, strata spaces, or commercial interiors where small dimensional errors can affect design feasibility. The practical recommendation is to order accurate floor plans before architectural design or contractor pricing begins.
As-built drawings create a technical record of what physically exists before new work is proposed. Property owners and design teams use as-built drawings for renovation planning, building permit drawings, tenant improvements, additions, lease area reviews, and construction documentation. The value of as-built drawings comes from their ability to establish one shared baseline for architects, contractors, engineers, millworkers, and consultants. The practical takeaway is that as-built drawings make project coordination easier because every stakeholder can work from the same measured version of the building.
3D laser scanning services are used when existing conditions are too complex for basic manual measurement. A 3D laser scanner captures dense spatial data as a point cloud, allowing measurement teams to document irregular walls, sloped floors, exposed structure, complicated stairs, heritage details, mechanical rooms, and multi-level spaces with greater completeness. This point-cloud data can be converted into scan-to-CAD documentation or scan-to-BIM documentation depending on the project requirement. The practical recommendation is to choose 3D laser scanning services when building geometry, schedule pressure, or construction risk makes manual measurement too limited.
2. When Accurate Floor Plans Are Needed Before a Greater Vancouver Renovation
Accurate floor plans are needed before design begins when existing drawings cannot be trusted. Many Greater Vancouver properties have gone through decades of interior renovations, basement changes, commercial fit-outs, deck additions, wall removals, or tenant improvements that were never reflected in the original drawings. When architects or contractors rely on old blueprints, every design decision can inherit the same dimensional error. The practical takeaway is to order accurate floor plans as soon as the project team discovers that existing records do not match the physical property.
Accurate floor plans are especially important before contractor estimates are requested. Contractors price labour, materials, demolition, millwork, framing, flooring, drywall, glazing, and mechanical work based on quantities and site conditions. If the floor plans are vague, outdated, or incomplete, contractors may add contingency to protect against unknown risk. Accurate floor plans help contractors price from measured dimensions instead of assumptions. The practical recommendation is to provide contractors with renovation-grade floor plans before comparing bids.
Accurate floor plans are often required before building permit drawings can be prepared. Building permit drawings usually depend on a clear understanding of existing room layouts, ceiling heights, exits, stairs, openings, exterior walls, and site constraints. In municipalities such as Vancouver, Burnaby, Richmond, Surrey, Coquitlam, and New Westminster, the required documentation depends on the project scope and local review process. Accurate as-built drawings do not guarantee permit approval, but accurate as-built drawings help architects and designers prepare permit documentation from reliable existing conditions. The practical takeaway is to measure first and design second when a renovation will require municipal review.
Accurate floor plans are also useful before buying, leasing, or improving commercial property. Property managers, brokers, tenants, and owners use measured floor plans to understand usable area, rentable area, circulation, demising walls, and fit-out potential. Real estate floor plans may be enough for marketing, but renovation-grade floor plans or BOMA-style area analysis may be needed for lease planning and commercial asset decisions. The practical recommendation is to match the level of measurement to the financial decision being made.
3. When 3D Laser Scanning Services Are Better Than Manual Measurement
3D laser scanning services are better than manual measurement when a building has complex geometry. Older homes, heritage properties, sloped sites, irregular additions, multi-level commercial spaces, and buildings with non-square walls often contain dimensional conditions that are difficult to capture with a tape measure or handheld laser. A 3D laser scanner records a dense point cloud from multiple scan positions, making the existing-condition record more complete. The practical takeaway is to use 3D laser scanning services when irregular geometry could affect design accuracy.
3D laser scanning services are recommended when return visits would be expensive or disruptive. In active commercial buildings, occupied homes, industrial facilities, medical offices, restaurants, retail spaces, and strata properties, access windows may be limited. A laser scanning appointment can capture large volumes of spatial information during one coordinated site visit, reducing the chance that the drafting team must return later for missed dimensions. The practical recommendation is to use 3D laser scanning services when site access is difficult, tenant disruption matters, or the project schedule is tight.
3D laser scanning services are useful when construction coordination depends on exact existing conditions. Mechanical rooms, exposed structure, congested ceilings, older concrete structures, and spaces with dense plumbing, ductwork, electrical equipment, or beams require more than a simple wall-to-wall measurement. Point-cloud data can help generate sections, reflected ceiling plans, elevations, and scan-to-BIM models for coordination. The practical takeaway is to choose 3D laser scanning services when the project involves MEP coordination, structural changes, custom fabrication, or clash-risk reduction.
Manual measurement may still be appropriate for simple, open, low-risk spaces. A small rectangular office, basic residential room, or empty retail unit may not require a full 3D laser scanning workflow if the project only needs basic dimensions or a simple real estate floor plan. The decision should be based on complexity, risk, deliverable requirements, and future use of the documentation. The practical recommendation is to use manual laser measurement for simple spaces and 3D laser scanning services for complex, high-risk, or renovation-grade documentation.
4. How 3D Laser Scanning Improves Existing Conditions Documentation
3D laser scanning improves existing conditions documentation by capturing spatial data more completely than traditional measuring methods. A scanner records millions of points across visible surfaces, producing a point cloud that shows walls, floors, ceilings, openings, stairs, exposed structure, and building irregularities. This matters in Greater Vancouver renovation planning because small differences in wall alignment, ceiling height, or structural position can affect drawings, estimates, and construction sequencing. The practical takeaway is that 3D laser scanning services create a stronger technical baseline for complex renovation documentation.
3D laser scanning services reduce the risk of missed dimensions. Manual measurement depends heavily on what the technician measures, what the technician can access, and what the technician anticipates needing later. Point-cloud capture preserves a wider record of existing conditions, allowing drafters to extract additional dimensions during CAD or BIM production without always returning to site. The practical recommendation is to use 3D laser scanning services when the project may require additional sections, elevations, ceiling plans, or design coordination details later.
3D laser scanning services help identify physical irregularities that flat drawings may hide. Older buildings in Vancouver, North Vancouver, West Vancouver, New Westminster, and other established areas may have sloped floors, bowed walls, uneven ceilings, undocumented additions, or non-orthogonal geometry. Point-cloud data can reveal these conditions before design decisions are finalized. The practical takeaway is that 3D laser scanning services help design teams see the building as it exists, not as a simplified rectangle on paper.
3D laser scanning services can support scan-to-CAD and scan-to-BIM workflows from the same measured source. A point cloud can be converted into 2D CAD drawings for architectural design or into a 3D Revit model for more advanced coordination. This flexibility is valuable when the project scope may grow from basic floor plans into sections, elevations, reflected ceiling plans, or BIM coordination. The practical recommendation is to capture more complete spatial data early when the project has uncertain or evolving documentation needs.
5. How Accurate Floor Plans Reduce Contractor Estimate Risk
Accurate floor plans reduce contractor estimate risk by giving builders measurable quantities instead of vague assumptions. Contractors need reliable dimensions to estimate demolition, framing, drywall, flooring, paint, millwork, glazing, mechanical routing, and labour. When existing-condition drawings are incomplete, contractors may increase contingency because the contractor is pricing unknown site conditions. The practical takeaway is that accurate floor plans help property owners receive clearer and more comparable contractor estimates.
Accurate floor plans can reduce pricing gaps between contractor bids. If each contractor measures the site independently or interprets old drawings differently, each estimate may be based on a different understanding of the same building. Renovation-grade as-built drawings give all bidders the same measured baseline, making differences in pricing easier to evaluate. The practical recommendation is to issue the same accurate floor plans to every contractor during the bidding process.
Accurate floor plans help prevent custom fabrication errors. Millwork, glass partitions, steel elements, cabinetry, counters, stairs, doors, and built-in furniture often need precise dimensions before fabrication begins. If the existing wall or opening dimensions are wrong, fabricated components may not fit on site, causing rework, rush orders, and schedule delays. The practical takeaway is that accurate floor plans and scan-to-CAD documentation are especially important before ordering custom building components.
Accurate floor plans help reduce change orders caused by spatial surprises. Change orders often occur when demolition reveals conditions that were not shown accurately in the original documentation. While as-built drawings cannot eliminate every unknown condition inside walls or concealed assemblies, accurate floor plans and 3D laser scanning services reduce the avoidable errors caused by poor baseline measurements. The practical recommendation is to invest in existing-condition documentation before signing construction contracts or finalizing renovation budgets.
6. How As-Built Drawings Support Permit-Ready Renovation Planning
As-built drawings support permit-ready renovation planning by documenting existing conditions before proposed changes are drawn. Designers and architects often need accurate existing floor plans, exterior elevations, sections, ceiling heights, stairs, openings, and site relationships before they can prepare building permit drawings. In Greater Vancouver municipalities, permit requirements vary by project type, building use, and scope of work. The practical takeaway is that as-built drawings help design professionals prepare clearer permit submissions, but as-built drawings do not guarantee permit approval.
As-built drawings help building professionals compare existing conditions against zoning and building-code considerations. Renovation projects may require review of ceiling heights, stairs, exits, window sizes, fire separations, suite layouts, accessibility routes, parking, setbacks, or building envelope conditions. Accurate floor plans and 3D laser scanning services give architects, designers, and code consultants a more reliable baseline for that analysis. The practical recommendation is to order as-built drawings before making design promises about what a property can legally or practically become.
As-built drawings are especially useful when legalizing or upgrading previously altered spaces. Basement suites, secondary suites, commercial tenant improvements, older additions, enclosed decks, and modified interiors may not match past permit drawings. Accurate Greater Vancouver renovation documentation can help the project team identify what exists before deciding what must be redesigned, removed, upgraded, or documented. The practical takeaway is that as-built drawings help clarify the starting point for renovation planning, compliance review, and professional design work.
As-built drawings improve communication with municipalities and consultants. A clear existing-condition drawing set helps city reviewers, architects, engineers, contractors, and owners discuss the same physical property with fewer misunderstandings. Poor existing drawings can create review delays, redesign cycles, and unclear responsibility between consultants. The practical recommendation is to treat as-built drawings as the first documentation layer in any renovation that may require permits, engineering review, or municipal coordination.
7. Risk and Cost Control Matrix for Vancouver As-Built Measuring Services
A risk and cost control matrix helps property owners decide whether professional measurement is worth the upfront cost. The cost of Vancouver as-built measuring services is usually small compared with the cost of redesign, contractor delay, failed fabrication, or permit resubmission. The table below shows how accurate floor plans, 3D laser scanning services, scan-to-CAD documentation, and scan-to-BIM documentation reduce common renovation risks. The practical takeaway is to choose the documentation level based on the risk level of the project.
Project Risk
What Can Go Wrong Without Accurate Existing Conditions
Best Documentation Response
Practical Cost-Control Value
Contractor estimates
Contractors add contingency because dimensions, quantities, or site conditions are unclear.
Renovation-grade accurate floor plans with room dimensions, openings, stairs, and key existing conditions.
Helps owners compare bids more fairly and reduces pricing based on uncertainty.
Custom fabrication
Millwork, glass, steel, cabinetry, or built-ins are fabricated from incorrect dimensions.
Scan-to-CAD documentation or 3D laser scanning services for tight-fitting components.
Reduces rework, rush fabrication, wasted materials, and installation delays.
Permit documentation
Existing building conditions are unclear, outdated, or inconsistent with the proposed drawings.
As-built drawings with accurate floor plans, elevations, sections, and site-specific details where needed.
Supports clearer building permit drawings and reduces avoidable documentation revisions.
MEP coordination
Ducts, pipes, beams, ceilings, or equipment conflict with the proposed design.
3D laser scanning services with reflected ceiling plans, sections, or scan-to-BIM documentation.
Helps design teams identify conflicts before construction or installation.
Point-cloud capture with scan-to-CAD drawings or scan-to-BIM modeling.
Reduces design assumptions in buildings with irregular geometry.
Commercial leasing
Usable or rentable area is misunderstood during lease planning or tenant improvement design.
Accurate floor plans or BOMA-style area analysis where appropriate.
Improves space planning, lease discussions, and property decision-making.
Site access limitations
Missing measurements require repeat site visits in occupied or difficult-to-access spaces.
3D laser scanning services during one coordinated access window.
Reduces disruption to tenants, owners, and active business operations.
8. The MeasureBuilt Existing Conditions Framework for Greater Vancouver Projects
The MeasureBuilt Existing Conditions Framework is a practical workflow for turning physical buildings into usable construction documentation. The framework follows four stages: scope definition, site capture, documentation production, and quality review. This approach helps architects, contractors, designers, and owners in Greater Vancouver receive documentation that matches the actual project need instead of a generic drawing package. The practical takeaway is that structured measurement workflows produce more useful as-built drawings than one-size-fits-all measuring.
Scope definition is the first stage of the MeasureBuilt Existing Conditions Framework. Before the site visit, the project team clarifies the property type, renovation goal, required deliverables, file formats, level of detail, access limits, and schedule. A homeowner planning interior renovations may need accurate floor plans, while an architect coordinating a commercial retrofit may need scan-to-CAD files, sections, elevations, and ceiling information. The practical recommendation is to define documentation requirements before measuring so the site capture supports the final deliverable.
Site capture is the second stage of the MeasureBuilt Existing Conditions Framework. Measurement technicians use manual laser tools, LiDAR equipment, or professional 3D laser scanning services depending on building complexity. In a simple residential space, manual measurement may be efficient. In a multi-level commercial space, heritage property, sloped-site home, or mechanical area, 3D laser scanning services may be the more reliable choice. The practical takeaway is that the capture method should match the building risk, not just the building size.
Documentation production is the third stage of the MeasureBuilt Existing Conditions Framework. Raw measurements or point-cloud data are translated into accurate floor plans, as-built drawings, scan-to-CAD documentation, or scan-to-BIM documentation. This stage determines whether the final file is useful for marketing, design, permitting, construction pricing, or advanced coordination. The practical recommendation is to request the file format your consultants actually use, such as PDF for review, DWG for CAD work, or RVT for Revit-based coordination.
Quality review is the fourth stage of the MeasureBuilt Existing Conditions Framework. Before final delivery, the documentation should be checked for completeness, consistency, drawing clarity, scale, dimensions, and alignment with the original scope. Quality review matters because a technically accurate scan can still become a confusing drawing if the deliverable is not organized for real project use. The practical takeaway is that final as-built drawings should be accurate, readable, and suitable for the next professional using the documentation.
9. Real Estate Floor Plans vs Renovation-Grade Floor Plans vs Scan-to-CAD vs Scan-to-BIM
Real estate floor plans are designed for marketing and basic space understanding. A real estate floor plan usually shows room layouts, approximate dimensions, room names, and general circulation. Real estate floor plans are useful for listings, leasing discussions, tenant orientation, and early space planning, but real estate floor plans are usually not detailed enough for major renovation design or construction documentation. The practical takeaway is to use real estate floor plans for communication and marketing, not for complex construction decisions.
Renovation-grade floor plans are designed for planning, estimating, and design coordination. Renovation-grade accurate floor plans show more detail than marketing plans, including wall thicknesses, openings, stairs, fixtures, ceiling references, structural indicators, and dimensions that help architects and contractors make decisions. A renovation-grade floor plan is appropriate when property owners are planning layout changes, contractor estimates, interior design, or building permit drawings. The practical recommendation is to choose renovation-grade floor plans when construction decisions depend on the dimensions.
Scan-to-CAD documentation converts measured existing conditions or point-cloud data into 2D CAD drawings. Architects, engineers, designers, and contractors use scan-to-CAD documentation for floor plans, elevations, sections, reflected ceiling plans, and design backgrounds in AutoCAD or similar software. Scan-to-CAD is often the right choice for professional renovation planning because scan-to-CAD files are detailed, editable, and compatible with common design workflows. The practical takeaway is to choose scan-to-CAD documentation when the project team needs editable 2D technical drawings.
Scan-to-BIM documentation converts measured existing conditions into a 3D model, usually for Revit-based workflows. Scan-to-BIM documentation is best for complex projects that require 3D coordination, clash detection, facility management, structural review, or advanced design collaboration. Scan-to-BIM takes more modeling time than basic floor plans or 2D CAD because the output is a coordinated 3D model rather than a flat drawing. The practical recommendation is to choose scan-to-BIM documentation when project complexity justifies a model-based workflow.
Documentation Type
Best For
Typical Detail Level
Common File Output
When to Choose This Option
Real estate floor plans
Listings, leasing, marketing, basic space communication.
Basic room layout and approximate dimensions.
PDF, image files.
Choose real estate floor plans when the goal is presentation, not construction.
3D model with building elements modeled to an agreed level of detail.
RVT, IFC where required.
Choose scan-to-BIM when 3D coordination is worth the added modeling time.
10. How to Choose Manual Measurement vs 3D Laser Scanning Services
Manual measurement is usually enough for simple spaces with low construction risk. A small rectangular office, basic apartment, empty retail bay, or simple residential room may be documented effectively with handheld laser distance meters when the project only needs basic floor plans. Manual measurement is faster and more cost-efficient when geometry is simple and the deliverable is limited. The practical takeaway is to choose manual measurement when the space is simple, accessible, and unlikely to require complex sections or 3D coordination.
3D laser scanning services are usually better for complex spaces with higher construction risk. A heritage home, multi-level property, restaurant, medical office, industrial space, mechanical room, sloped-site house, or irregular commercial interior can contain too many dimensional relationships for basic manual measuring to capture efficiently. Point-cloud data gives the drafting team a more complete visual and spatial record. The practical recommendation is to choose 3D laser scanning services when missed information could cause redesign, rework, or contractor uncertainty.
The threshold for 3D laser scanning should be based on risk, not just square footage. A small mechanical room can require laser scanning because the ceiling, pipes, ducts, and equipment are dense. A large empty warehouse may be easier to document manually if the geometry is simple. The key question is whether the design team needs only basic wall dimensions or a complete record of existing conditions. The practical takeaway is that complexity, access, coordination needs, and consequences of error should drive the measurement method.
A hybrid workflow can be the best option for many Greater Vancouver renovation projects. Some areas of a property may need 3D laser scanning services, while simple rooms may only need manual verification. For example, a commercial renovation may require scanning in a congested ceiling zone but manual measurement in open office areas. The practical recommendation is to use a hybrid workflow when the project contains both simple and complex spaces.
Decision Factor
Manual Measurement Is Often Enough When…
3D Laser Scanning Services Are Better When…
Building geometry
Rooms are rectangular, open, and easy to access.
Walls, floors, stairs, ceilings, or exterior conditions are irregular.
Project risk
The project is cosmetic or low-impact.
The project affects structure, layout, MEP systems, or custom fabrication.
Deliverable need
The project needs basic floor plans only.
The project needs CAD drawings, BIM models, sections, elevations, or ceiling plans.
Site access
The site is easy to revisit if a dimension is missing.
Access is limited, occupied, tenant-controlled, or disruptive.
Consultant workflow
The project team only needs dimensions for planning.
Architects, engineers, or contractors need coordinated technical documentation.
Cost of error
A small dimensional error would have limited consequences.
A missed condition could cause rework, change orders, delays, or redesign.
11. How Vancouver As-Built Measuring Services Support Local Renovation Workflows
Greater Vancouver renovation documentation often begins with missing or unreliable building records. Many properties in Vancouver, Burnaby, Richmond, Surrey, North Vancouver, and New Westminster have been altered over time through renovations, additions, suite changes, commercial fit-outs, or tenant improvements. Original drawings may show what was intended decades ago, not what exists today. The practical takeaway is that Vancouver as-built measuring services are most valuable when the current building must be verified before design or permitting decisions are made.
Local renovation workflows often move quickly from concept to pricing to permit preparation. Property owners may speak with designers, contractors, engineers, lenders, tenants, and municipalities within the same early planning period. Without accurate floor plans, each stakeholder may make a different assumption about the building. The practical recommendation is to create accurate as-built drawings early so the entire project team can use the same measured baseline.
Greater Vancouver projects often involve site constraints that make existing-condition accuracy more important. Sloped lots, older homes, laneway projects, secondary suites, strata buildings, commercial tenant spaces, and mixed-use properties can all require careful documentation before design. Accurate floor plans and 3D laser scanning services help reveal how the existing building is actually organized before expensive design time is spent. The practical takeaway is that stronger existing-condition documentation reduces the chance of discovering basic spatial conflicts too late.
Local renovation documentation should be matched to the municipality and project type. A small interior update may need limited drawings, while an addition, suite legalization, commercial tenant improvement, or structural retrofit may require more complete as-built drawings and consultant coordination. The exact requirements should be confirmed by the project’s design professional or municipality. The practical recommendation is to use Vancouver as-built measuring services as a technical foundation, not as a substitute for architectural, engineering, or municipal advice.
12. Common Myths About Accurate Floor Plans and 3D Laser Scanning Services
Original blueprints are not always reliable for modern renovation planning. Older drawings may omit field changes, undocumented renovations, settlement, past additions, removed walls, altered windows, or tenant improvements. Even when original blueprints exist, architects and contractors still need to know whether the physical building matches the documents. The practical takeaway is that original blueprints can be useful references, but accurate as-built drawings should verify the current building before renovation decisions are made.
Real estate floor plans are not the same as renovation-grade floor plans. Real estate floor plans are usually created for marketing, listing, leasing, and general space communication. Renovation-grade floor plans require more accurate dimensions, clearer wall relationships, openings, stairs, ceiling information, and technical details that contractors and designers can use. The practical recommendation is to avoid using marketing plans as the only documentation for construction pricing or building permit drawings.
3D laser scanning services are not only for large commercial projects. Smaller residential renovations, custom homes, older houses, restaurants, clinics, retail spaces, and strata units can benefit from 3D laser scanning when geometry is complex or access is limited. The value of 3D laser scanning services depends on the cost of potential errors, not only the total size of the property. The practical takeaway is that laser scanning can be appropriate for any project where accurate existing-condition documentation reduces risk.
As-built drawings do not guarantee permit approval. Accurate as-built drawings help document existing conditions and support the preparation of building permit drawings, but municipal approval also depends on proposed design, zoning, code compliance, consultant review, and local submission requirements. No measurement provider should promise permit approval based only on as-built documentation. The practical recommendation is to use as-built drawings as a reliable technical baseline while relying on qualified design professionals for permit strategy.
13. Practical Decision Guide: Which Documentation Do You Need?
Property owners should choose documentation based on the decision the drawings must support. A marketing decision may only require real estate floor plans, while a renovation decision may require accurate floor plans, scan-to-CAD documentation, or scan-to-BIM documentation. Choosing too little detail can create risk, while choosing too much detail can waste budget. The practical takeaway is to define the project goal before selecting the documentation package.
Basic real estate floor plans are suitable for listings, leasing, and early space communication. Real estate agents, landlords, and property managers often need simple visual layouts that help buyers, tenants, or stakeholders understand the space. Real estate floor plans are not intended to replace architectural drawings for major renovation work. The practical recommendation is to choose real estate floor plans when the goal is presentation or general planning.
Renovation-grade accurate floor plans are suitable for design planning and contractor estimates. Homeowners, designers, and contractors need reliable dimensions before discussing layout changes, material quantities, scope, and budget. Renovation-grade floor plans help prevent early design decisions from being based on incorrect assumptions. The practical recommendation is to choose renovation-grade accurate floor plans before requesting serious contractor pricing.
Scan-to-CAD documentation is suitable for architectural and engineering workflows. Architects and consultants use DWG files as editable backgrounds for proposed plans, elevations, sections, and construction documentation. Scan-to-CAD documentation is often the most practical technical deliverable for renovations that require professional design work but do not need a full BIM model. The practical takeaway is to choose scan-to-CAD when the design team works in 2D CAD or needs editable technical drawings.
Scan-to-BIM documentation is suitable for complex, model-based coordination. Revit models are useful when project teams need 3D coordination, existing-structure modeling, clash detection, or long-term facility planning. Scan-to-BIM requires more modeling time, so the project should justify the added detail. The practical recommendation is to choose scan-to-BIM when 3D coordination will reduce risk or improve the work of architects, engineers, and contractors.
Project Scenario
Recommended Documentation
Why This Choice Fits
Selling or leasing a property
Real estate floor plans
The goal is clear visual communication, not construction documentation.
The design team and contractor need reliable existing dimensions.
Preparing contractor estimates
Accurate floor plans or scan-to-CAD documentation
Contractors can price quantities and scope with less uncertainty.
Preparing building permit drawings
As-built drawings with floor plans, elevations, and sections as needed
Designers need verified existing conditions before drawing proposed work.
Renovating a complex commercial space
3D laser scanning services with scan-to-CAD documentation
Complex layouts and building systems require more complete documentation.
Coordinating MEP or structural work
3D laser scanning services with scan-to-BIM documentation where appropriate
3D coordination can reduce clashes and improve consultant communication.
Reviewing commercial lease area
Accurate floor plans or BOMA-style area analysis
Area calculations need measured, consistent floor plan data.
14. How to Prepare for a Measurement or 3D Laser Scanning Appointment
Good site preparation improves the accuracy and completeness of Vancouver as-built measuring services. Property owners, tenants, facility managers, or contractors should provide access to all areas included in the scope, including rooms, closets, service spaces, stairwells, mechanical rooms, exterior elevations, garages, and locked areas. Missing access can create gaps in the final as-built drawings. The practical takeaway is to unlock and clear every area that must be documented before the measurement appointment begins.
Clear sightlines help 3D laser scanning services capture better point-cloud data. Laser scanners record visible surfaces, so large furniture, stored materials, wall coverings, parked vehicles, or locked rooms can block important geometry. The scanning team can often work around normal furniture, but heavy clutter or inaccessible areas can reduce documentation completeness. The practical recommendation is to clear critical walls, openings, utility areas, and exterior access routes where accurate documentation is required.
Project requirements should be communicated before the site visit. A team preparing basic floor plans will capture different information than a team preparing scan-to-CAD documentation, reflected ceiling plans, exterior elevations, or scan-to-BIM documentation. If the project needs ceiling heights, beams, window sizes, mechanical equipment, commercial area calculations, or permit-support drawings, those requirements should be known before capture begins. The practical takeaway is to define deliverables early so the measurement appointment captures the right information.
Occupied buildings require simple coordination before measurement. Tenants, staff, residents, property managers, and security teams should know when technicians will arrive, which areas must be accessed, and whether equipment will be used in common areas. Modern 3D laser scanning services are typically non-invasive, but the scanning team still needs stable access and clear movement through the space. The practical recommendation is to coordinate access in advance to reduce disruption and avoid incomplete site documentation.
15. Key Takeaways for Vancouver As-Built Measuring Services
Vancouver as-built measuring services are most valuable before design, estimating, permitting, or construction decisions depend on existing building conditions. Accurate floor plans, as-built drawings, 3D laser scanning services, scan-to-CAD documentation, and scan-to-BIM documentation give project teams a measured baseline instead of assumptions. The practical takeaway is to order existing-condition documentation early, before errors become expensive to fix.
Accurate floor plans improve contractor estimates by reducing uncertainty. Contractors can price more confidently when walls, openings, stairs, ceiling heights, and key dimensions are documented clearly. Better documentation does not guarantee a lower bid in every case, but better documentation can reduce the contingency that comes from unknown conditions. The practical recommendation is to provide the same accurate floor plans to every contractor bidding the work.
3D laser scanning services are best used when complexity, access limitations, or coordination risk make manual measurement insufficient. Point-cloud data is especially useful for irregular buildings, older homes, commercial interiors, mechanical spaces, structural retrofits, and projects requiring scan-to-CAD or scan-to-BIM deliverables. The practical takeaway is to use 3D laser scanning services when a missed dimension could cause redesign, rework, or construction delay.
As-built drawings support permit-ready renovation planning but do not guarantee municipal approval. Building permit drawings still depend on proposed design, zoning, applicable code requirements, consultant input, and local review. Accurate as-built drawings provide the existing-condition baseline that design professionals need to prepare clearer documentation. The practical recommendation is to treat as-built drawings as the first technical layer in a responsible renovation workflow.
Frequently Asked Questions
What exactly are Vancouver as-built measuring services?
Vancouver as-built measuring services are professional measurement services that document the current condition of an existing building. The final deliverables may include accurate floor plans, as-built drawings, exterior elevations, sections, scan-to-CAD documentation, or scan-to-BIM documentation. Architects, contractors, designers, engineers, and property owners use Vancouver as-built measuring services before renovation, permit preparation, contractor estimates, commercial leasing, or construction planning.
Why are accurate floor plans important for contractor estimates?
Accurate floor plans are important for contractor estimates because contractors price work based on measurable quantities and site conditions. When drawings are incomplete or outdated, contractors may add contingency for unknown dimensions, unclear demolition scope, or uncertain material quantities. Renovation-grade accurate floor plans help contractors estimate framing, flooring, drywall, millwork, glazing, and labour more consistently. The practical value is clearer pricing and fewer estimate assumptions.
When should I order 3D laser scanning services?
3D laser scanning services should be ordered before design begins when the building is complex, irregular, occupied, difficult to access, or likely to require detailed coordination. 3D laser scanning services are especially useful for older homes, commercial interiors, mechanical rooms, heritage properties, structural retrofits, and projects needing scan-to-CAD or scan-to-BIM documentation. The best time to scan is before drawings, estimates, or permit documents depend on existing-condition accuracy.
Can as-built drawings guarantee my building permit is approved?
As-built drawings cannot guarantee building permit approval. As-built drawings provide accurate existing-condition information that can support building permit drawings, but municipal approval also depends on zoning, proposed design, applicable building-code requirements, consultant review, and local submission rules. Accurate as-built drawings help architects and designers prepare clearer documentation, but permit decisions remain with the municipality and depend on the full permit application.
What is the difference between scan-to-CAD and scan-to-BIM?
Scan-to-CAD converts measured existing conditions or 3D point-cloud data into editable 2D drawings, such as floor plans, elevations, sections, and reflected ceiling plans. Scan-to-BIM converts measured existing conditions into a 3D model, often for Revit-based coordination. Scan-to-CAD is usually best for standard renovation design workflows. Scan-to-BIM is usually best for complex projects that need 3D coordination, clash review, or model-based collaboration.
How long does a standard 3D laser scanning appointment take?
A standard 3D laser scanning appointment depends on property size, complexity, access, and required deliverables. A simple residential property or small commercial unit may be captured in a few hours, while a complex multi-level building, industrial facility, or congested mechanical space may require more time. The practical planning rule is to provide full access, clear critical areas, and confirm the documentation scope before the site visit.
Do I need as-built drawings if I already have original blueprints?
You may still need as-built drawings even if original blueprints exist. Original blueprints may not show later renovations, undocumented wall changes, additions, field changes, settlement, altered openings, or current interior layouts. Architects and contractors often use original blueprints as references, but accurate as-built drawings verify what physically exists today. The practical recommendation is to confirm old drawings against current conditions before relying on them for renovation planning.
What is a BOMA floor area analysis?
A BOMA floor area analysis uses measured floor plans to calculate commercial floor areas according to recognized commercial real estate measurement methods. Property owners, brokers, landlords, and tenants may use BOMA-style area analysis to understand usable area, rentable area, common areas, and lease-related space planning. Accurate floor plans are important because commercial area calculations affect leasing discussions, tenant improvements, and property decision-making.
Are real estate floor plans enough for renovation planning?
Real estate floor plans are usually not enough for serious renovation planning. Real estate floor plans are created for marketing, listings, leasing, and general space communication, so the detail level may be too limited for construction decisions. Renovation-grade floor plans include more accurate dimensions, openings, stairs, wall relationships, and technical details. The practical recommendation is to use renovation-grade floor plans or scan-to-CAD documentation for design and contractor pricing.
What should I prepare before a Vancouver as-built measuring appointment?
Before a Vancouver as-built measuring appointment, provide access to all rooms, closets, service spaces, mechanical areas, exterior walls, garages, and locked areas included in the scope. Clear important walls, openings, and access routes where possible. Share project requirements in advance, including whether the deliverable needs floor plans, elevations, sections, reflected ceiling plans, scan-to-CAD files, or scan-to-BIM documentation. Good preparation helps prevent missing information in the final drawings.
We use necessary cookies to make this website work. With your permission, we also use analytics and marketing cookies to understand website usage and measure advertising. You can accept all cookies, reject optional cookies, or manage your preferences.
Necessary
Always active
The technical storage or access is strictly necessary for the legitimate purpose of enabling the use of a specific service explicitly requested by the subscriber or user, or for the sole purpose of carrying out the transmission of a communication over an electronic communications network.
Preferences
The technical storage or access is necessary for the legitimate purpose of storing preferences that are not requested by the subscriber or user.
Analytics
Helps us understand how visitors use the website so we can improve it.The technical storage or access that is used exclusively for anonymous statistical purposes. Without a subpoena, voluntary compliance on the part of your Internet Service Provider, or additional records from a third party, information stored or retrieved for this purpose alone cannot usually be used to identify you.
Marketing
Used to measure advertising performance and show more relevant ads.